Edit Table Data
The Table component provides spreadsheet-like editing capabilities. Users can edit table data to modify existing rows in the table, insert new rows, and delete existing rows.
By default, any edits are "staged", meaning that they show in the table's edit state and can be saved by the user by clicking the Save button on the table. It's common to process these updates using table bulk edit.
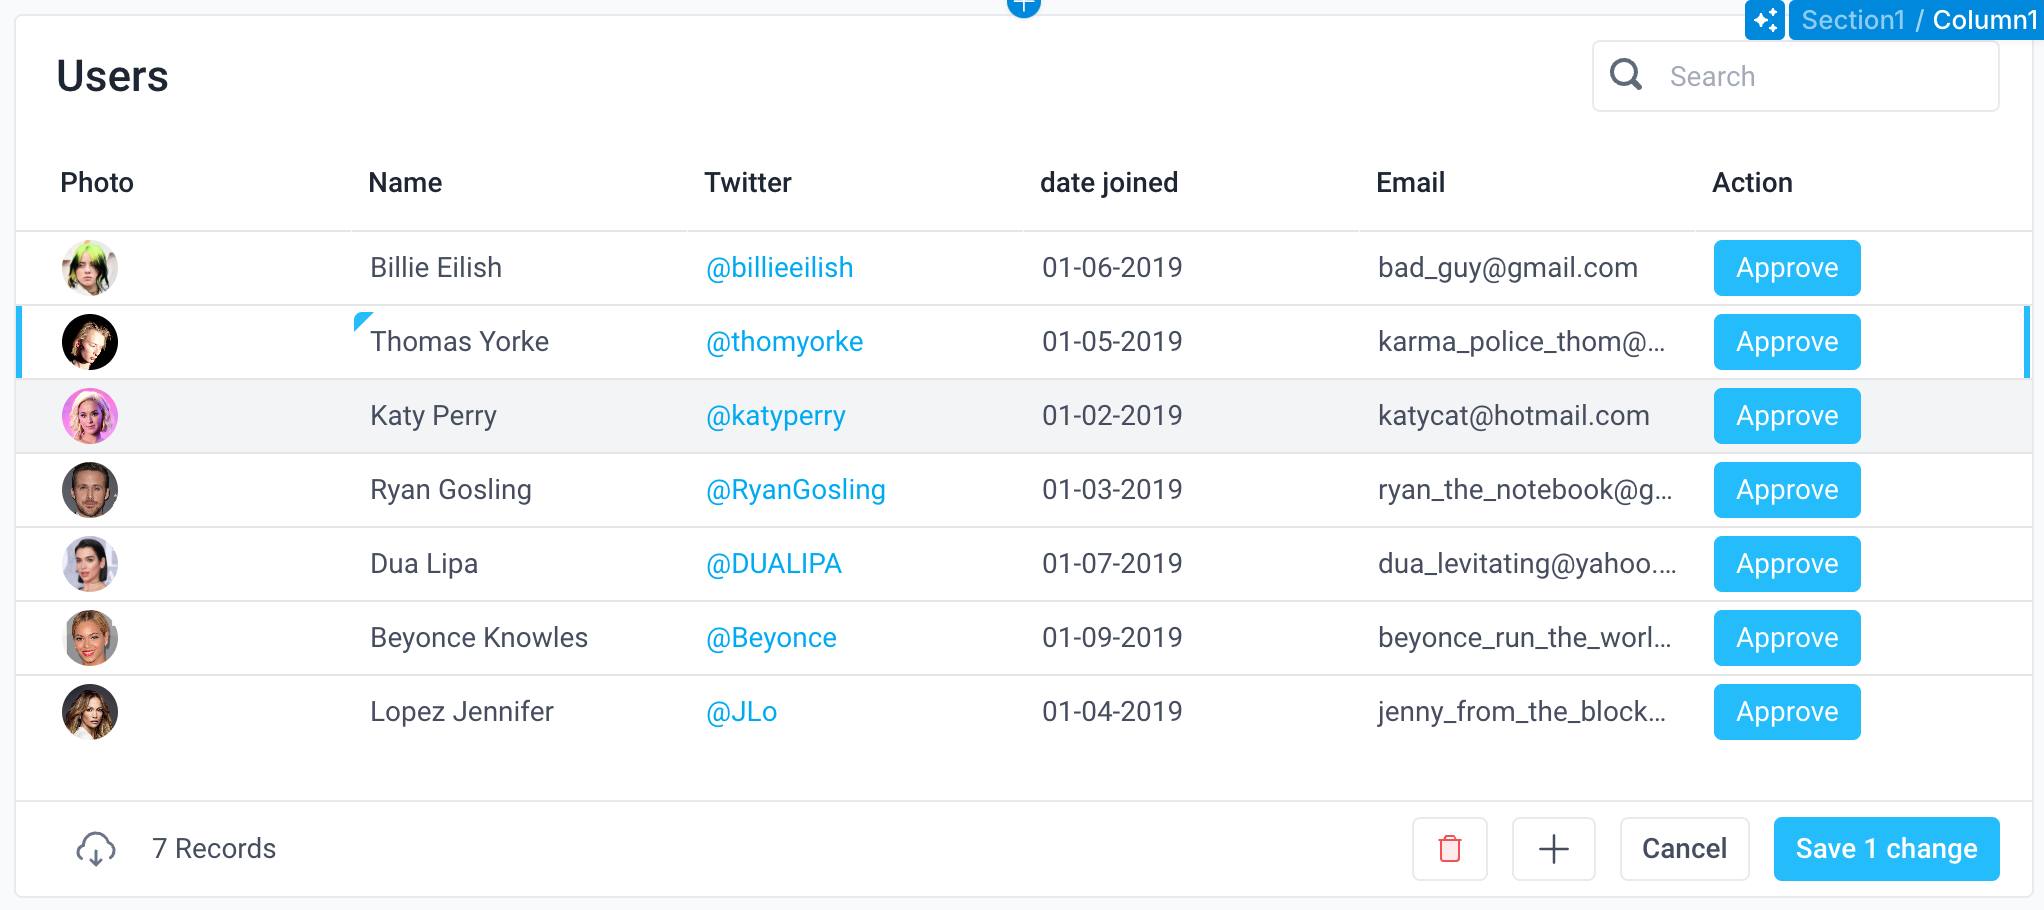
Make a column editable
If you wish to allow users to edit a column, you will first need to make the column editable. To do so, you can check the column's Editable checkbox in the Properties panel.
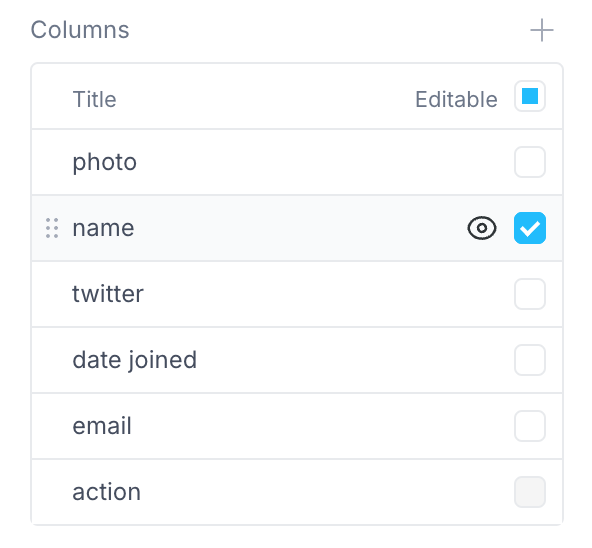
For each editable column, you can configure the Editing Type within the column's properties panel. Selecting an editing type will determine the type of input that will be displayed when the user edits the column.
The following options are available for selection: Text, Number, Email, Date Picker, Dropdown, Checkbox.
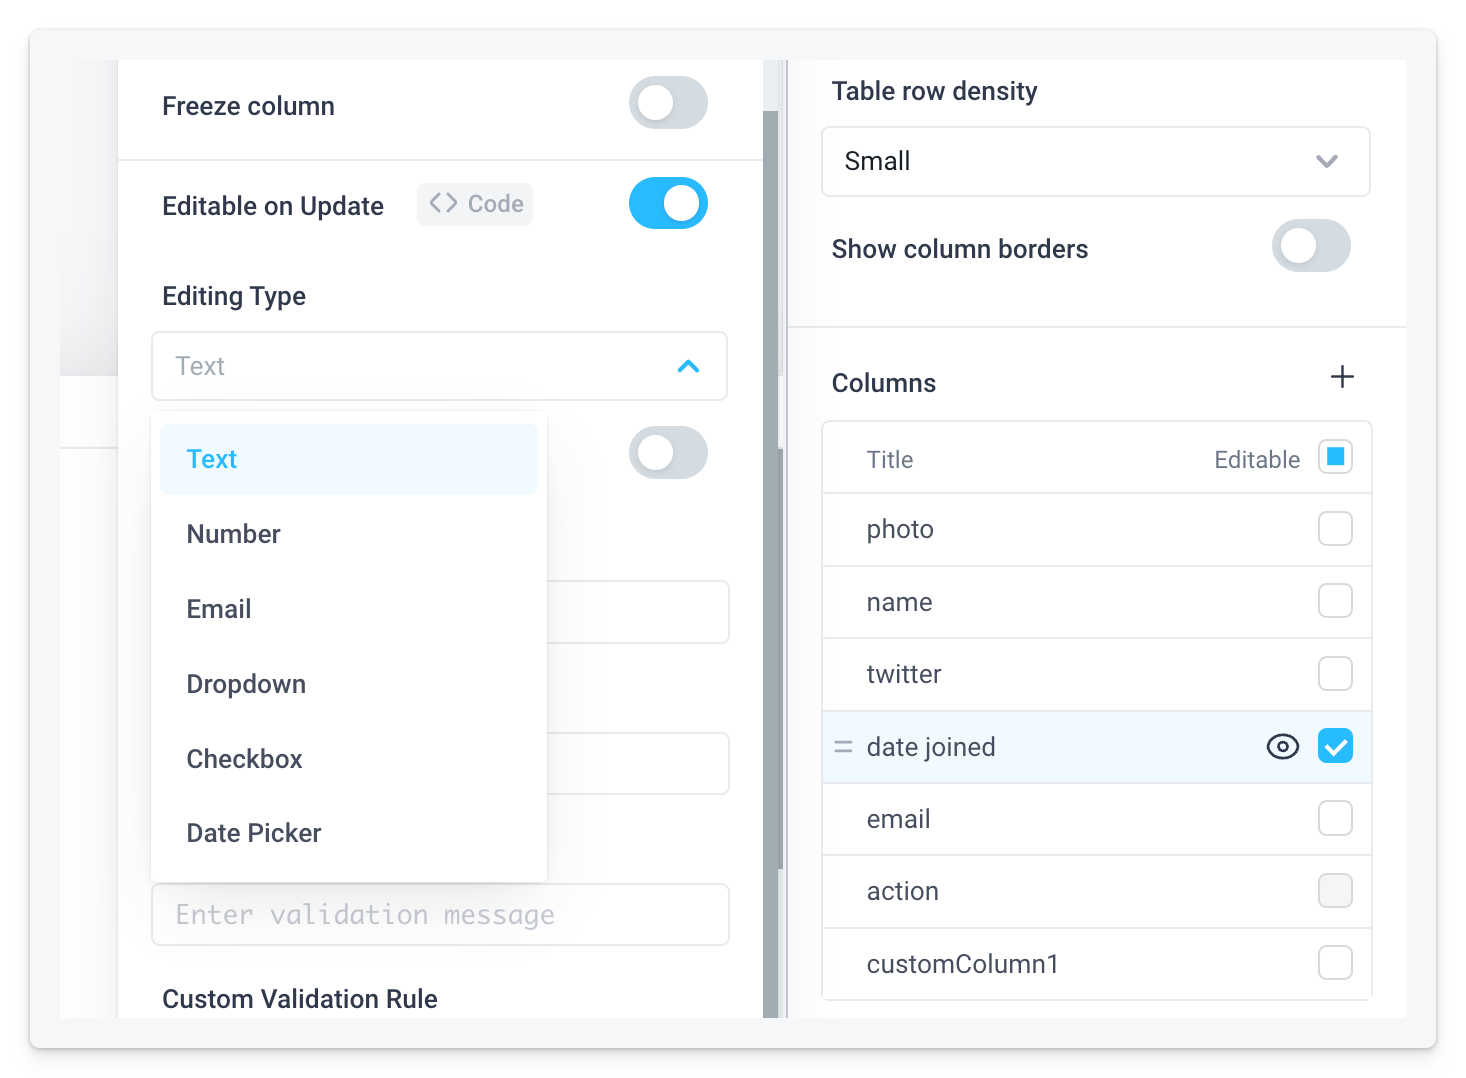
These inputs behave the same way as their corresponding standalone input components.
For example, to configure the Dropdown editing type, you can use the same Options
property as you would for a standalone Dropdown component.
Update existing rows
When hovering over an editable cell, you will see a raised border around the cell. You can double-click the cell or press the Enter key to begin editing the cell's value.
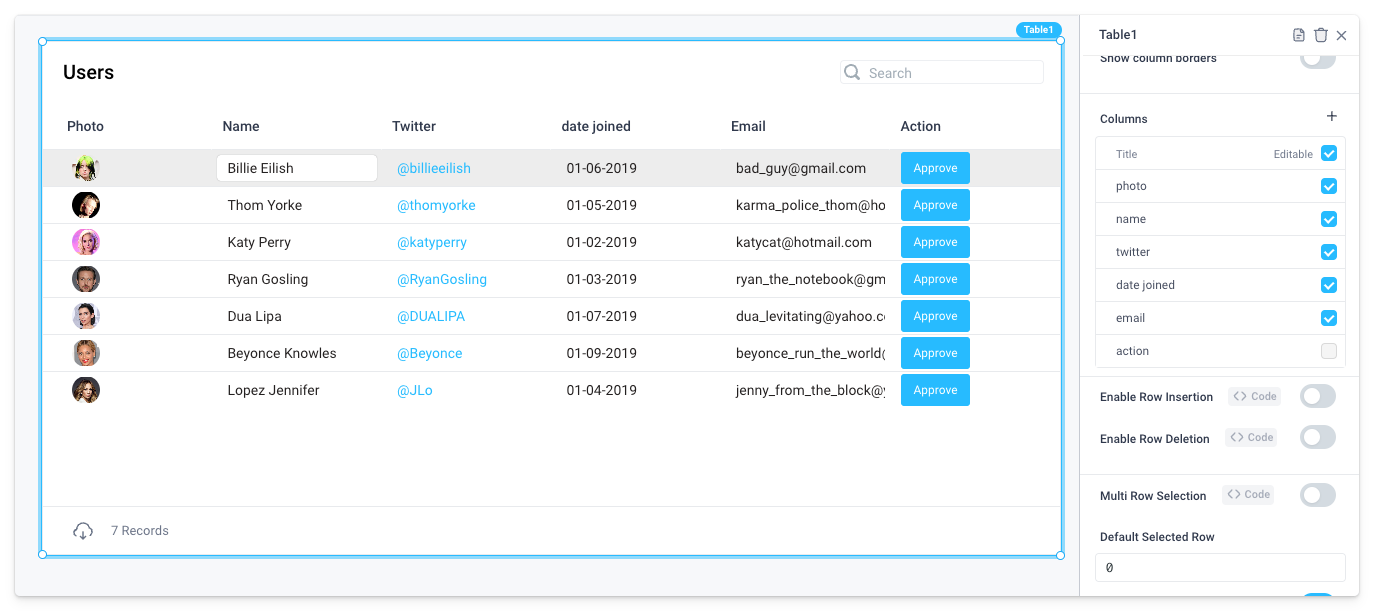
By default, every editable column is "Editable on update", which means that the column is editable for existing rows in the table. You can control this behavior via the Editable on update property in the column's properties panel.
You can also make the same edits programmatically using the updateRows() function.
Insert new rows
To allow new rows to be inserted by the user, click on the table component to open the properties panel. Toggle on Enable row insertion.
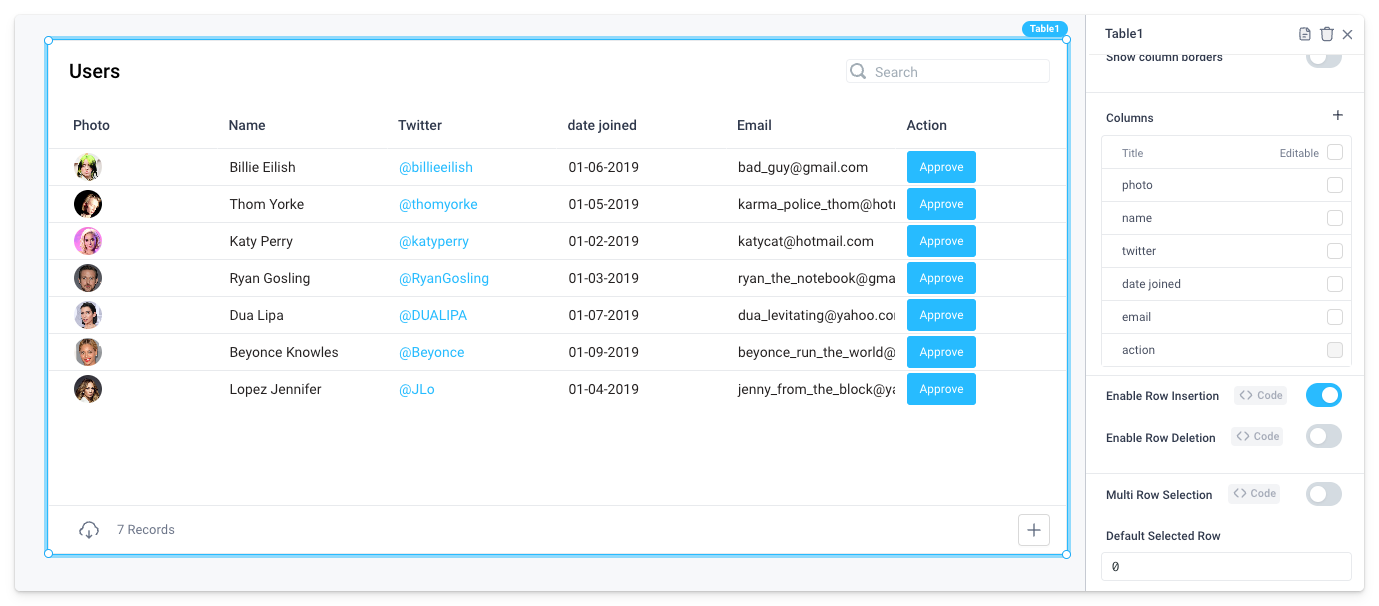
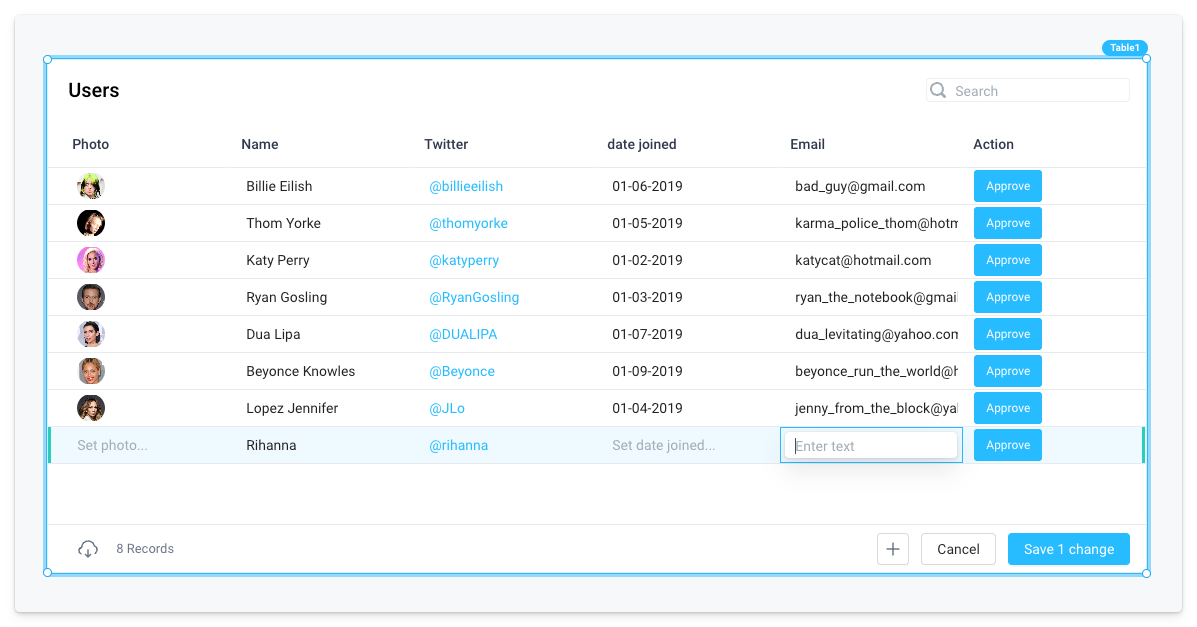
When row insertion is enabled, new rows can be added by clicking the "+" button in the table footer. An empty row is added to the bottom of the table, and the user can edit each cell in the newly inserted row.
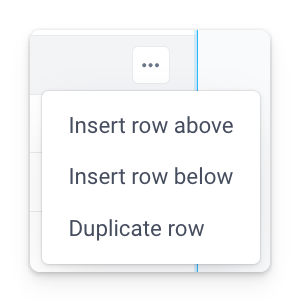
Additionally, if you click into the ... menu on the right side of a row, you can select from the dropdown menu to Insert Row Above, Insert Row Below, or Duplicate Row. Insert Row Above/Below will place a blank row above or below the currently selected row. Duplicate Row will add a row below the currently selected row and will auto-fill the same data as the selected row.
You can also insert rows programmatically using the insertRows() function.
Delete rows
To allow rows to be deleted by the user, click on the table component to open the properties panel. Toggle on "Enable row deletion".
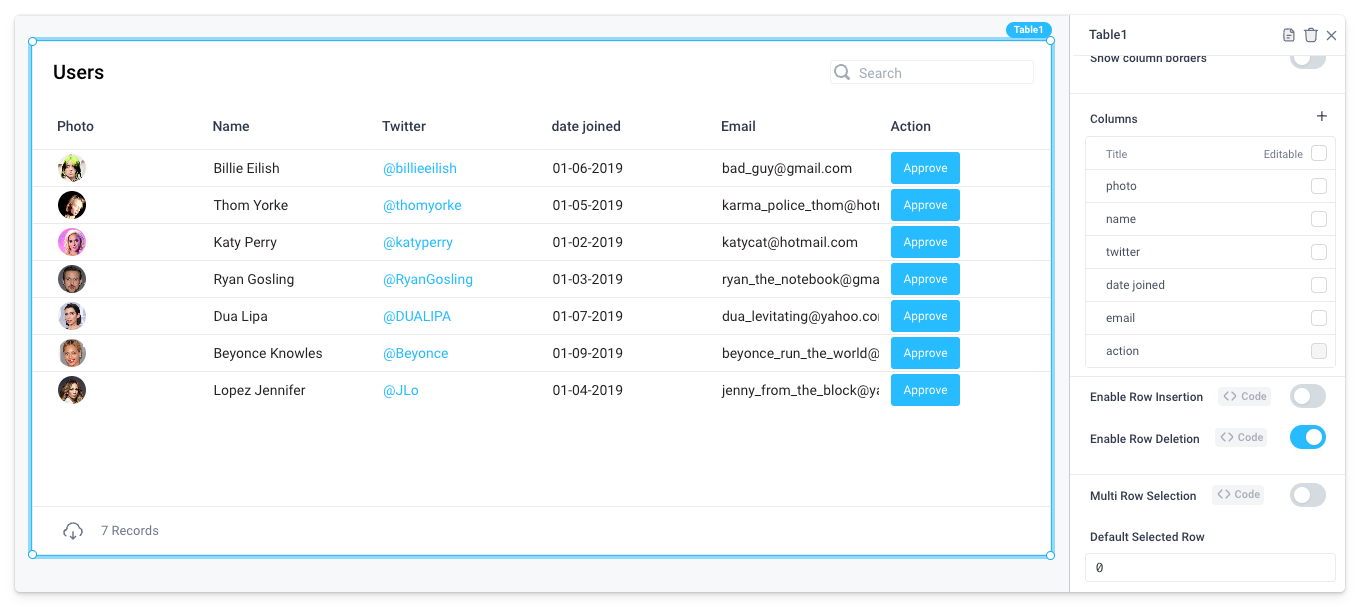
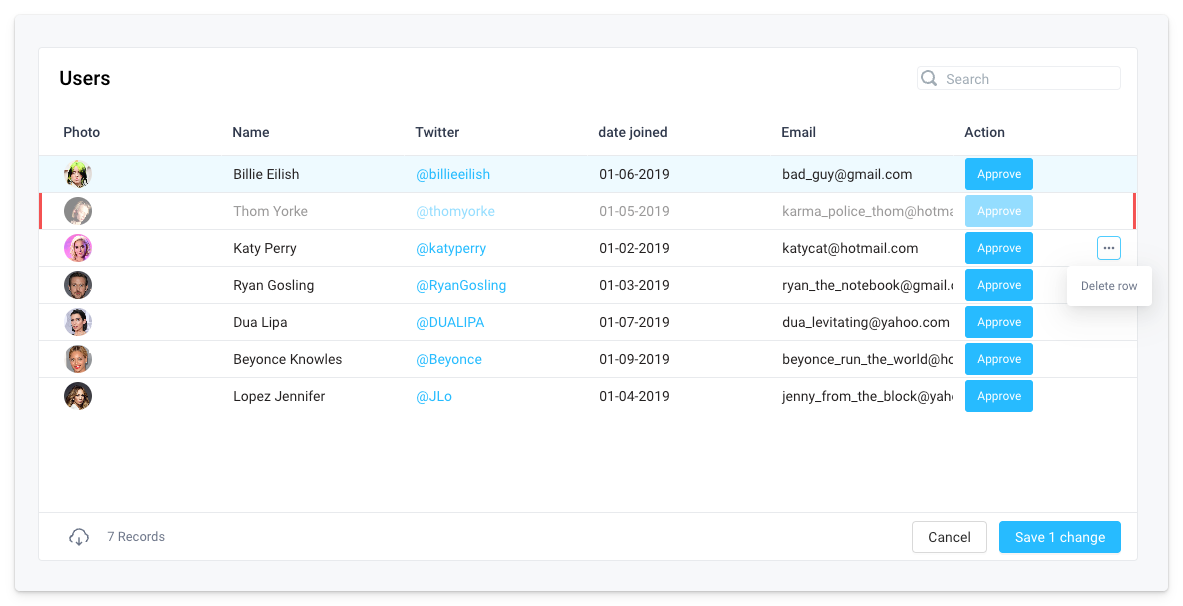
When row deletion is enabled, the user can mark a row to delete by hovering over it to reveal a context menu and then selecting the "Delete row" option.
You can also delete rows programmatically using the deleteRows() function.
Handle table edits
Edits to the table are "staged", meaning that they show visually in the table and are stored in the table component's state. The user then has two options:
- Click Save changes, which will trigger the
onSaveChangesevent handler - Click Cancel to discard the changes and revert the table component's state to its original state
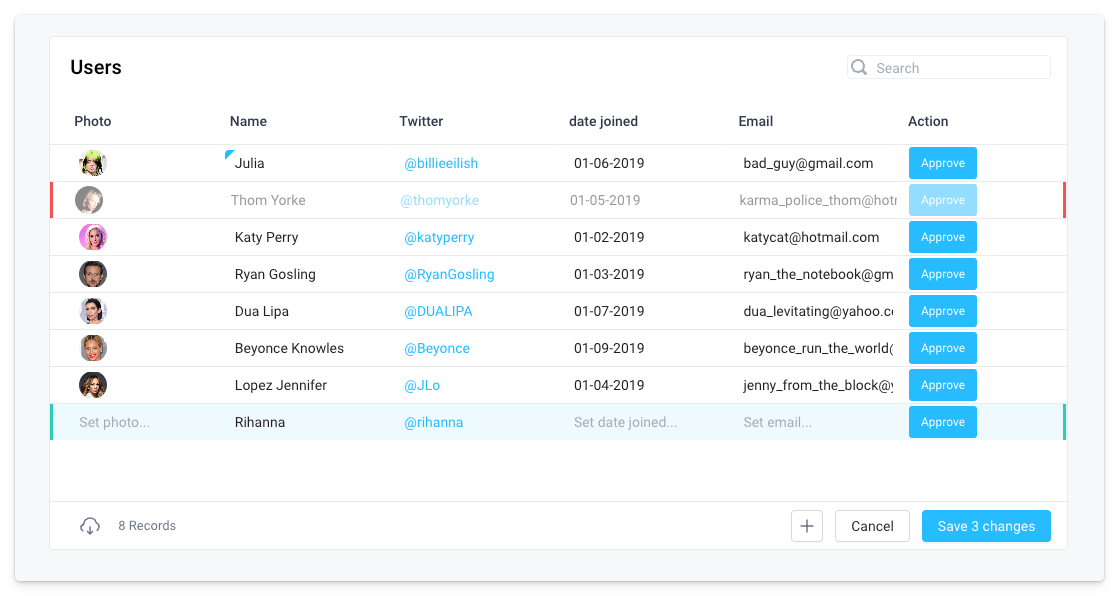
To handle the table edits, the developer must properly define their onSaveChanges event handler.
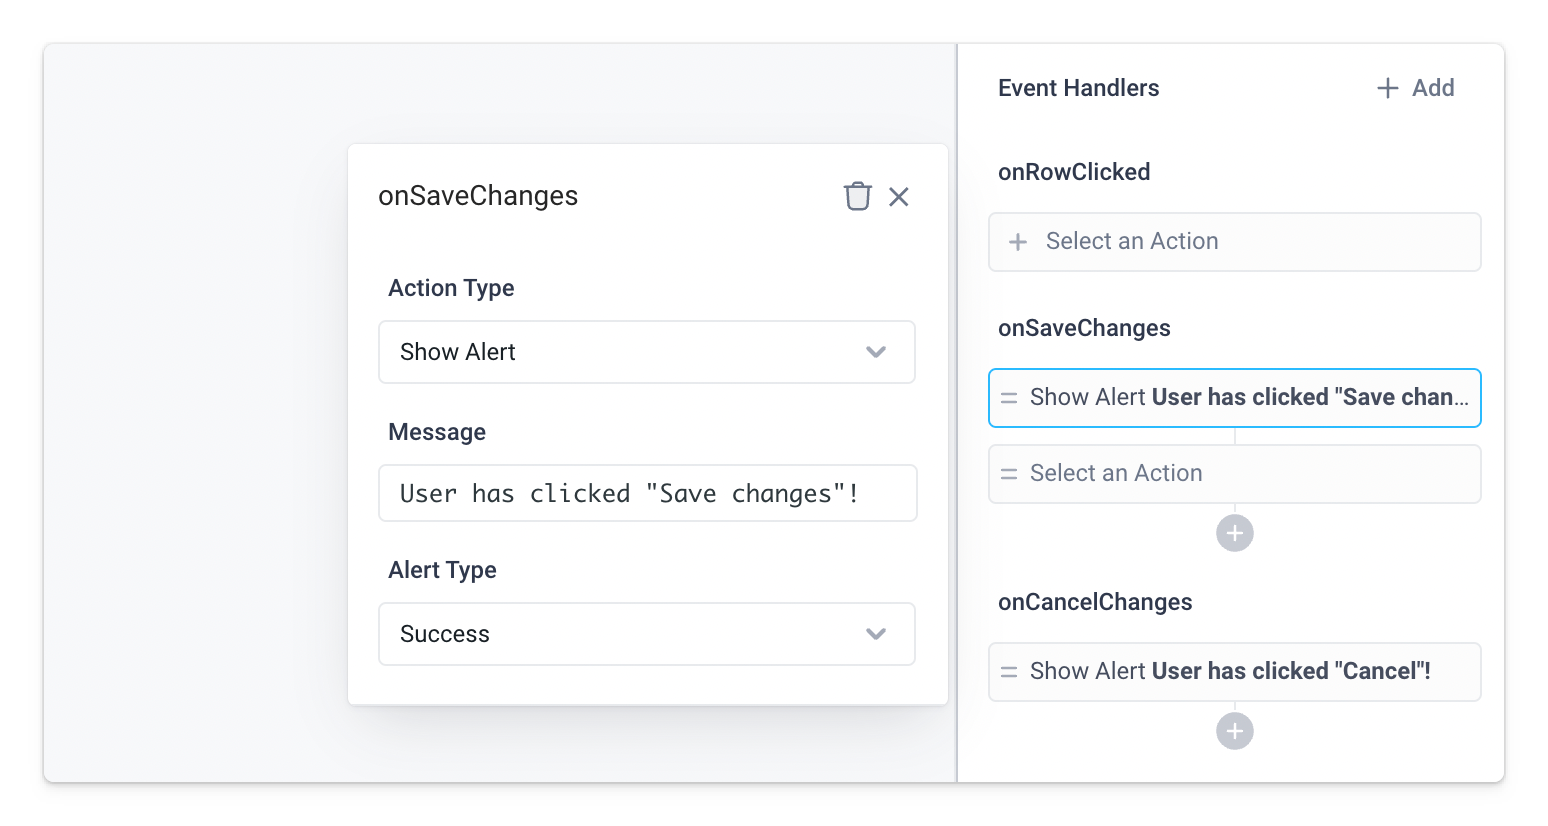
The most common way to handle these changes is run an API which processes the table's edit state and writes the changes back to the relevant data source.
To understand how to properly handle table edits, it's important to understand how table edits are stored in the table component's state.
Table edits in component state
Table edits are represented in a few different reference properties in the table component's state. To better understand how these properties work, we'll walk through an example with the following table:
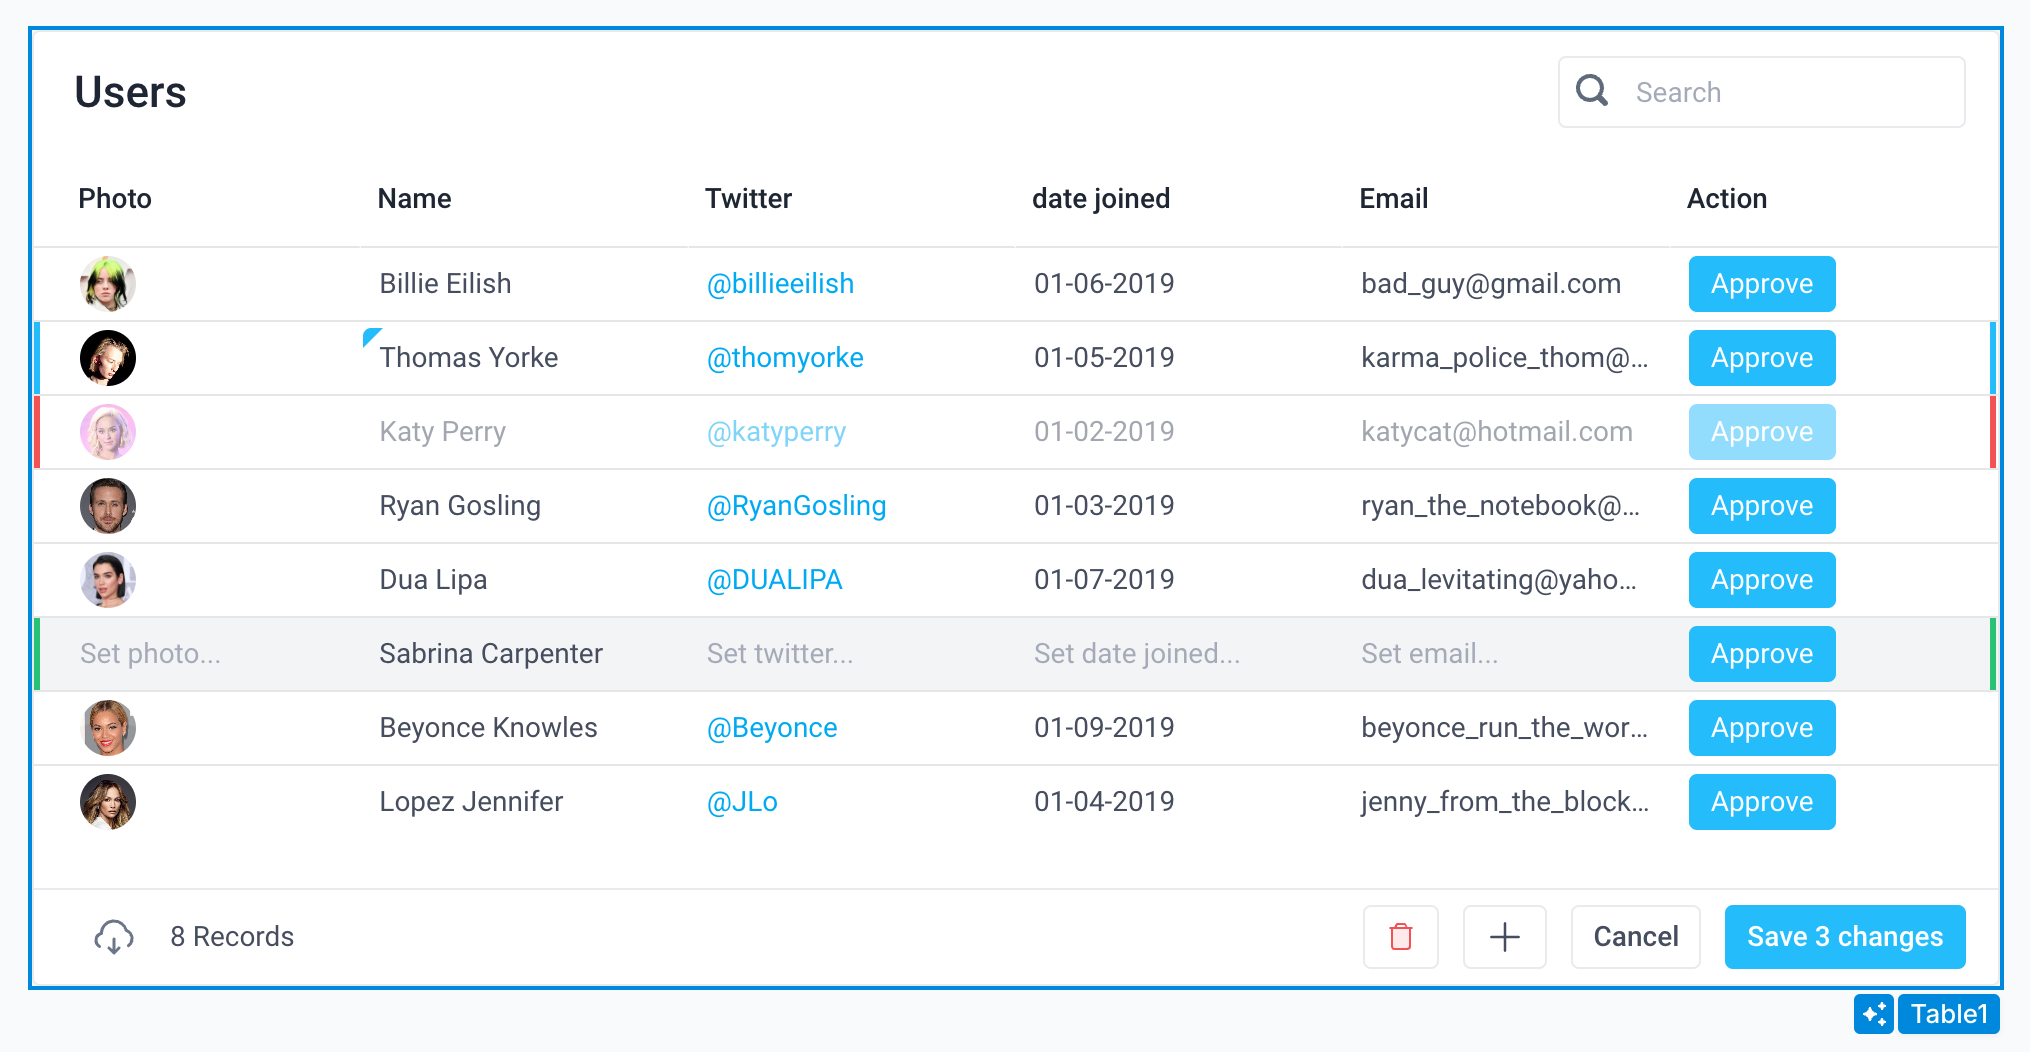
Table1.editedRows
The editedRows property contains an object with 4 properties: insertedRows, updatedRows, deletedRows, originalRows. All of these properties include arrays of the relevant rows.
For the table above, the editedRows property would look like this:
{
  "deletedRows": [
    {
      "action": "",
      "date_joined": "2019-01-02",
      "email": "katycat@hotmail.com",
      "name": "Katy Perry",
      "photo": "https://lowcode.s3-us-west-2.amazonaws.com/katy_perry.png",
      "twitter": "https://twitter.com/katyperry"
    }
  ],
  "insertedRows": [
    {
      "name": "Sabrina Carpenter"
    }
  ],
  "originalRows": [
    {
      "action": "",
      "date_joined": "2019-01-05",
      "email": "karma_police_thom@hotmail.com",
      "name": "Thom Yorke",
      "photo": "https://lowcode.s3-us-west-2.amazonaws.com/thom_yorke.png",
      "twitter": "https://twitter.com/thomyorke"
    }
  ],
  "updatedRows": [
    {
      "action": "",
      "date_joined": "2019-01-05",
      "email": "karma_police_thom@hotmail.com",
      "name": "Thomas Yorke",
      "photo": "https://lowcode.s3-us-west-2.amazonaws.com/thom_yorke.png",
      "twitter": "https://twitter.com/thomyorke"
    }
  ]
}
This data structure is often the most convenient to use to process table edits, for example:
- With SQL bulk insert, update, and delete form
- With REST APIs, as you can easily select the relevant API endpoint based on the type of update.
The editedRows property is typically the best property to use to
handle table edits.
Table1.allEdits
The allEdits property contains an array including all existing, updated, and newly inserted rows.
The allEdits property is less frequently used than editedRows, but it can
be useful when programmatically manipulating the table's edit state.
Notably, allEdits:
- Does not include deleted rows
- Is not filtered according to any UI filters applied to the table.
You can think of allEdits as the full dataset of the table after all edits have been made, excluding any deleted rows.
For the table above, the allEdits property would look like this:
[
  {
    "action": "",
    "date_joined": "2019-01-06",
    "email": "bad_guy@gmail.com",
    "name": "Billie Eilish",
    "photo": "https://lowcode.s3-us-west-2.amazonaws.com/billie_eilish.png",
    "twitter": "https://twitter.com/billieeilish"
  },
  {
    "action": "",
    "date_joined": "2019-01-05",
    "email": "karma_police_thom@hotmail.com",
    "name": "Thomas Yorke",
    "photo": "https://lowcode.s3-us-west-2.amazonaws.com/thom_yorke.png",
    "twitter": "https://twitter.com/thomyorke"
  },
  {
    "action": "",
    "date_joined": "2019-01-03",
    "email": "ryan_the_notebook@gmail.com",
    "name": "Ryan Gosling",
    "photo": "https://lowcode.s3-us-west-2.amazonaws.com/ryan_gosling.png",
    "twitter": "https://twitter.com/RyanGosling"
  },
  {
    "action": "",
    "date_joined": "2019-01-07",
    "email": "dua_levitating@yahoo.com",
    "name": "Dua Lipa",
    "photo": "https://lowcode.s3-us-west-2.amazonaws.com/dua_lipa.png",
    "twitter": "https://twitter.com/DUALIPA"
  },
  {
    "name": "Sabrina Carpenter"
  },
  {
    "action": "",
    "date_joined": "2019-01-09",
    "email": "beyonce_run_the_world@hotmail.com",
    "name": "Beyonce Knowles",
    "photo": "https://lowcode.s3-us-west-2.amazonaws.com/beyonce_knowles.png",
    "twitter": "https://twitter.com/Beyonce"
  },
  {
    "action": "",
    "date_joined": "2019-01-04",
    "email": "jenny_from_the_block@yahoo.com",
    "name": "Lopez Jennifer",
    "photo": "https://lowcode.s3-us-west-2.amazonaws.com/jennifer_lopez.png",
    "twitter": "https://twitter.com/JLo"
  }
]
Table1.editedRowIndices
The editedRowIndices property contains an object that includes the indices of modified rows. Today, editedRowIndices only includes deletedRows.
The editedRowIndices property is most useful when
programmatically manipulating the table's edit state along with the
allEdits property.
editedRowIndices provides both the relative and absolute indices of the modified rows, where:
- The relative index is the index of the row in the table as is visible to the user including any filters applied to the table
- The absolute index is the index of the row in the table's original data
For example, if we filtered the table above as follows:

The editedRowIndices property would look like this:
{
  "deletedRows": {
    "absolute": [2],
    "relative": [0]
  }
}
Immediately react to table edits
In addition to reacting to the user clicking the Save changes button to bulk update the table, you can also hook directly into updates as the user edits the table, such as when the user:
- Edits a cell
- Inserts a row
- Deletes a row
React to cell edits
Any editable column in the table comes with Event handlers just like its corresponding input type (onSubmit for inputs, onOptionChange for dropdowns, onCheckChange for checkboxes).
You can use these event handlers to have your application react to cell edits immediately, for example, updating another column in the table based on the value of the edited cell.
React to row insertions
Whenever a row is inserted, the onRowInserted event handler will fire, which allows you to react to row insertions.
This event receives the row and rowIndex of the newly inserted row as arguments. You can easily use this information to programmatically update the newly inserted row or any other rows in the table.
React to row deletions
Whenever one or more rows are deleted, the onRowsDeleted event handler will fire, which allows you to react to row deletions.
This event receives rowIndices as an argument, which is the array of indices for the deleted rows. This event handler is useful if you want to modify other rows in the table based on a row deletion.
Programmatically manipulate table edit state
As covered throughout these docs, when a user edits table data in the UI by modifying an editable cell, inserting a new row, or deleting one or more rows, these edits are stored in the table's edit state.
Superblocks allows you to make these same edits in code via frontend JavaScript. This functionality is useful to:
- React to table edits immediately to immediately modify other columns/rows in the table, transparently to the user
- Bulk edit the table programmatically, for example, to bulk delete a selected set of rows while still requiring that the user clicks the Save changes button to persist the updates to the database
Functions to manipulate table edit state
Superblocks provides the following functions to programmatically manipulate the table's edit state:
| Function | Arguments | Description |
|---|---|---|
| updateRows() | (rows: { [index: number]: Row }, { absoluteIndices?: boolean }) | Update one or more rows in a table based on their indices. Each row can be specified as a partial update. By default indices specified with be treated as relative indices |
| insertRows() | (startIndex: number, rows: Row[]) | Insert one or more contiguous rows beginning with a start index. Each row can be specified as a partial update. |
| deleteRows() | (rowIndices: number[]) | Delete one or more rows based on their indices |
When using these functions, it is critical to understand index and row data.
Row index
By default, the index is relative to the table's current edit state as a user would see visually on the screen.
The index includes any inserted or deleted rows. For example, if I insert a new row via the UI directly after the first row (0th index), this new row is at index 1. Thus, if I called updateRows() or deleteRows() on index 1, I would be modifying/deleting this newly inserted row.
When using the updateRows() function, you can set the absoluteIndices argument to true to treat the indices as absolute indices. This means that the indices specified will be relative to the table's unfiltered data structure, allowing you to modify rows that are not currently visible rows.
Row data structure
The row data structure is an object where the column is the key and the value is the data in that column. This data structure mactches what you would see when inspecting the Table data in Superblocks.
Other important table properties in code
In addition to the allEdits, editedRows, and editedRowIndices properties, which are covered in the table edits in component state section above, it's important to also understand the following properties when manipulating the table's edit state programmatically:
Table1.tableData
The tableData property is an array of the initial data passed to the table via the Data property in the properties panel.
This property will never change solely as a result of the user manipulating the table on the frontend. The only way this property will change is if the data passed to the Data property in the properties panel changes.
Table1.filteredTableData
The filteredTableData property is an array of the rows that are visible to the user in the table at a given point in time.
This property accounts for any filters or searches applied to the table as well as any edited, deleted, or added rows. This property is 1-to-1 with what the user sees in the table at a given point in time.
For example, if we filtered the example table from the table edits in component state section above as follows:
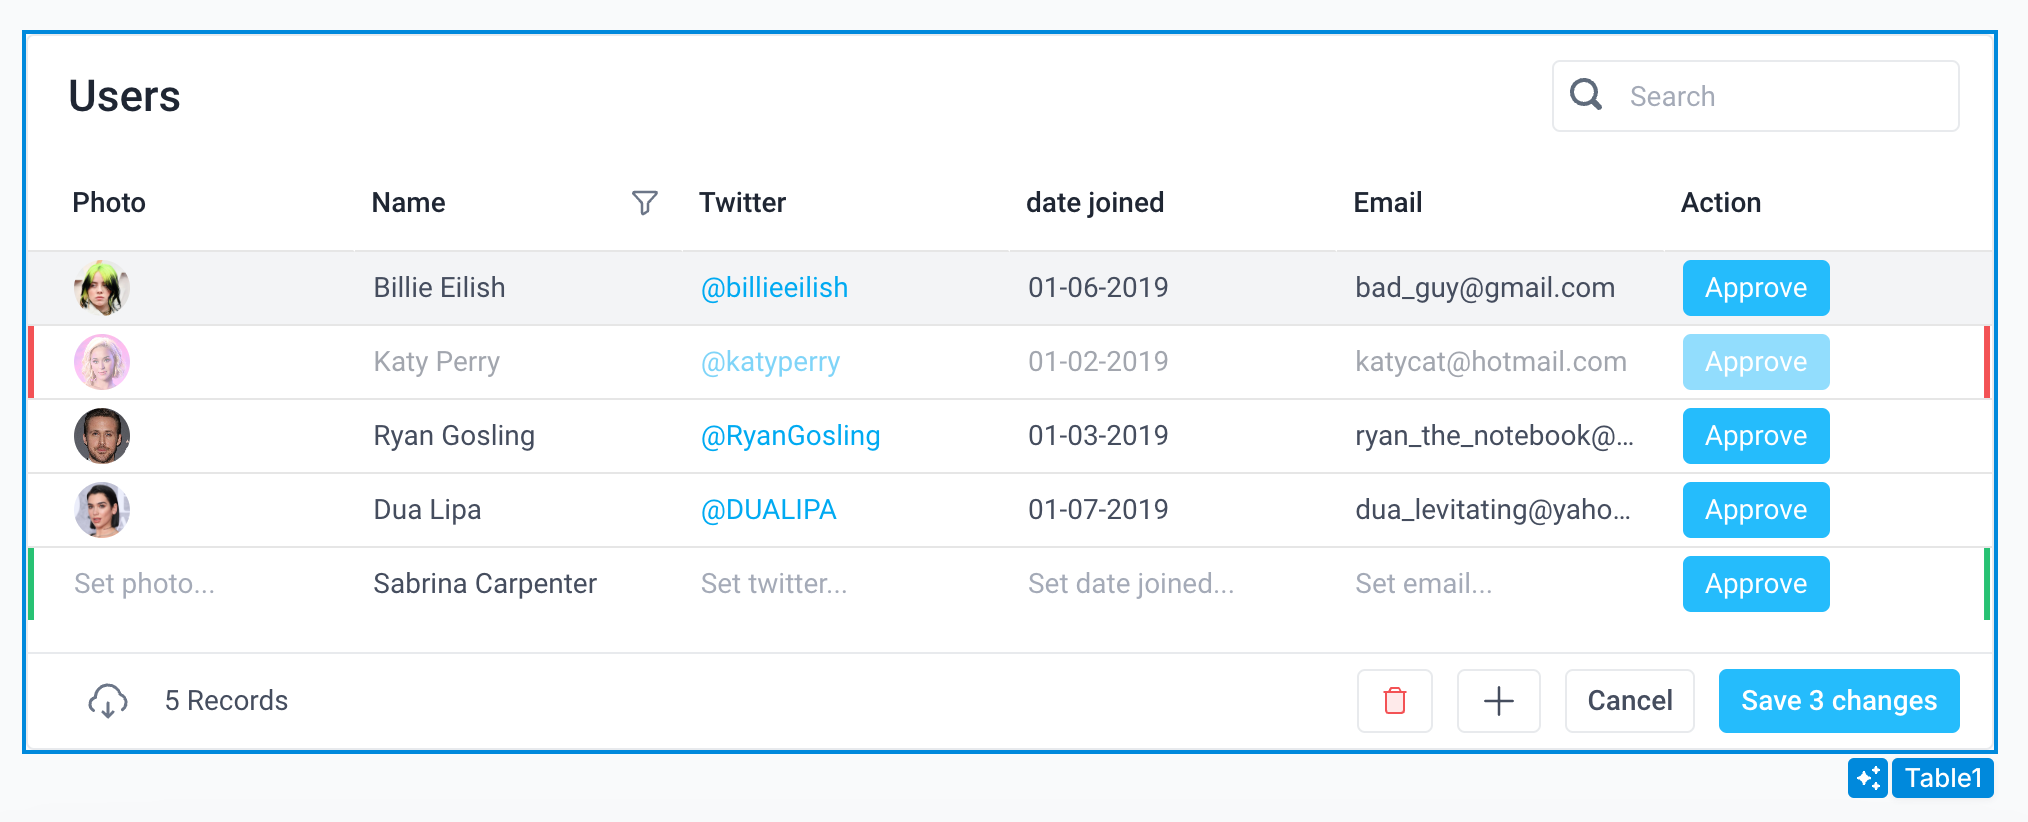
The filteredTableData property would look like this:
[
  {
    "action": "",
    "date_joined": "2019-01-06",
    "email": "bad_guy@gmail.com",
    "name": "Billie Eilish",
    "photo": "https://lowcode.s3-us-west-2.amazonaws.com/billie_eilish.png",
    "twitter": "https://twitter.com/billieeilish"
  },
  {
    "action": "",
    "date_joined": "2019-01-02",
    "email": "katycat@hotmail.com",
    "name": "Katy Perry",
    "photo": "https://lowcode.s3-us-west-2.amazonaws.com/katy_perry.png",
    "twitter": "https://twitter.com/katyperry"
  },
  {
    "action": "",
    "date_joined": "2019-01-03",
    "email": "ryan_the_notebook@gmail.com",
    "name": "Ryan Gosling",
    "photo": "https://lowcode.s3-us-west-2.amazonaws.com/ryan_gosling.png",
    "twitter": "https://twitter.com/RyanGosling"
  },
  {
    "action": "",
    "date_joined": "2019-01-07",
    "email": "dua_levitating@yahoo.com",
    "name": "Dua Lipa",
    "photo": "https://lowcode.s3-us-west-2.amazonaws.com/dua_lipa.png",
    "twitter": "https://twitter.com/DUALIPA"
  },
  {
    "name": "Sabrina Carpenter"
  }
]
Using updateRows()
Let's imagine that we have a list of transactions to process displayed in a table. The status column in the table is used to display the status of the transaction.
We want to implement a feature to allow users to multi-select a set of rows and bulk modify their status to approved. The user will then review the statuses in the table along with any other edits, and click save to persist the updates to the database.
To do so, we can easily drag on a Button above the table and add a Run JS action to the button's onClick event handler with the following JavaScript.
const updates = {};

// loop over the selected rows to construct an object to pass to updateRows, setting each row to approved
Table1.selectedRowIndices.forEach((index) => {
  updates[index] = { status: "approved" };
});

Table1.updateRows(updates);
Now, if the user selects the first, second, and third rows:
Table1.selectedRowIndiceswould be[0, 1, 2]- The JS function would produce an updates object with the following structure, which matches the schema accepted by the
updateRows()function
{
    "0": {
        "status": "approved"
    },
    "1": {
        "status": "approved"
    },
    "2": {
        "status": "approved"
    }
}

Using insertRows()
Similarly, the insertRows() function can be used to programmatically insert new rows into the table.
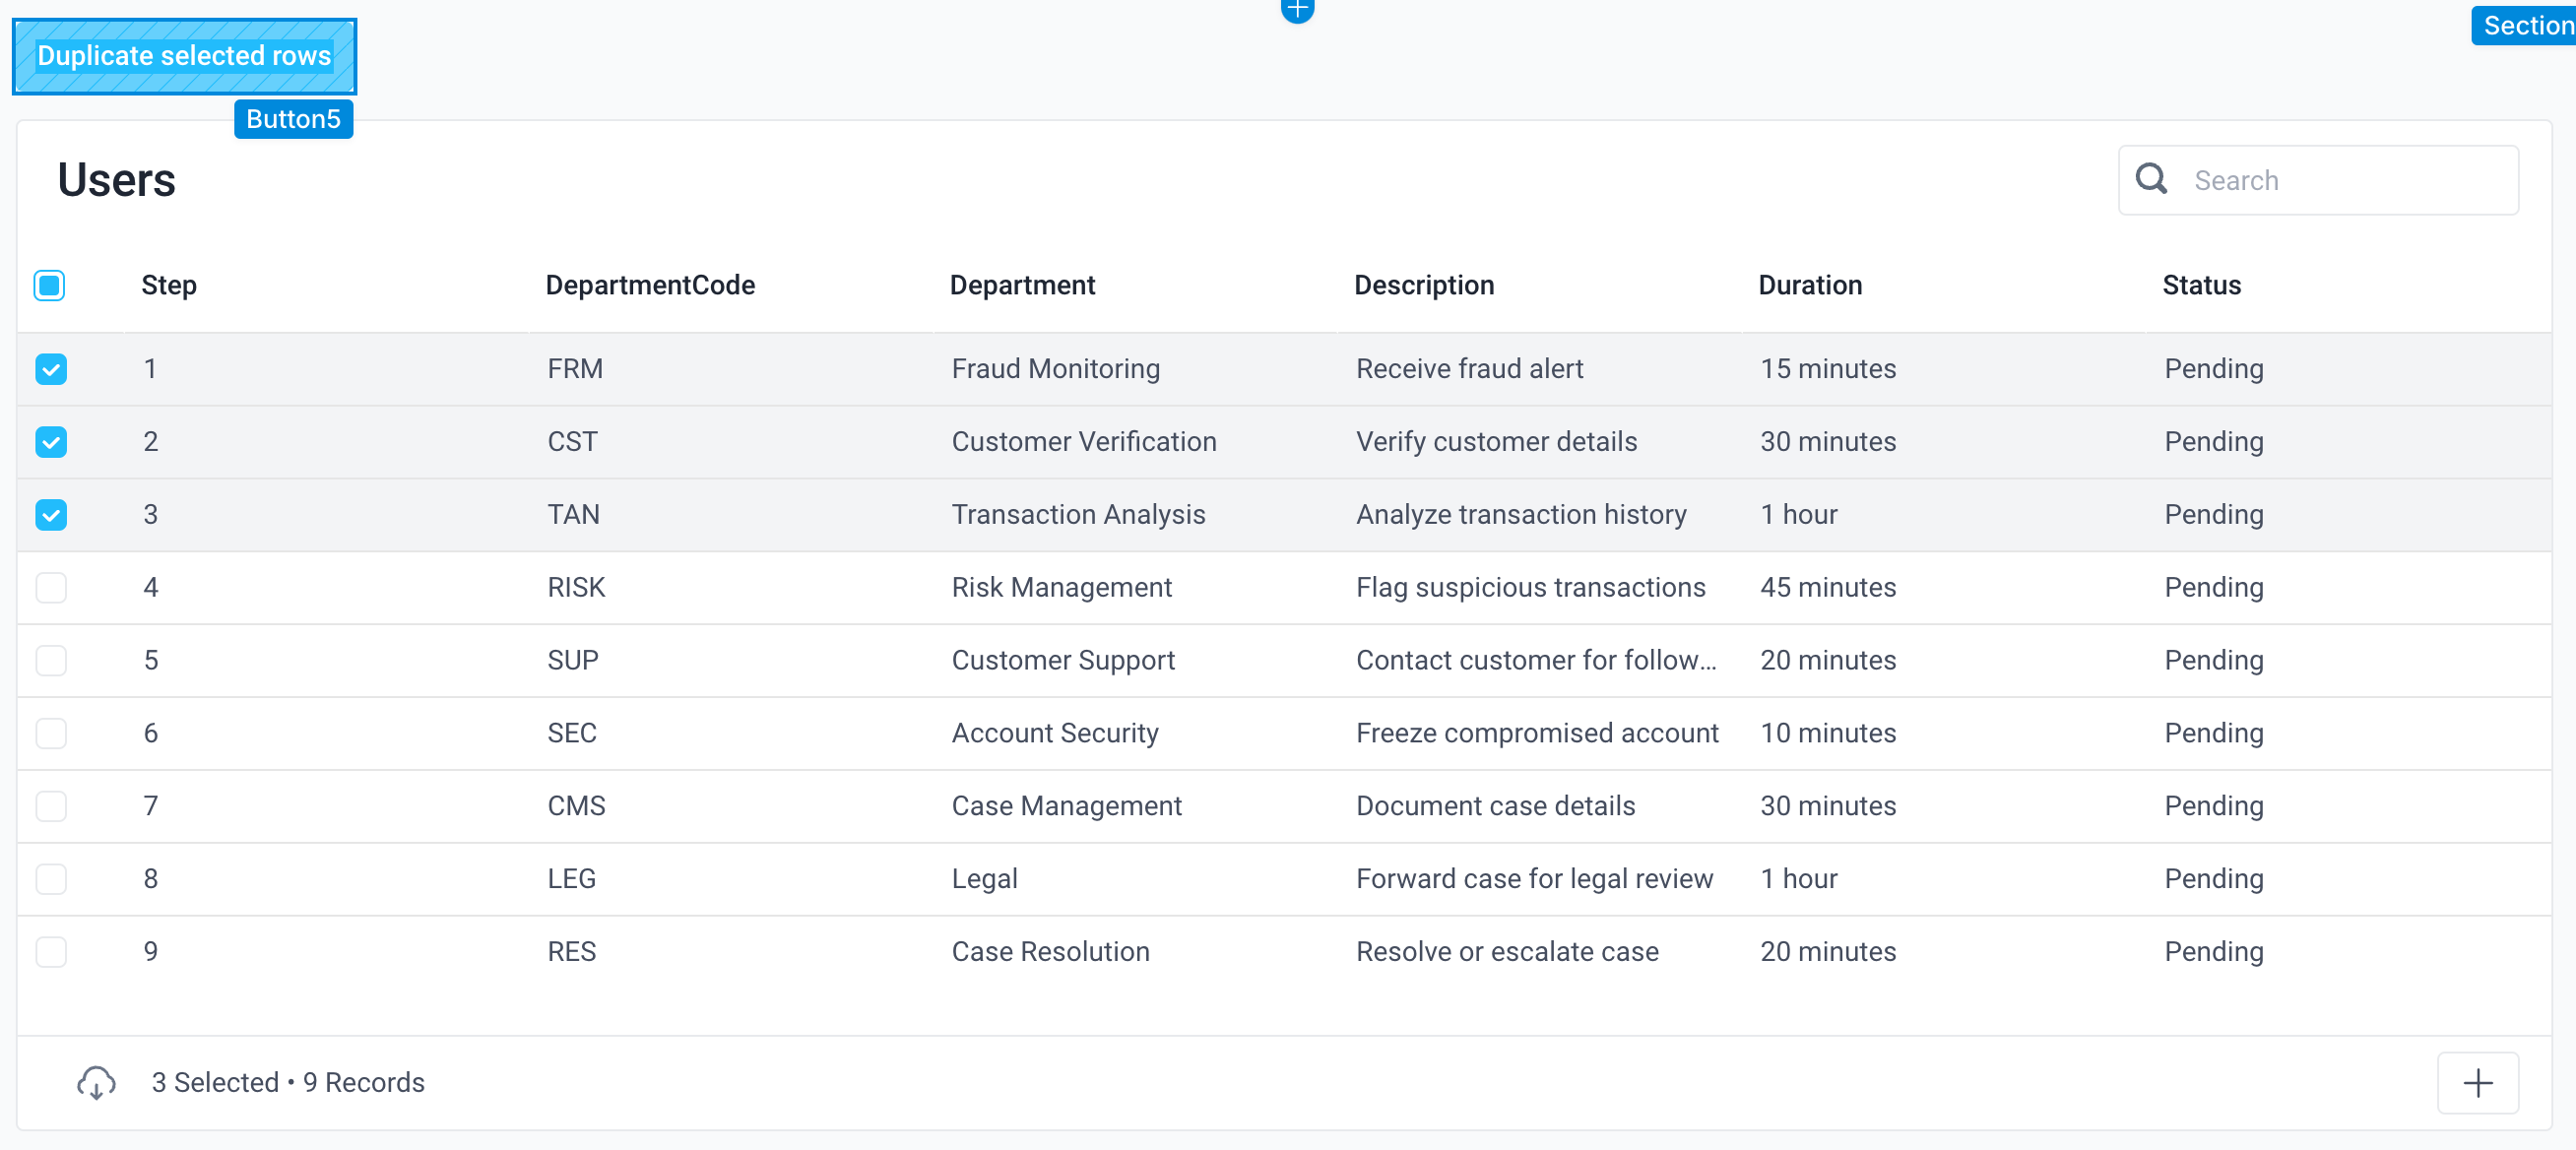
For example, let's imagine that we wanted to allow users to easily select a set of rows in a table and duplicate those rows below.
To do so, we could add a button above the table and add a Run JS action to the button's onClick event handler with the following JavaScript:
const insertStartIndex = Math.max(...Table1.selectedRowIndices) + 1;

Table1.insertRows(insertStartIndex, Table1.selectedRows);
This code would find the index of the last selected row and increment by 1 to identify where to begin the row insertion. In our insertRows call, we then pass that insertStartIndex as the first argument, and as the second argument pass the row data for the selected rows.
Using deleteRows()
Finally, the deleteRows() function can be used to programmatically delete rows from the table.
For example, let's imagine that as part of the same workflow, the user wants to be able to bulk delete any transactions with the status rejected.
Rather than requiring the user to manually select each rejected transaction, we could implement a feature to allow the user to click a button and automatically mark all rows in the table as deleted.
To do so, we can easily drag on a Button above the table and add a Run JS action to the button's onClick event handler with the following JavaScript:
const rowIndicesToDelete = [];

Table1.tableData.forEach((row, index) => {
  if (row.status == "rejected") {
    rowIndicesToDelete.push(index);
  }
});

Table1.deleteRows(rowIndicesToDelete);
Note: The code above only works reliably if row insertion is disabled for the table. To account for row insertion, see
this (slighly more complicated) example
.
Example: Maintaining a process sequence in an editable table
Finally, let's demonstrate how we would maintain a sequence of steps displayed in a table in an end-to-end fashion.
For this use case, our support agents are completing a process and recording all steps they take when monitoring a transaction. The user can:
- Insert new steps
- Delete steps
- Modify steps
- Filter any column in the table
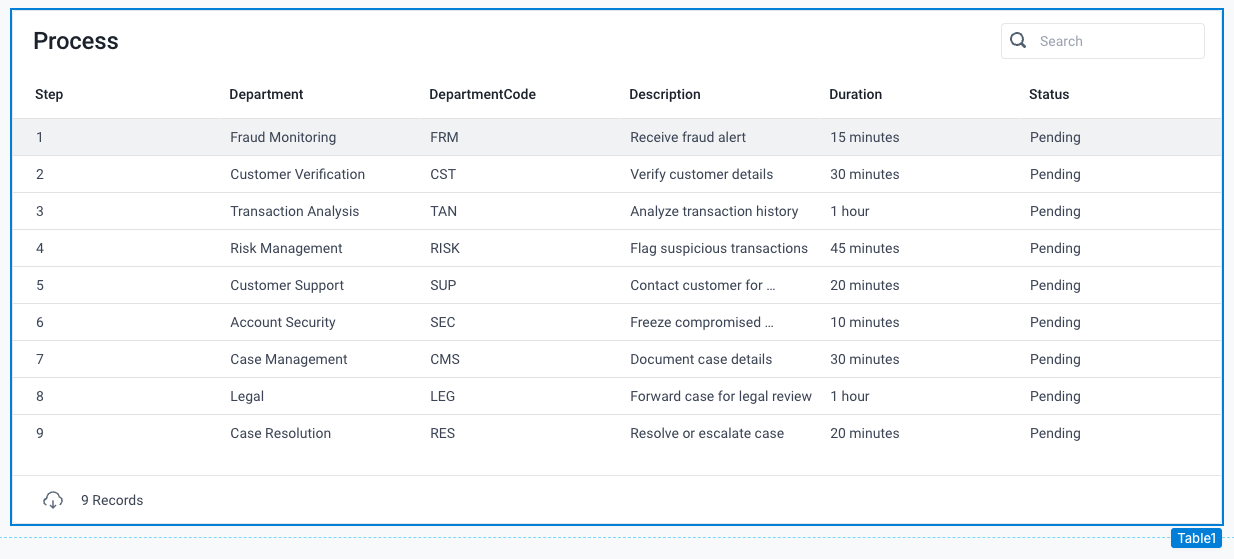
This data is going to be written back to the database, and the order in which the steps were taken is critical. As such, we need to ensure that the Step column is updated as the user interacts with the table.
To facilitate this user experience, we can use the same JavaScript code to handle row insertions, deletions, and edits.
const updates = {};

// Calculate the length of the table, accounting for any inserted rows
const tableLength =
  Table1.tableData.length + Table1.editedRows.insertedRows.length;

// Loop over the length of the table and increment the current step for any non-deleted row to construct the updates object
let step = 0;
for (let i = 0; i < tableLength; i++) {
  if (!Table1.editedRowIndices.deletedRows.absolute.includes(i)) {
    updates[i] = {
      Step: step,
    };
    step++;
  }
}

// Write the updates back to the table
// Set the absoluteIndices argument to true to ensure that the updates are applied to all rows in the table, even those that are not currently visible
Table1.updateRows(updates, { absoluteIndices: true });
Note that we set the absoluteIndices argument to true to ensure that the updates are applied to all rows in the table, even those that are not currently visible.
We also use the Table1.editedRowIndices.deletedRows.absolute property to ensure that we do not update rows that have been deleted. Since we are looping over the full table data, we must use the absoluteIndices argument to ensure that we are ignoring the correct rows.
We can write this JavaScript inside of a Custom Event so that we can call the same custom event from the onRowInserted and onRowDeleted event handlers, as well as the onFocusOut event handler on the Step column.
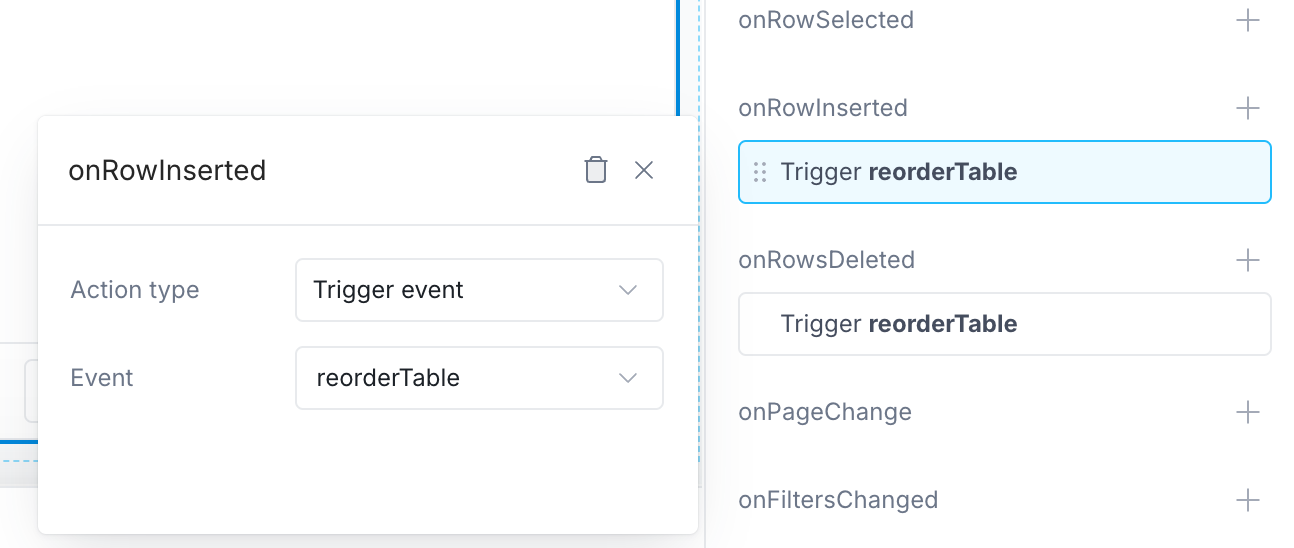
Now, every time a user inserts, deletes, or edits the step column for a row in the table, the custom event will fire and the table will be reordered, even if the user has filtered the table.
Example - setting another column's value dynamically based on a dropdown
For example, let's imagine we have a column Country that is editable as a dropdown. When a user selects the country, we want to automatically update the Currency column based the mapping from the getCurrencyMappings API.
To do so, we would select the Country column from the properties panel and set the Editing type to Dropdown. Then, we'd add an onOptionChange event handler with the following code:
const selectedCountry = currentRow.country;
const currencyMapping = getCurrencyMappings.response[selectedCountry];

const updates = {
  [currentRowIndex]: {
    currencyCode: currencyMapping,
  },
};

Table1.updateRows(updates);
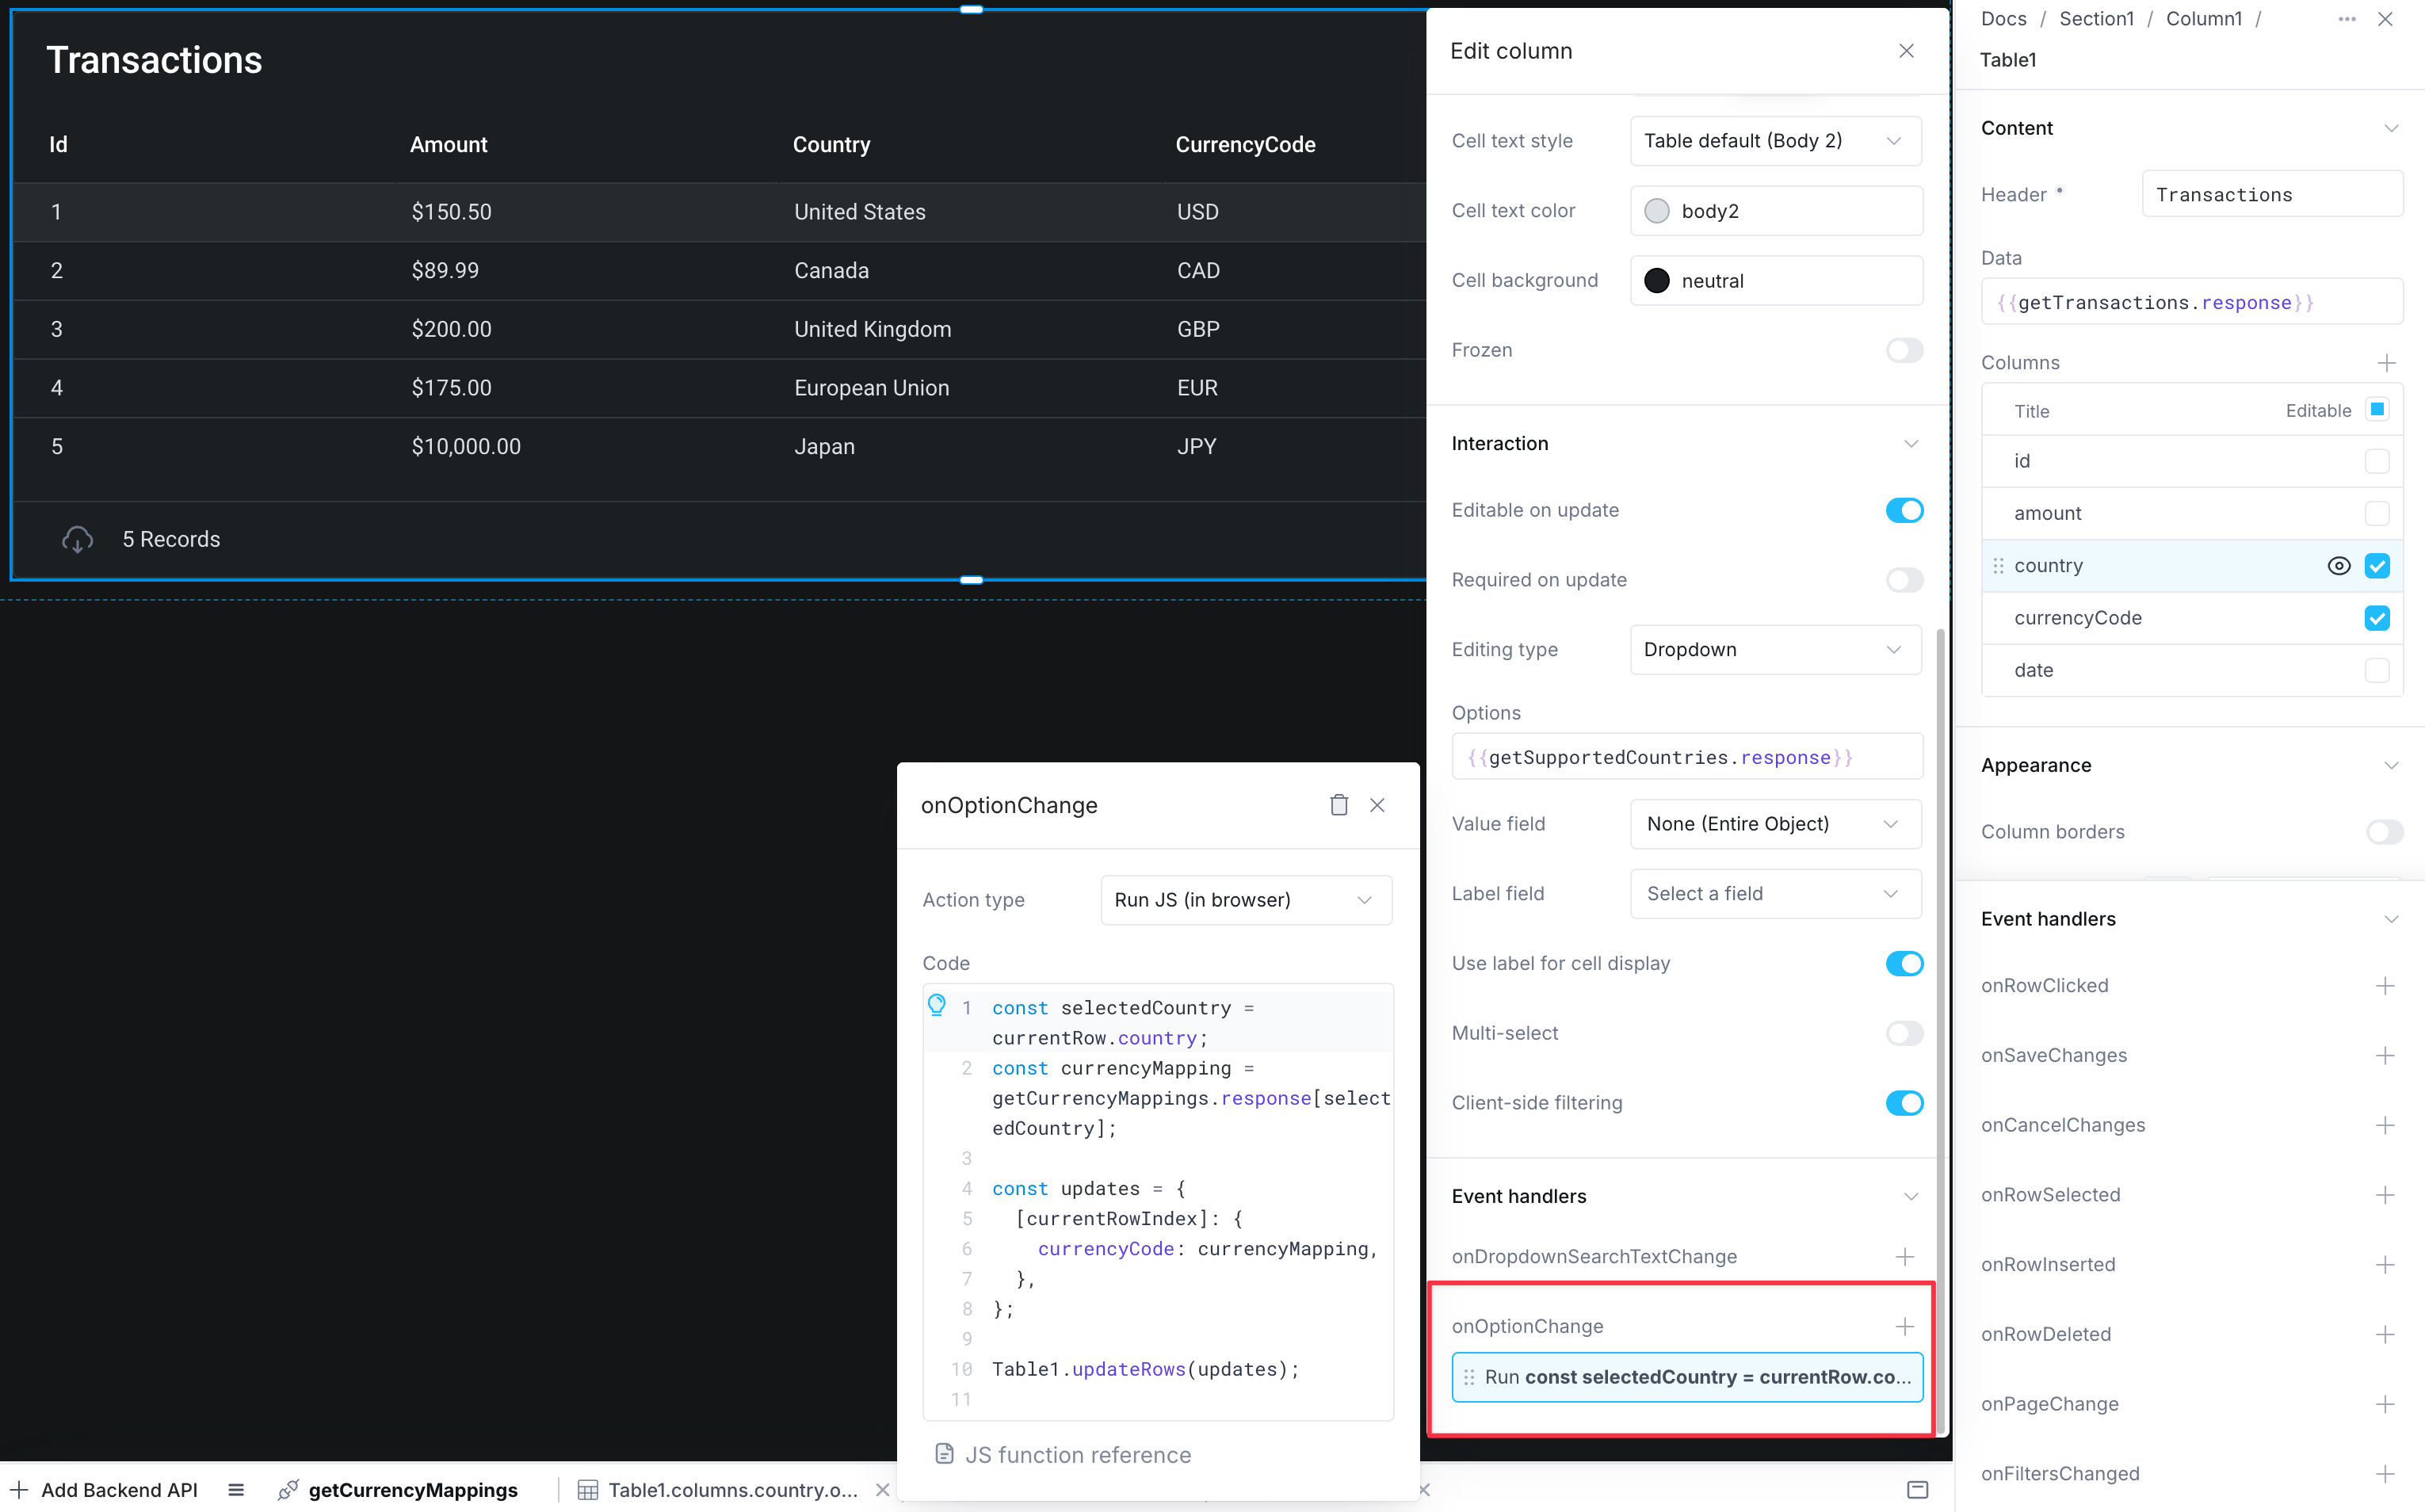
Now, when the user selects an option from the country dropdown, the JS code would run and set the currencyCode column for the currentRow (the row being edited) based on getCurrencyMappings.