FilePicker
Upload or process files in Superblocks APIs
Use the FilePicker when your users upload assets like images, or when you need to manipulate text files like CSVs. Files can only be handled inside Superblocks API steps (i.e. the Upload Multiple Files action in S3, Python step, JavaScript step, etc.). If you are using the On-Premise Agent, files are sent directly from the user's computer to your agent. Superblocks supports files up to 150Mb.
FilePicker Properties
Component Properties
| FilePicker Property | Description |
|---|---|
| Content | |
| Label | Sets a label text for the file picker |
| Selection type | Set the FilePicker widget to Multi select to handle multiple files or Single select to restrict it to one file at a time |
| Allowed file types | File types can either be mime types or suffixes. * represents a wildcard |
| Appearance | |
| Label position | Position the label above or to the side of the input |
| Label style | Changes the style (font, size, color, etc.) of the file picker label text. Configure styles in the Typography settings |
| Loading animation | Display a loading animation if dependent data is loading |
| Layout | |
| Width | Controls the width of the component |
| Height | Controls the height of the component |
| Visible | Controls the visibility of the component, values are a boolean |
| Collapse when invisible | Controls what happens when the component is invisible. When true, other components shift to fill its space; when false, it leaves a blank space. This has no effect in edit mode. |
| Interaction | |
| Required | Makes adding a file mandatory, values are a boolean |
| Disabled | Disables user interaction with this component, values are a boolean |
| Error display | Toggles whether an error should be displayed in a Tooltip when hovering or Inline below the input. |
| Validation | Programmatically sets a custom validation rule. |
Reference Properties
Properties can be accessed from other frontend components and backend APIs by adding the name of the FilePicker, and dot referencing the property. For a FilePicker named FilePicker1:
| Property | Description |
|---|---|
FilePicker1.files | Returns an array of files |
FilePicker1.isVisible | Returns the boolean value of the component's visibility (True, if it is visible) |
Working with files in APIs
Each file that you upload is wrapped in a special <FilePickerComponentName>.files array item. To read the contents of a file, use the following language-specific syntax.
JavaScript
await <FilePickerComponentName>.files[<index>].readContentsAsync(<optional mode>)
API Step Bindings
{{ await <FilePickerComponentName>.files[<index>].readContentsAsync(<optional mode>) }}
Python
<FilePickerComponentName>.files[<index>].readContents(<optional mode>)
Available modes
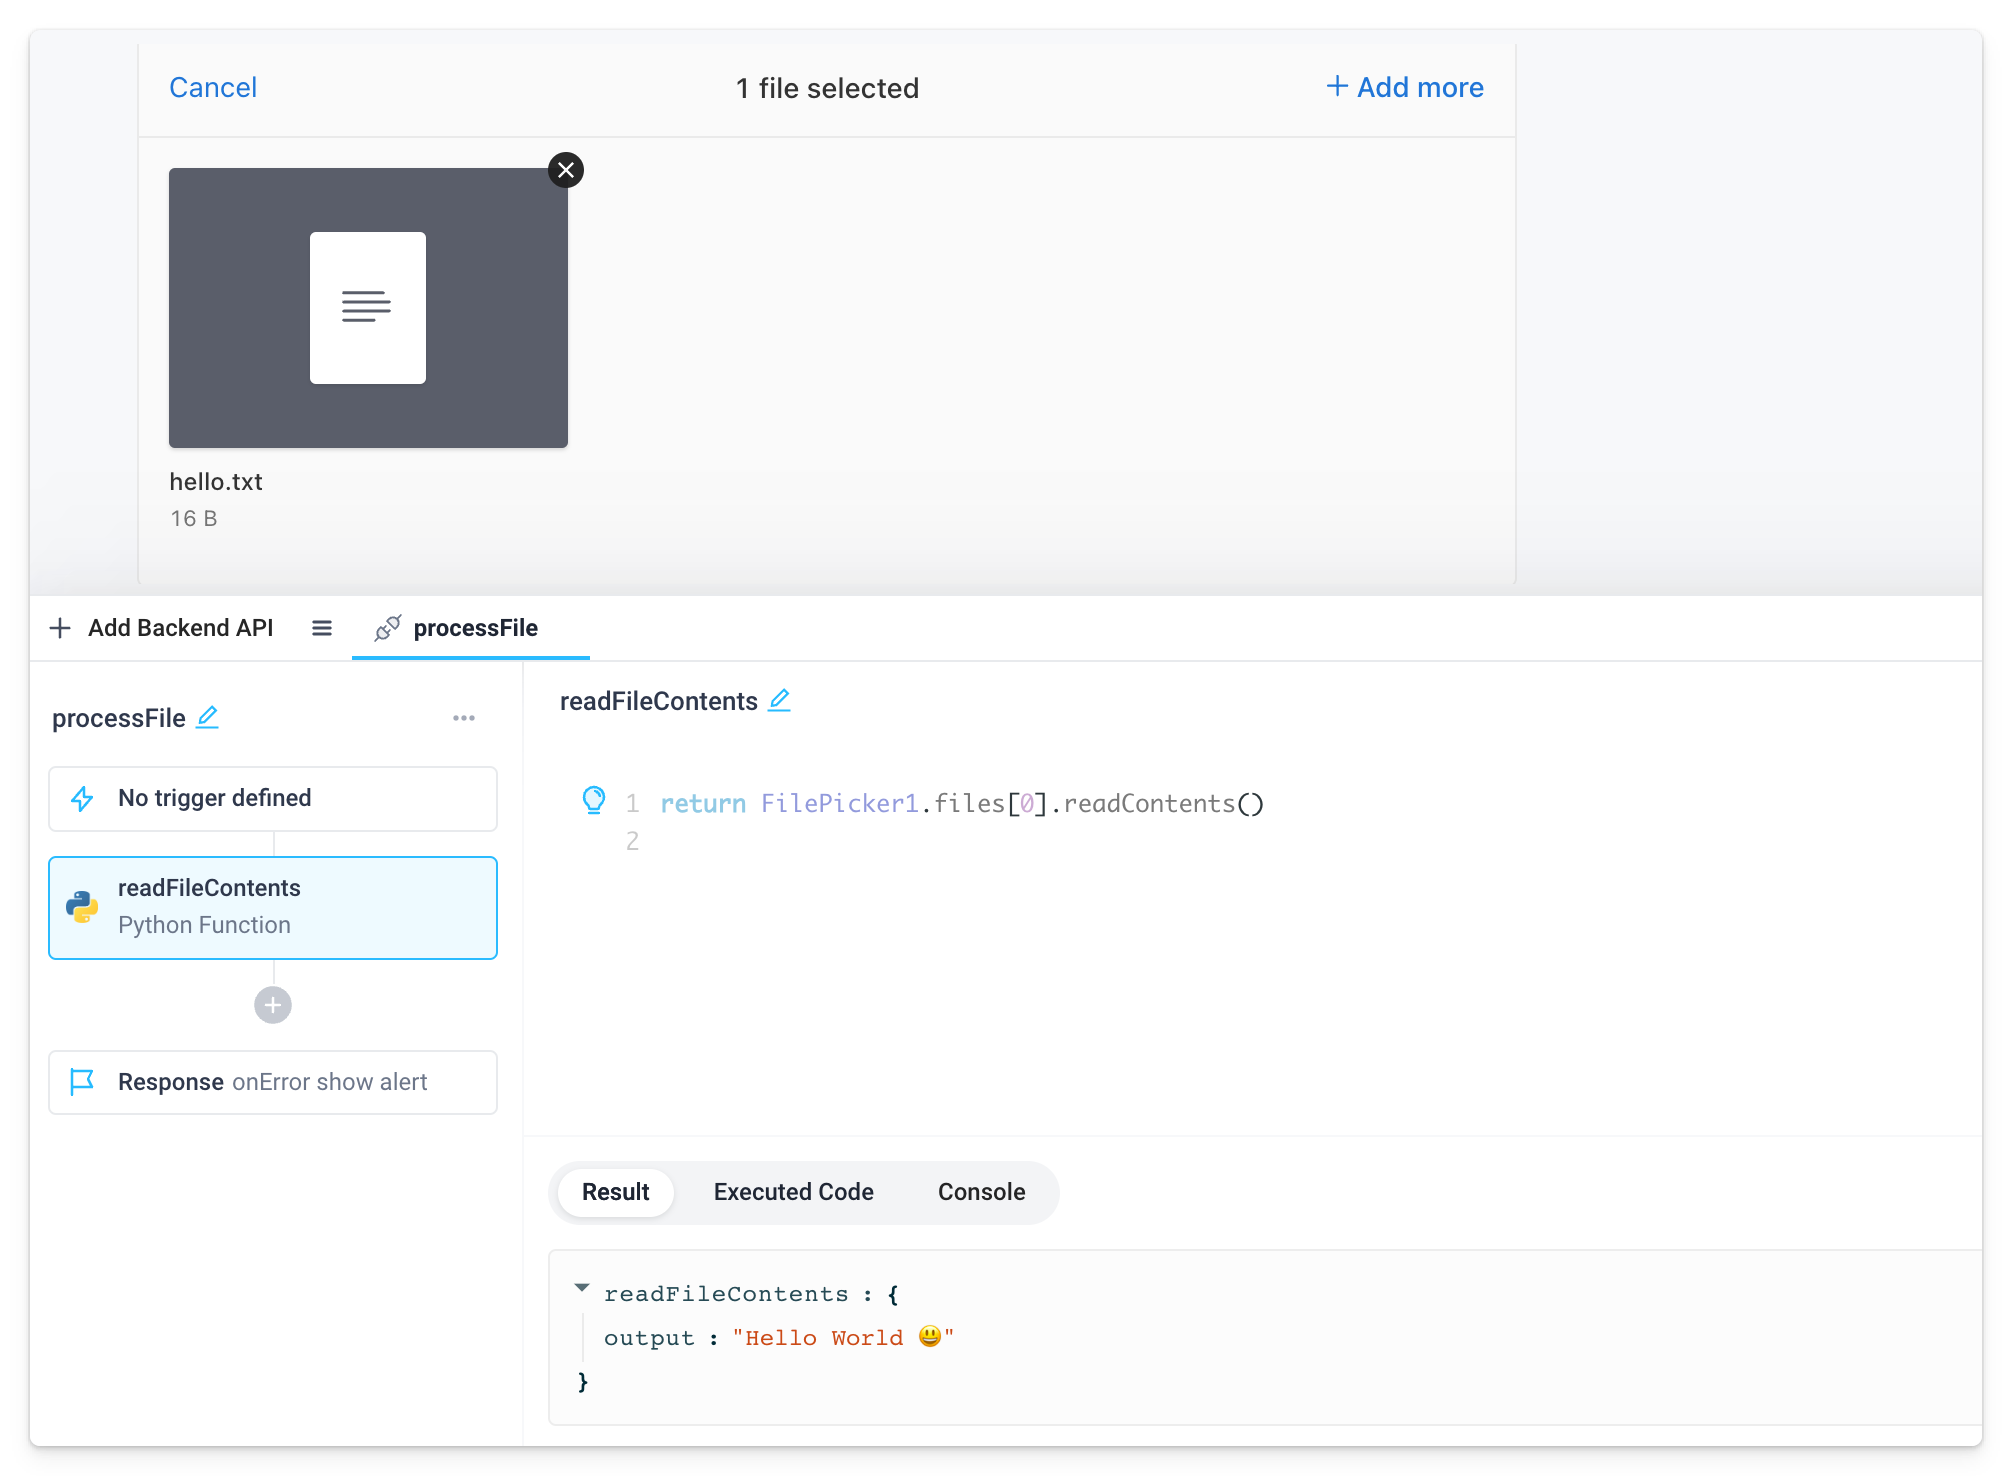
- Text
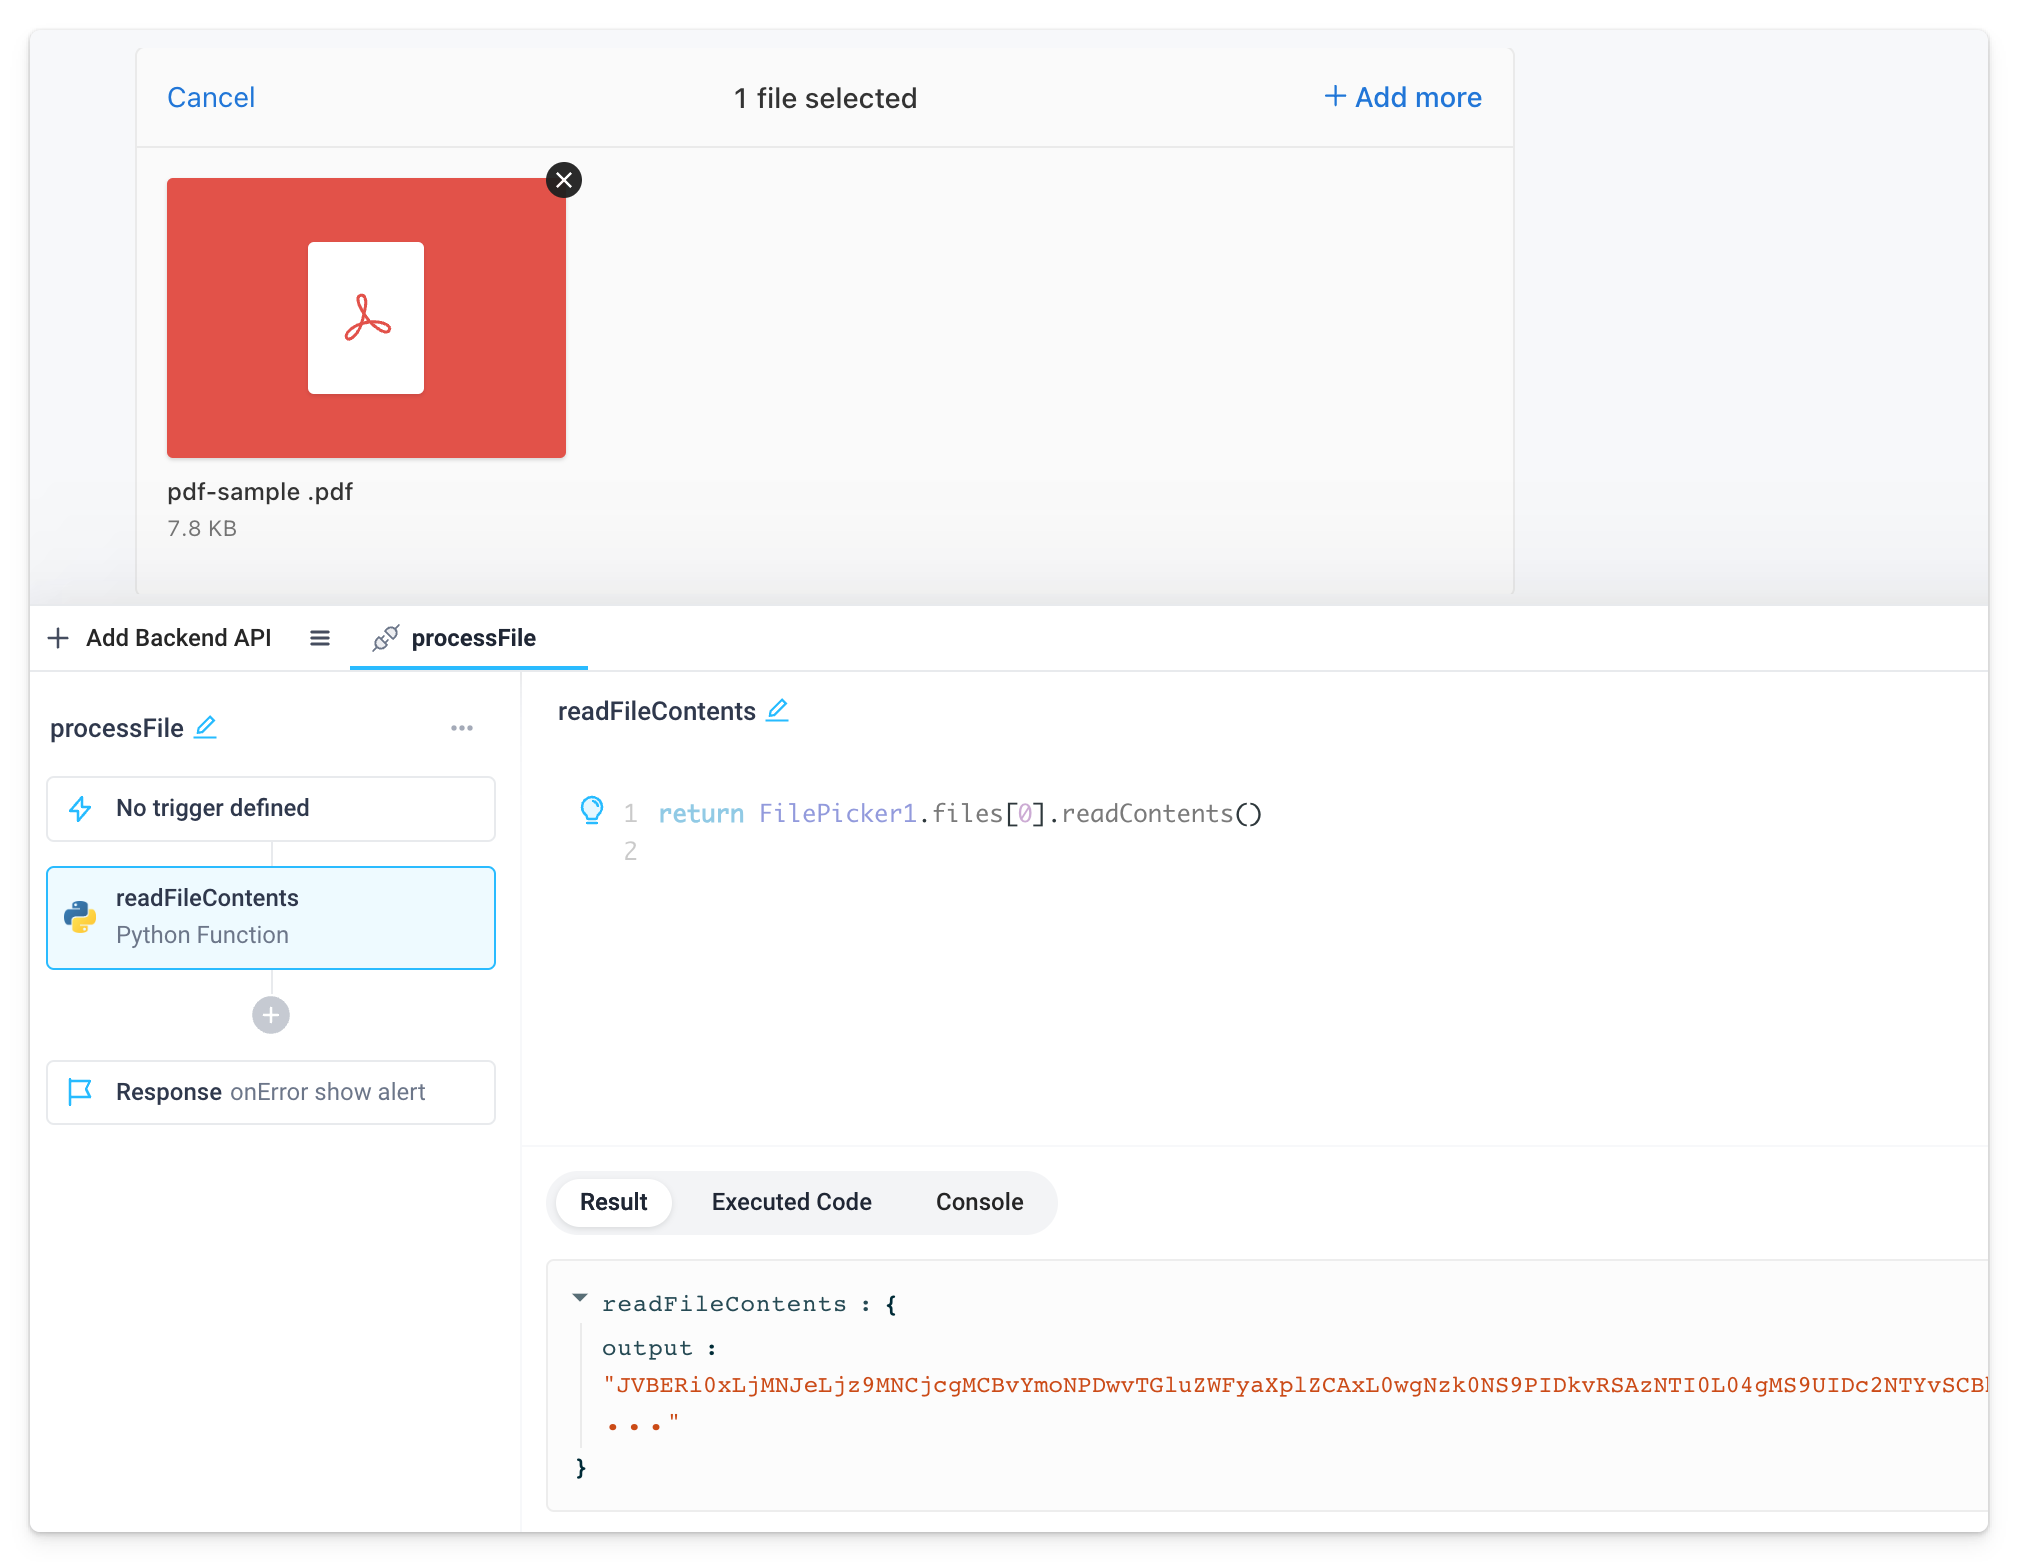
- Binary
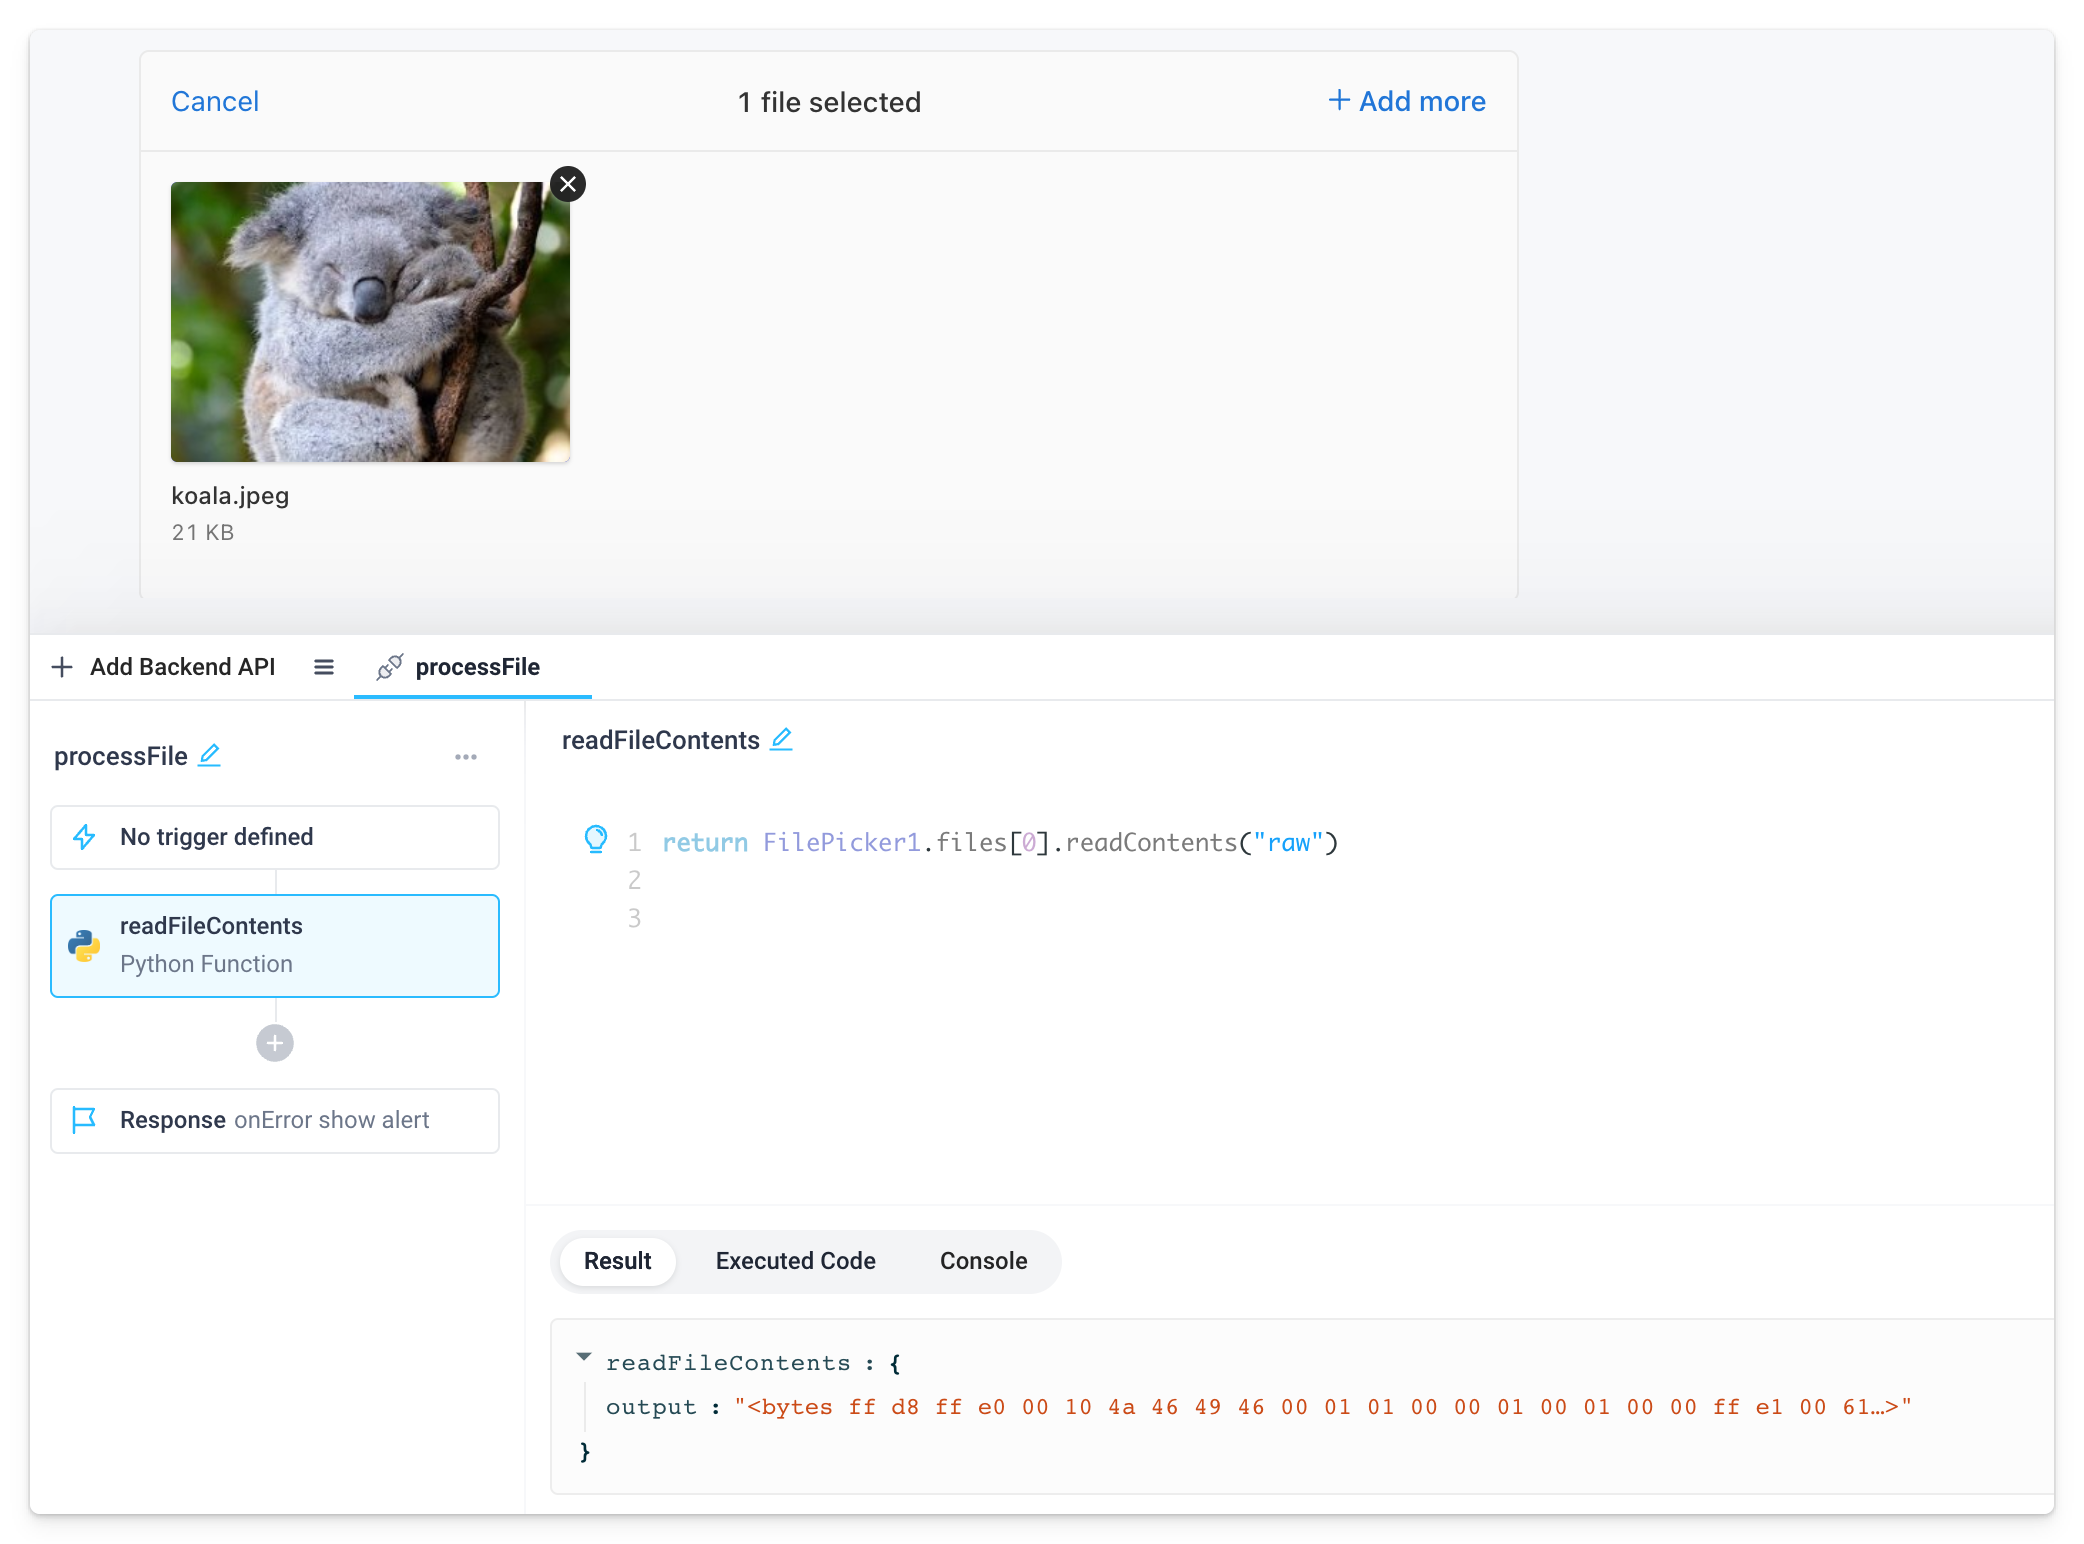
- Raw
- Returns a
utf-8encoded string - Default for non-binary files (e.g.,
.txt,.csv,.html) - Configure manually by setting
<optional mode>totext
- Returns a
base64encoded string - Default for binary files (e.g.,
.pdf) - Configure manually by setting
<optional mode>tobinary
- Returns the raw bytes buffer
- Configure manually by setting
<optional mode>toraw Use
rawwhen sending binary data like images and PDFs to S3 or in email attachments
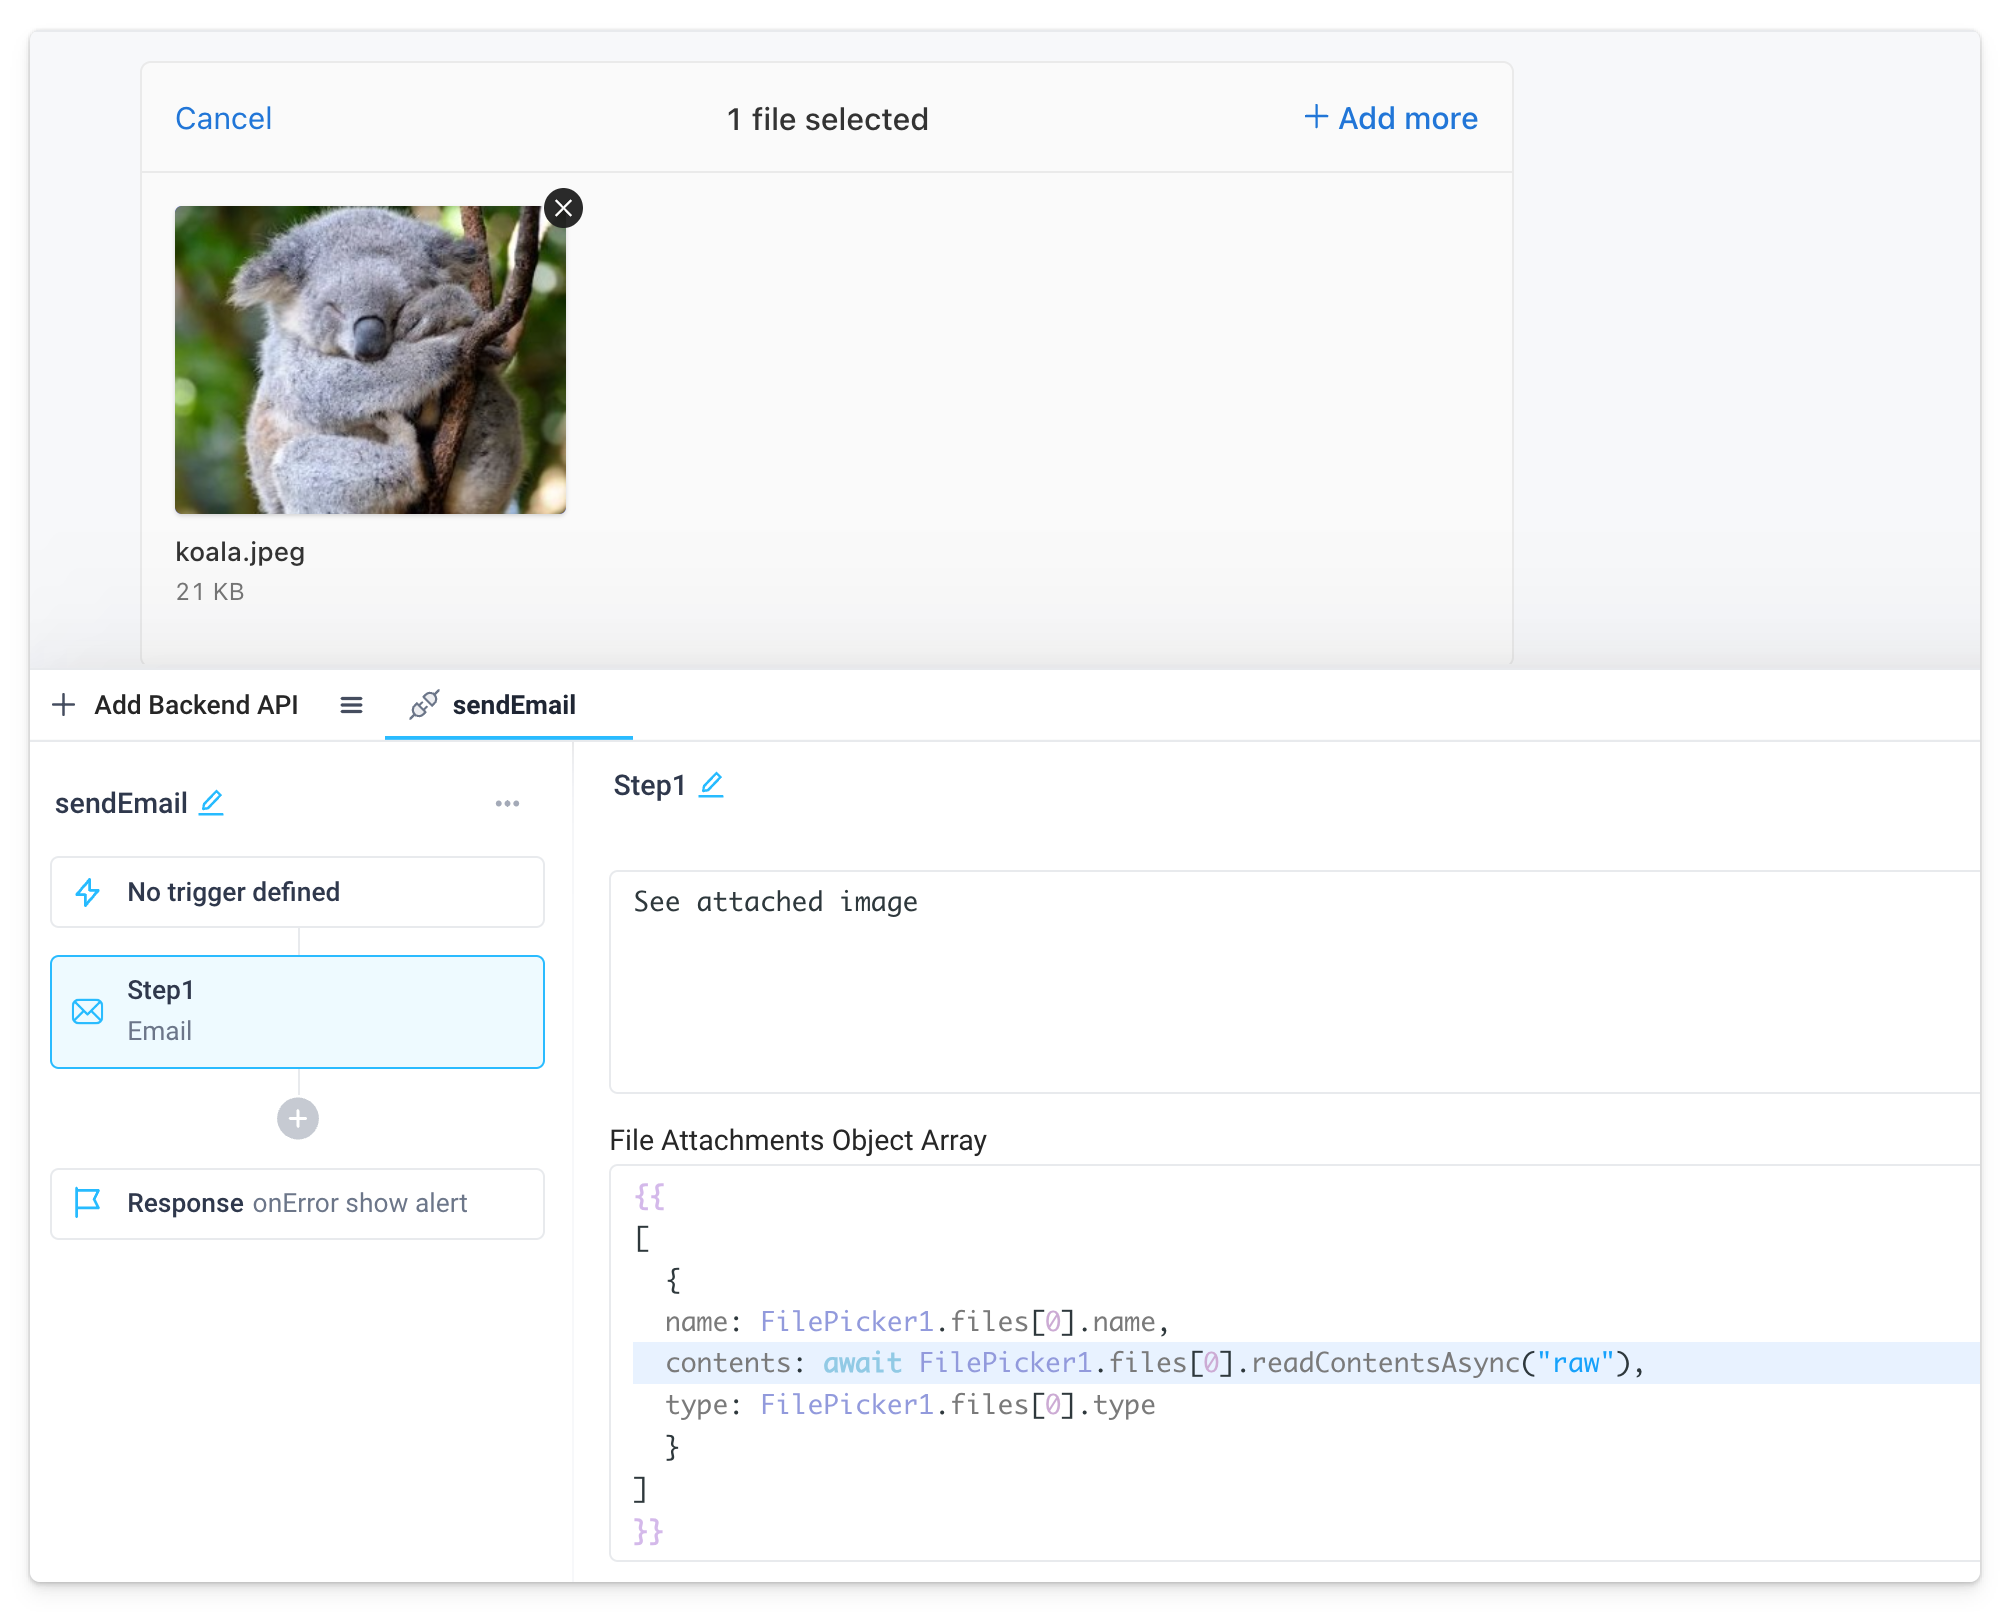
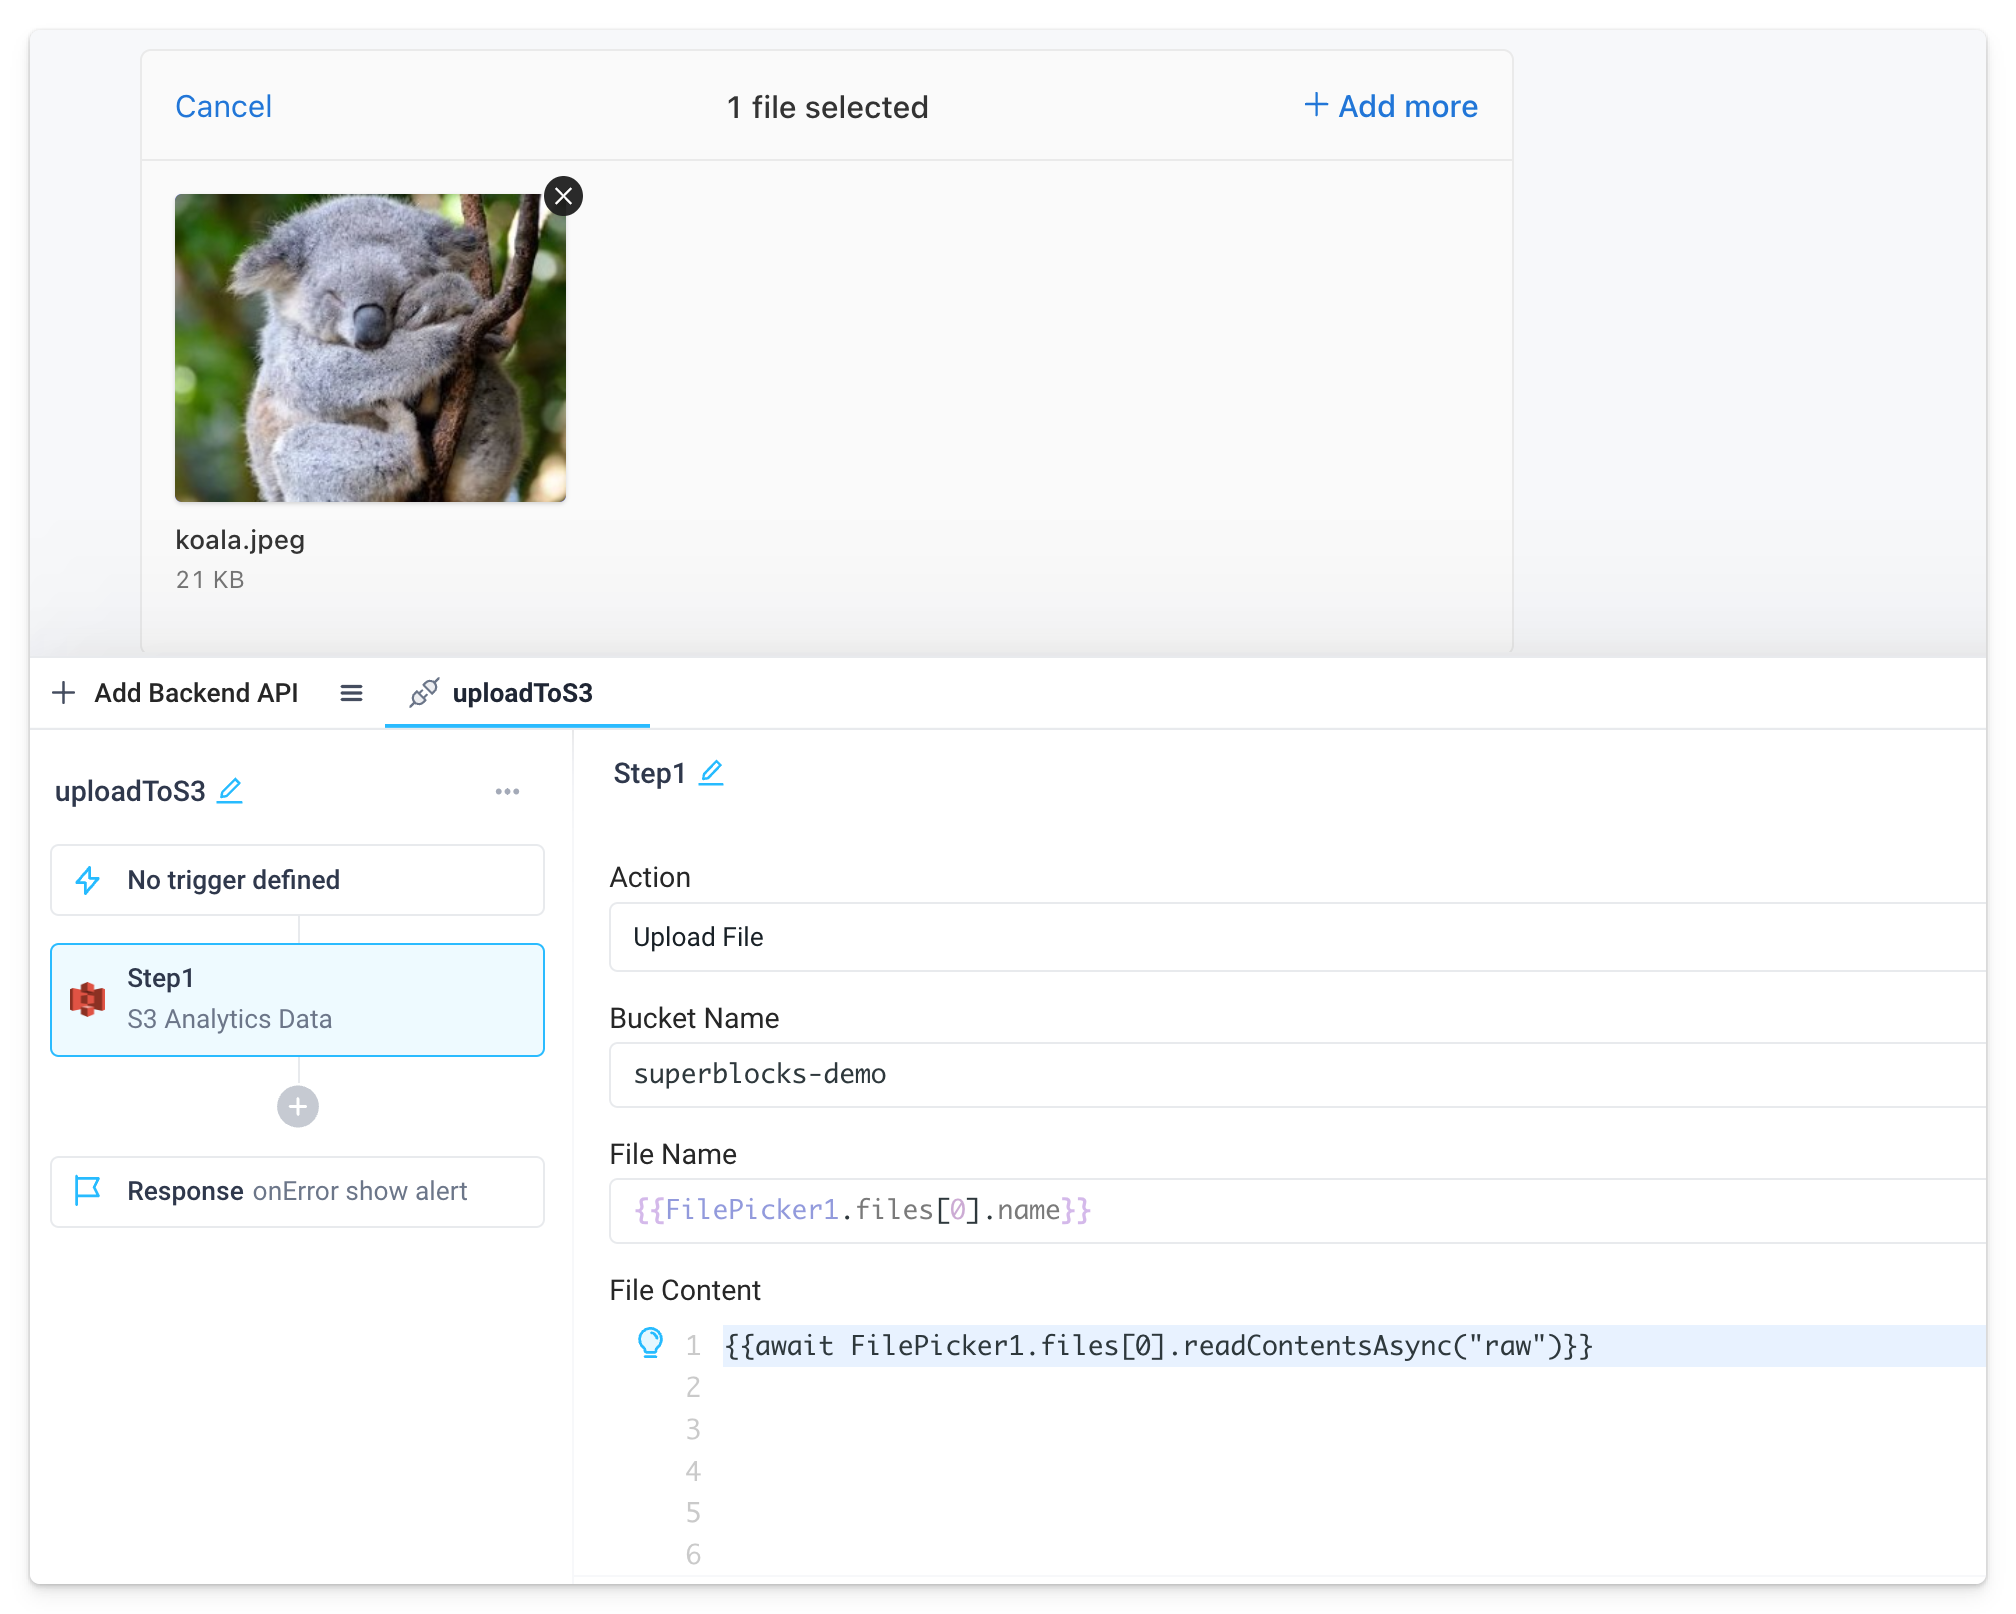
Example Usage:
Upload CSV and display in Table
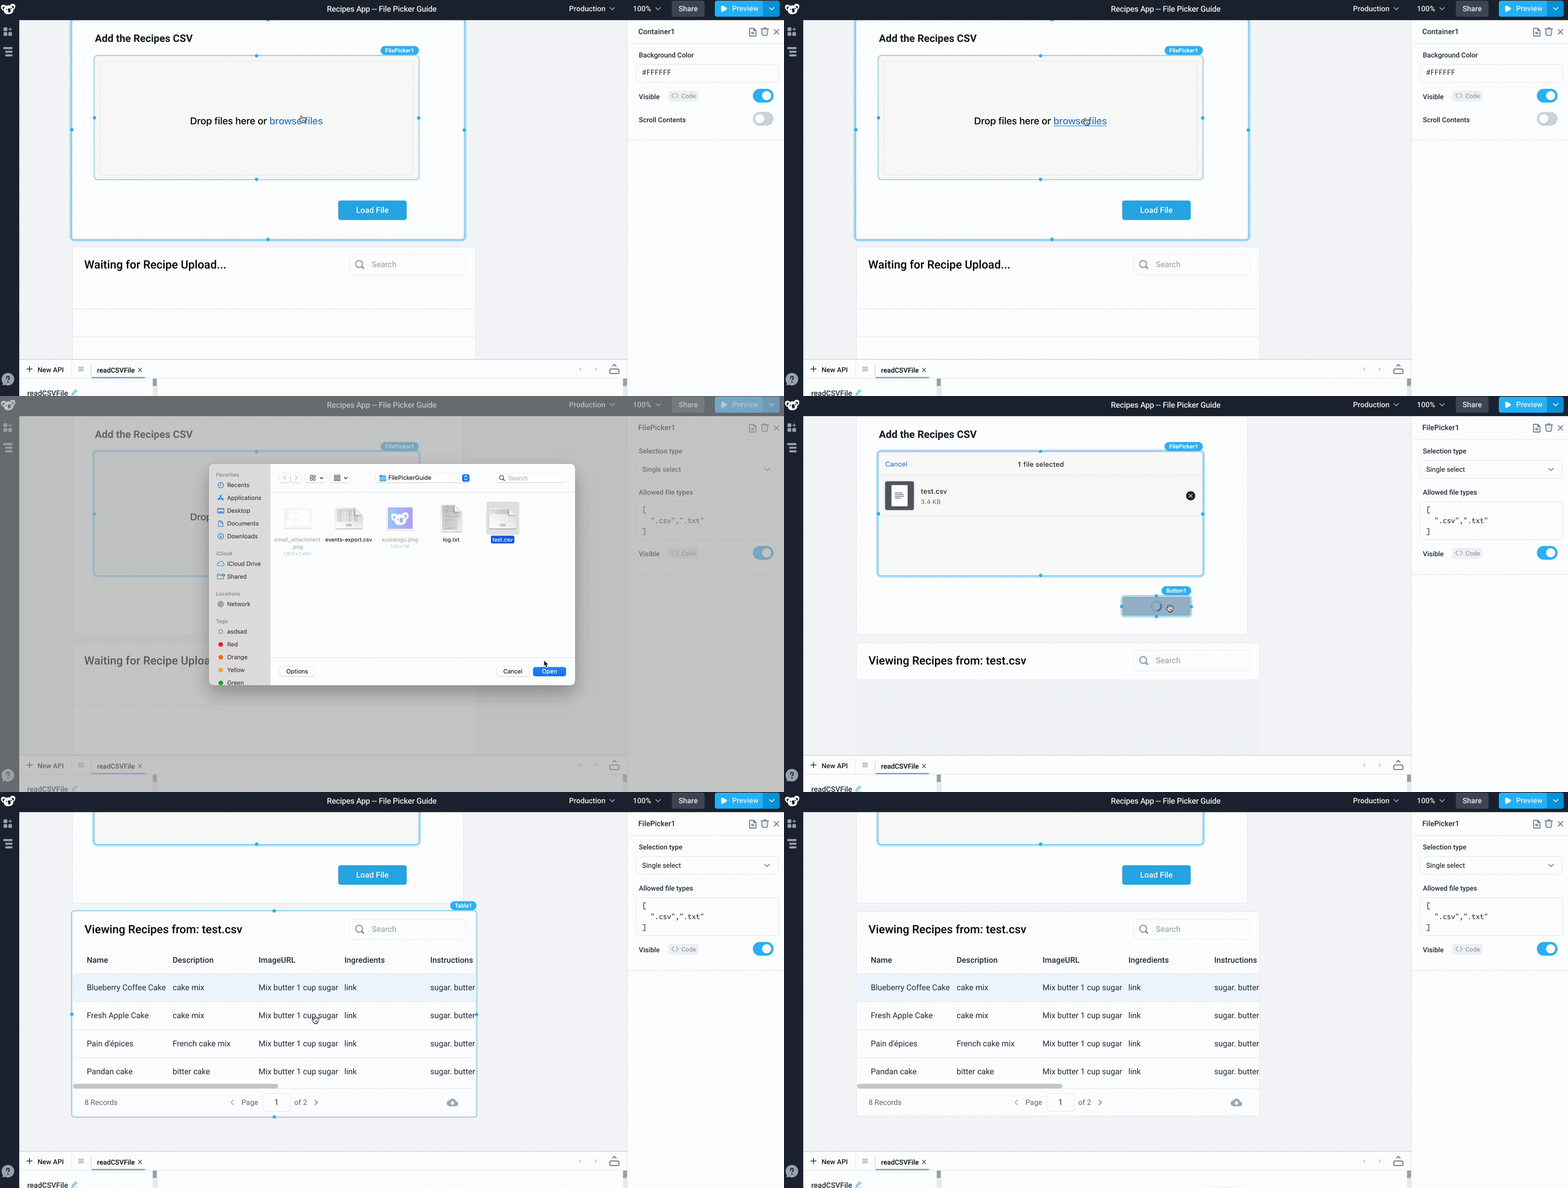
This guide will quickly walk you through how to use the FilePicker in order to create a basic recipes explorer.
Use FilePicker to import files
- Start by dragging a Container component from the Components panel to the empty canvas.
- Now add a FilePicker component inside of the Container component.
- Add a Button component inside of the Container component as well. Change the Label to
Load File. - Lastly, add a Text component inside of the Container component. Change the Text to
Add the Recipes CSV. Change the Text Size toHeading 2.
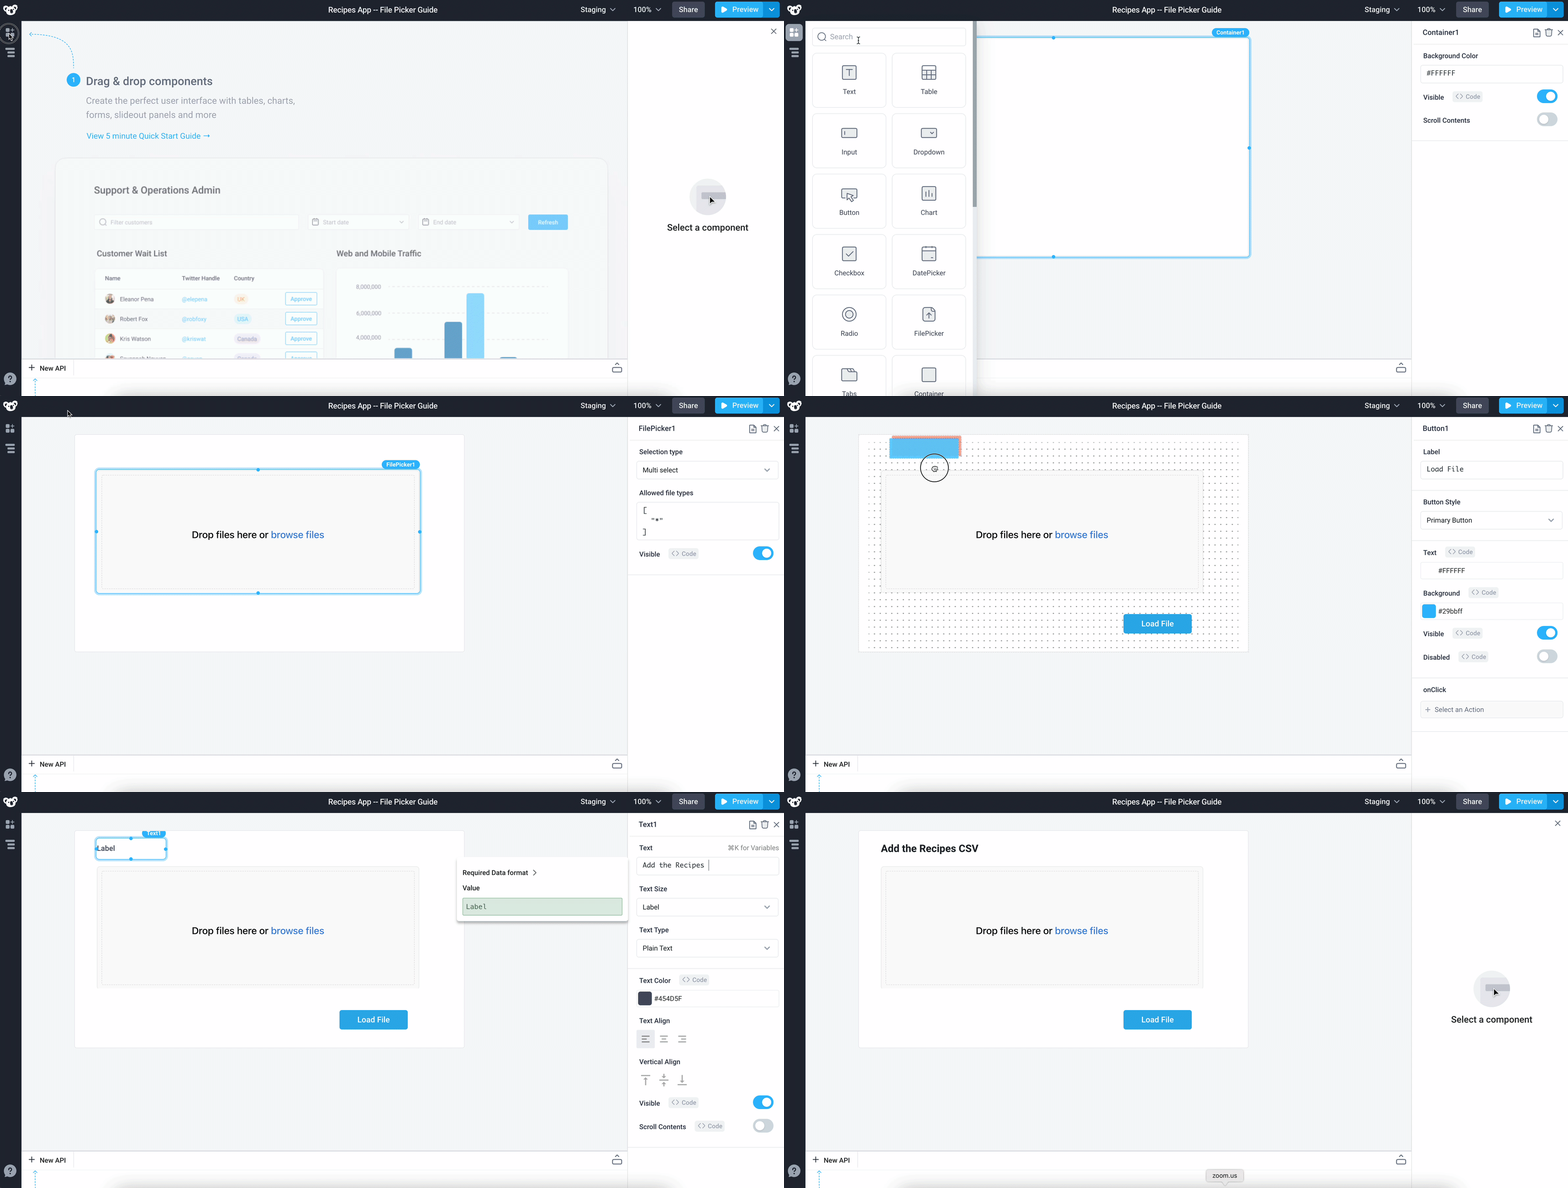
To configure our FilePicker to only allow certain file types, follow these steps:
- Click the FilePicker widget to open the right side Properties panel.
- Change Selection type to
Single select. - Update the Allowed file types to only allow
.csvand.txtfile types:
[
  ".csv",".txt"
]
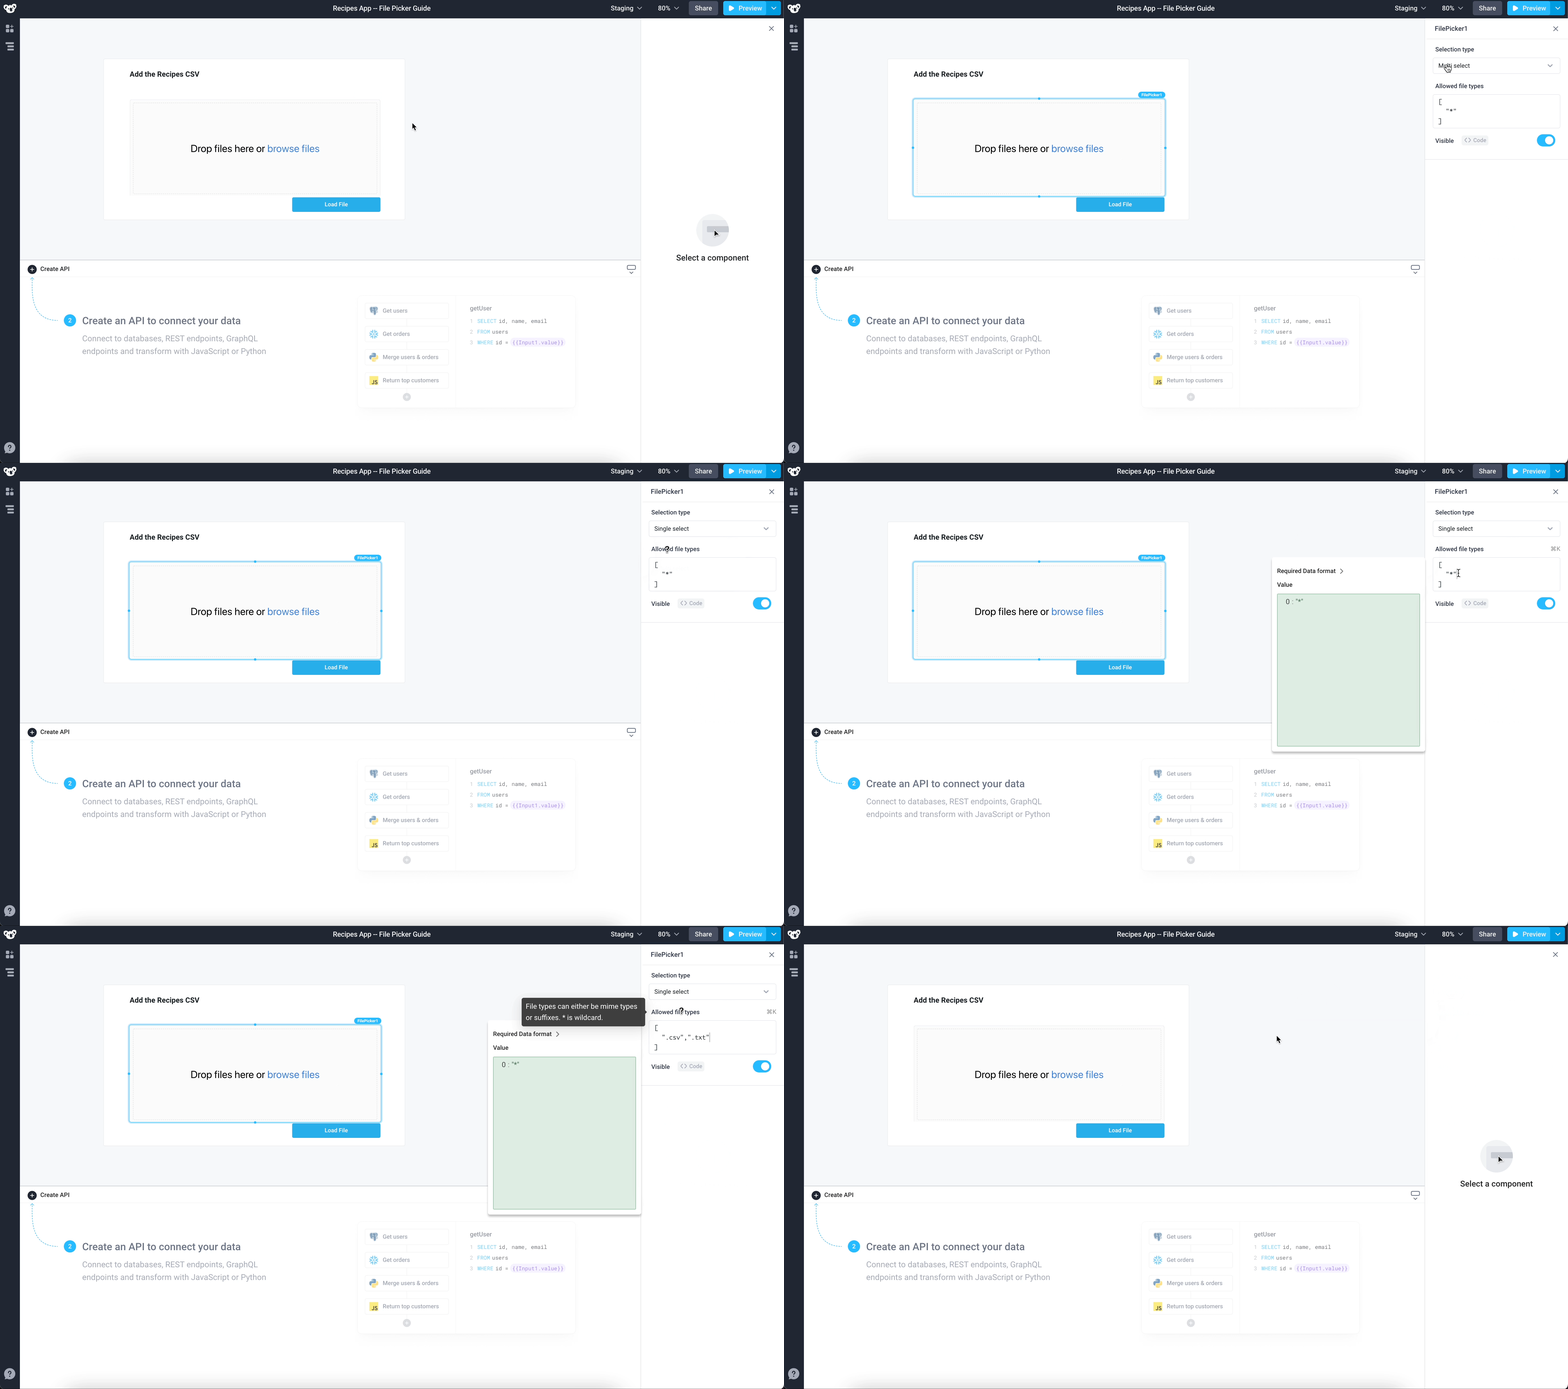
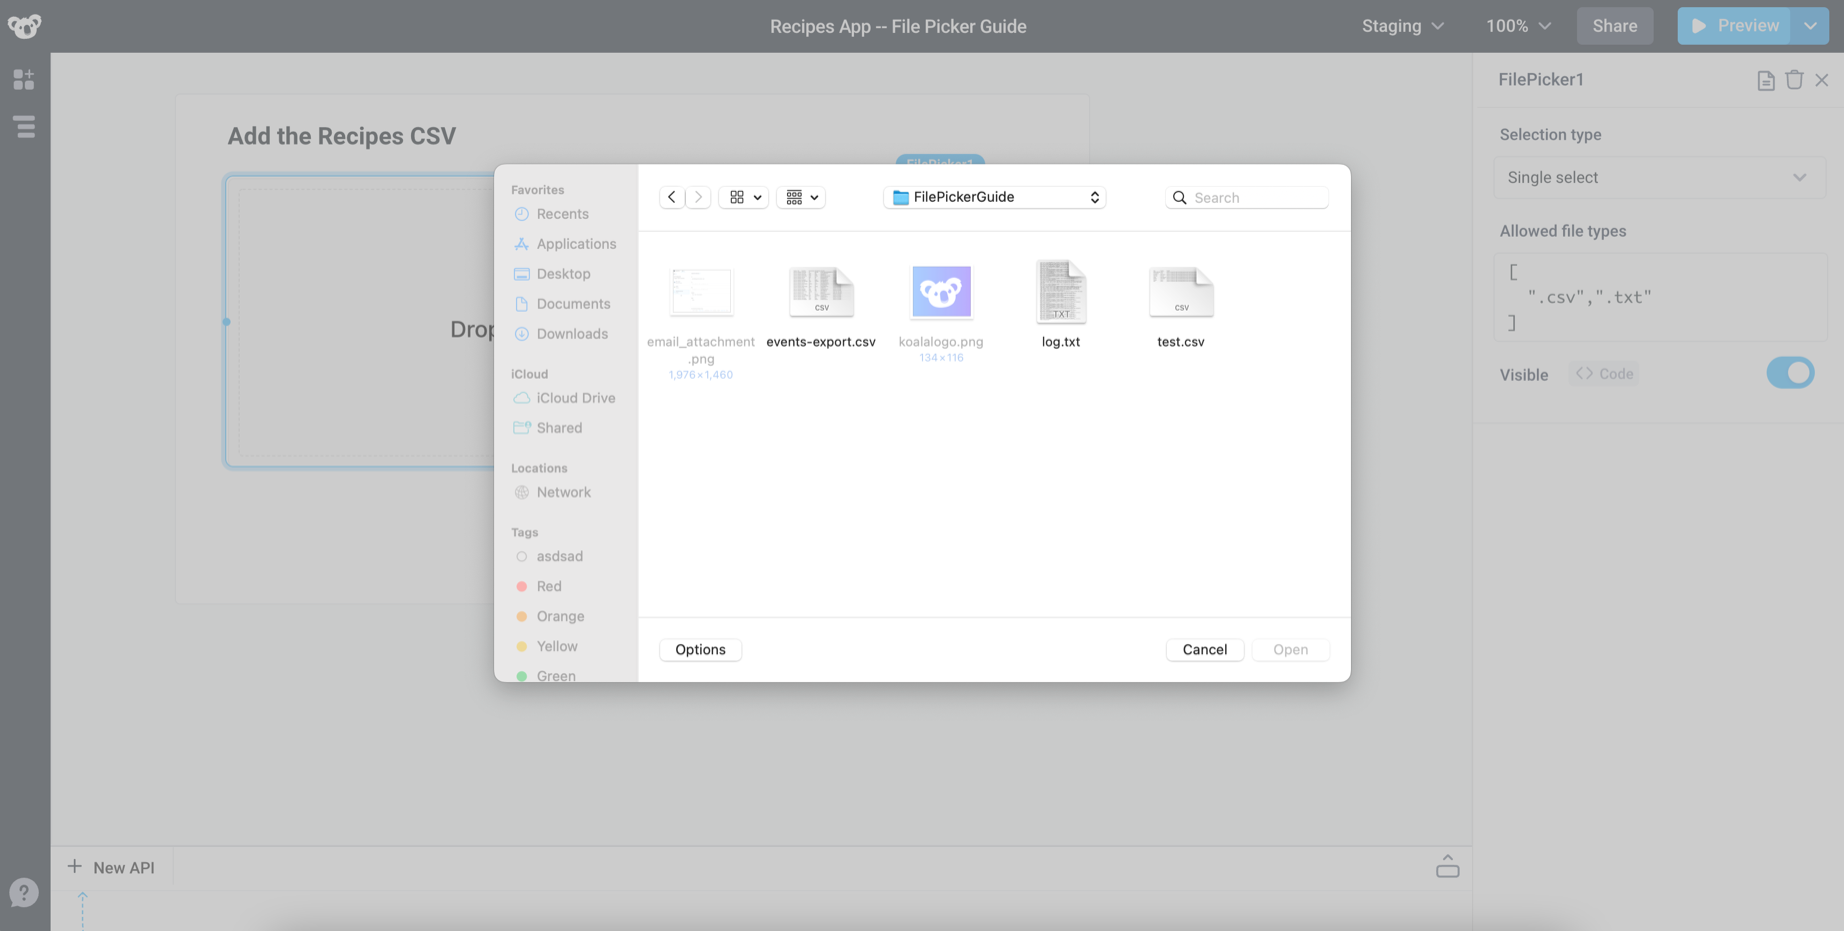
Now that we've restricted the file types allowed, you'll see that only .txt and .csv are available after clicking browse files.
Create an API to parse imported CSV
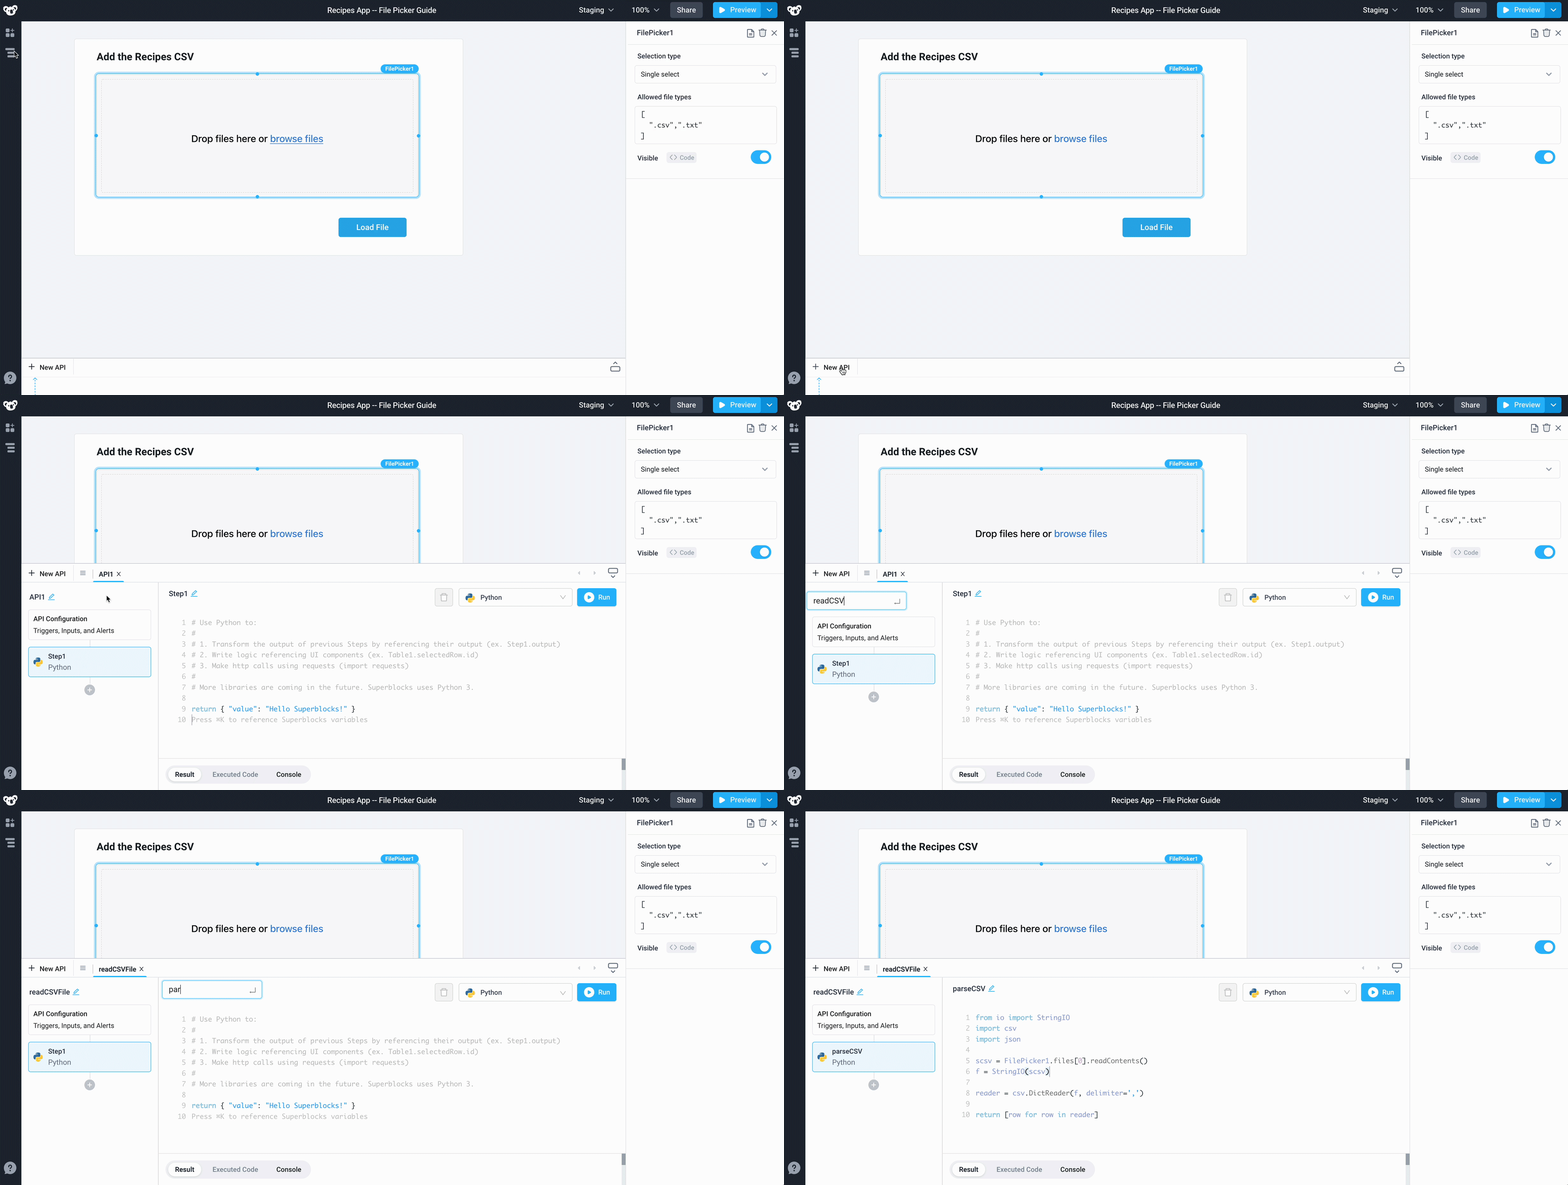
Now let's create an API in order to add some more functionality to our FilePicker component and show its data in a Table.
- Click New API and select
Pythonas the type - Change the name of the API to
readCSVFile - Change the name of the step to
parseCSV - Paste in the following code, which loads and reads the
.csvfile:
from io import StringIO
import csv

scsv = FilePicker1.files[0].readContents()
f = StringIO(scsv)

reader = csv.DictReader(f, delimiter=',')

return [row for row in reader]
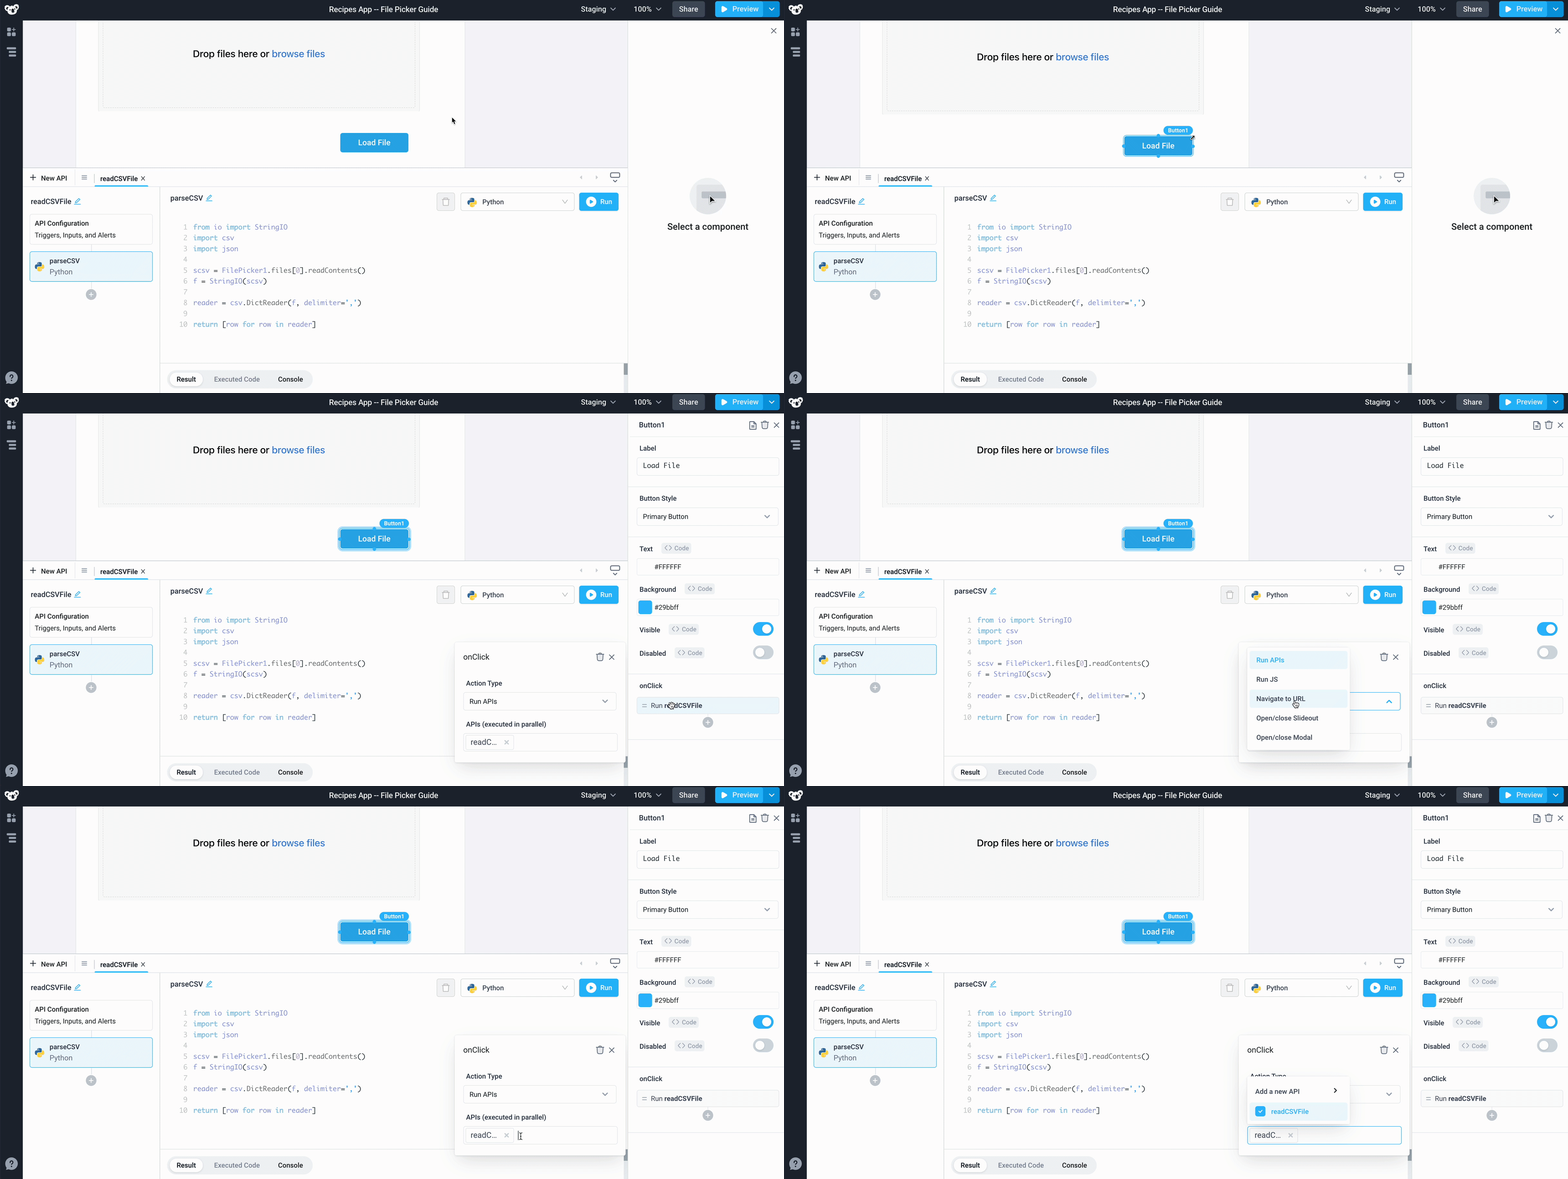
Now that the API is up and running, update the Button component to have the readCSVFile API run when it's clicked. Select Run API as the Action Type for the onClick trigger and choose the readCSVFile API.
Show the file's data in a Table
- Drag a Table component from the Component panel and place it below the Container component.
- Update Table Data to
{{readCSVFile.response}} - Update Table Header to the following code snippet to dynamically update the table's header based on the file loaded:
{{FilePicker1.files[0] ? "Viewing Recipes from: " + FilePicker1.files[0].name : "Waiting for Recipe Upload..."}}
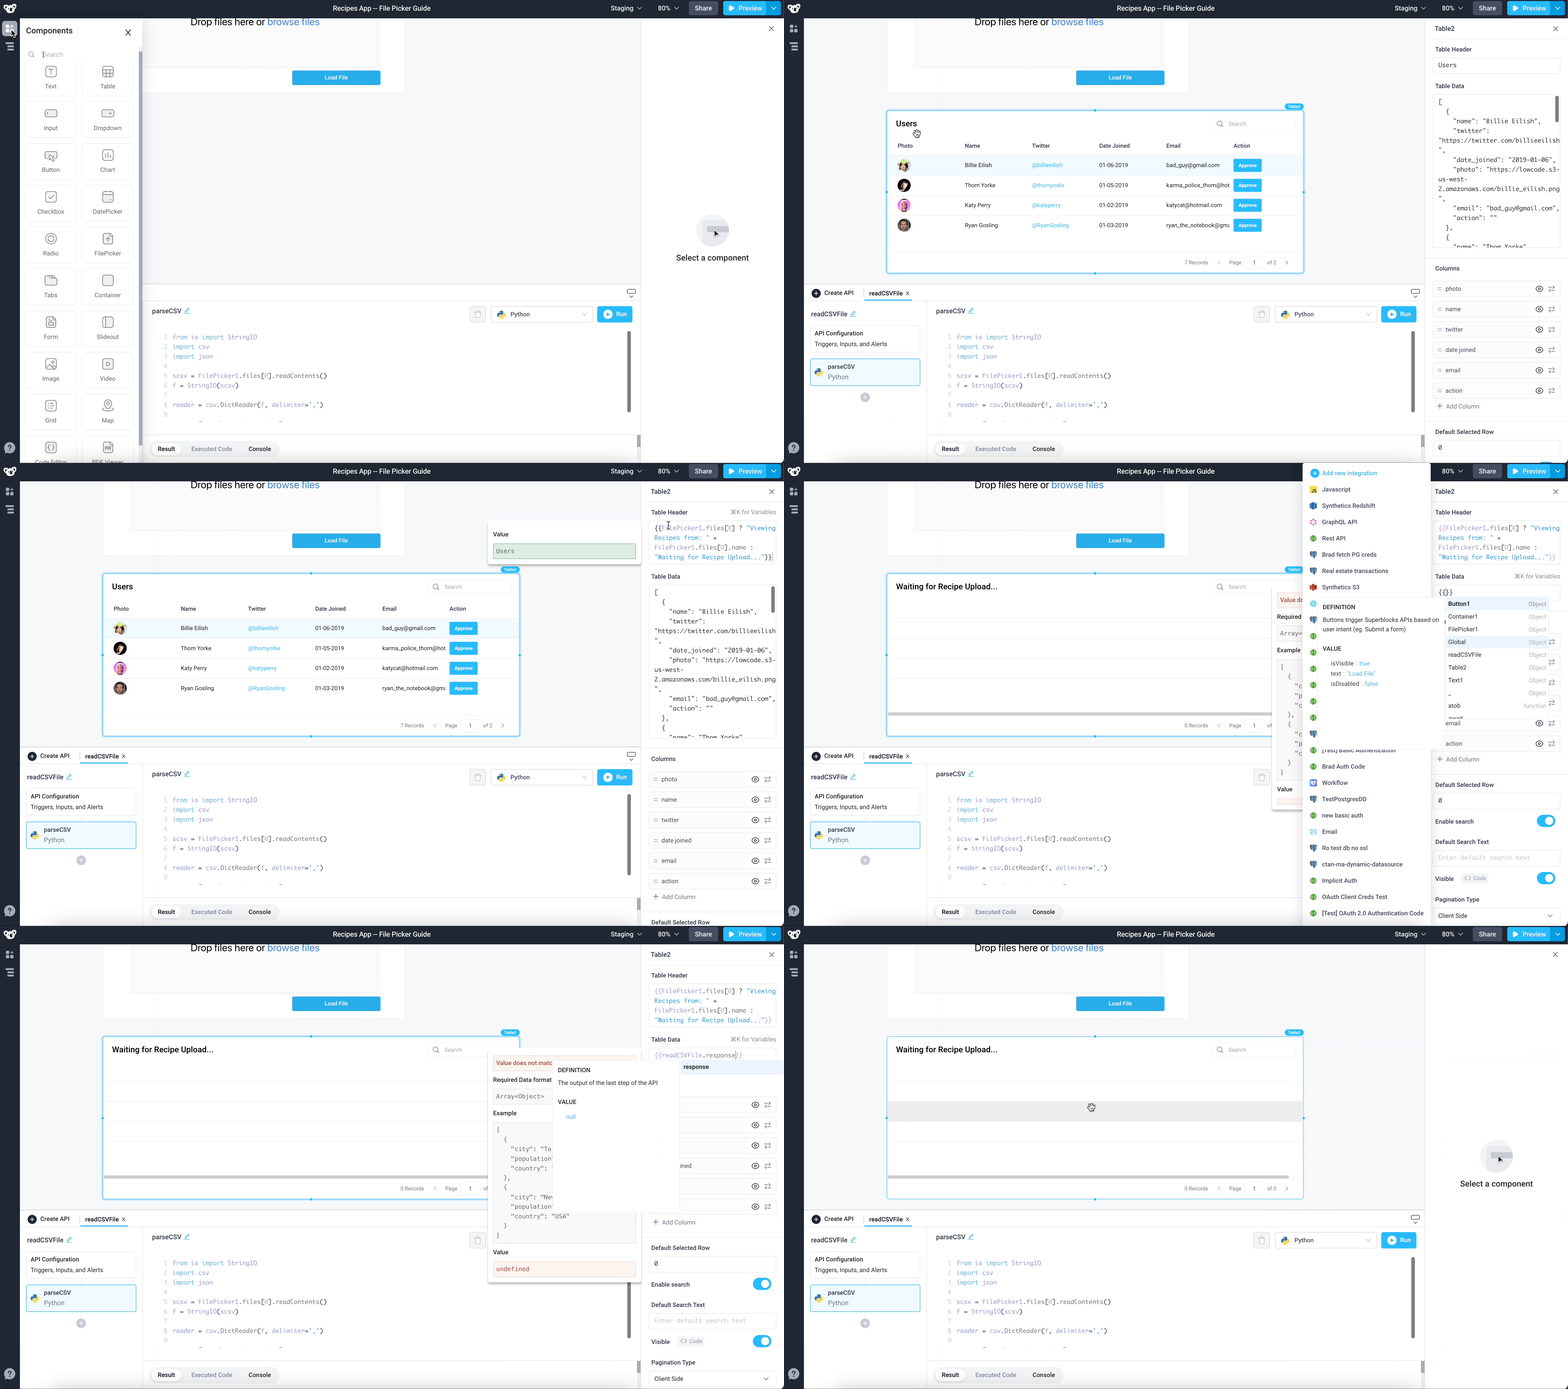
You now have a working app that imports a csv file and shows it in a table!
Upload file to S3
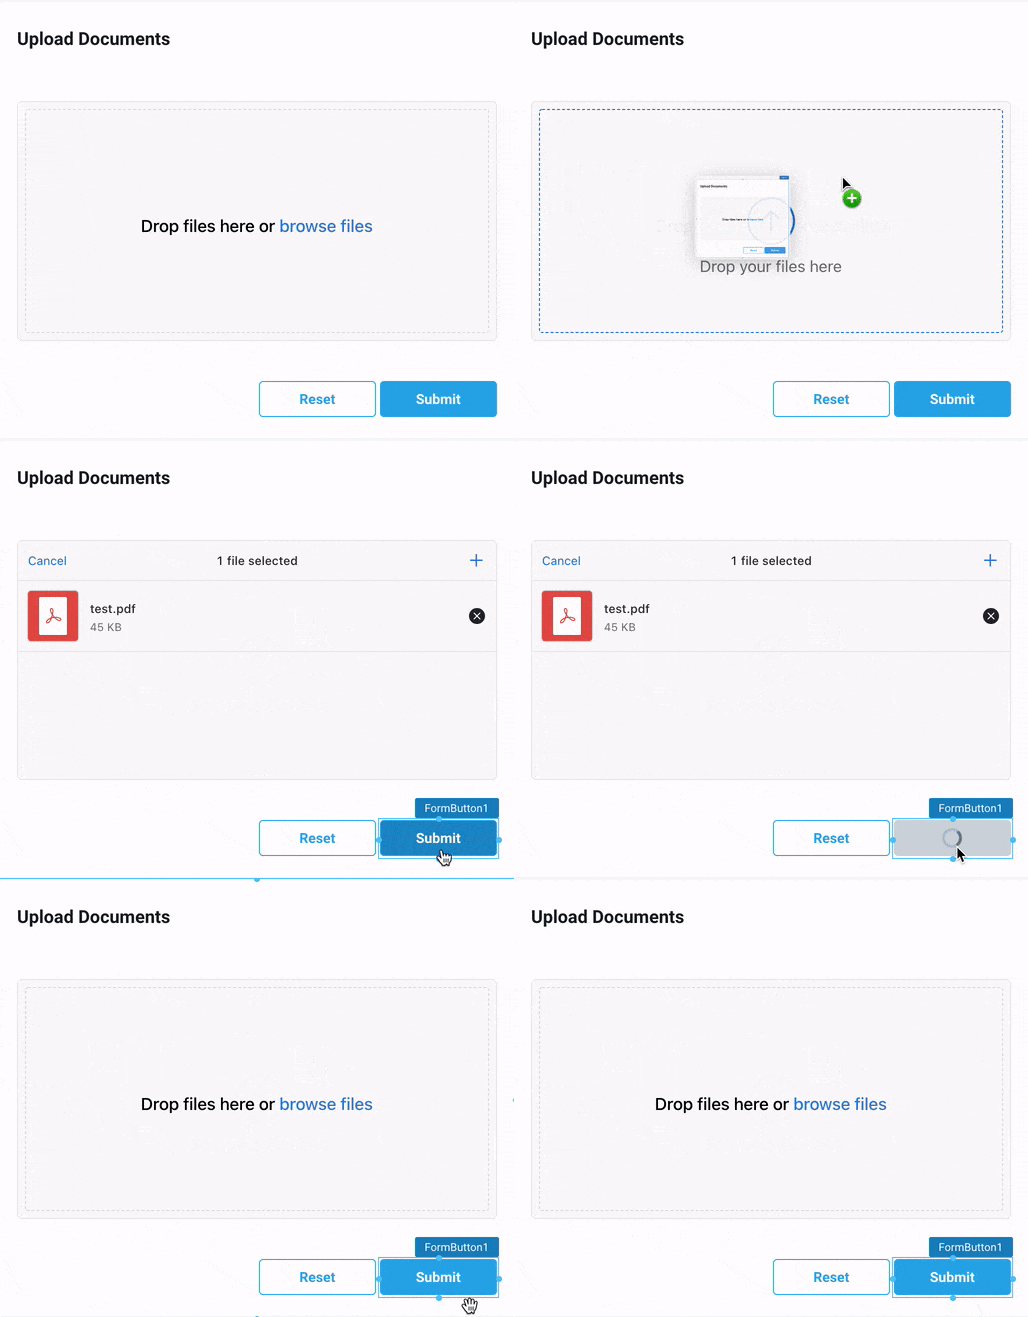
In this example, we will allow users to upload PDF and Microsoft Office documents to our S3 store.
-
Before starting, set up an S3 integration and note the name of the S3 bucket that you will upload to.
-
Drag and drop the Form component, and then drag and drop the FilePicker component inside the Form.
-
Change the "Allowed Files Types" to
["application/pdf", ".doc", ".docx"]. -
Click the Submit button to open the button properties. Under "onClick", add a new API to call. Choose the S3 integration from above.
-
Change the S3 action to "Upload Multiple Files", and configure the bucket name. Type
{{FilePicker1.files}}as the File Objects Array. Alternatively, to allow for uploading a single file, set the S3 action to "Upload File" and set File Content to{{FilePicker1.files[0].readContents("raw")}}. -
If you want to customize the name of each file, for example by adding a prefix, write this snippet instead:
{{FilePicker1.files.map((file) => ({...file, name: '/prefix/' + file.name }))}} -
Go back to the User Interface editor and select a file. Click "Submit" to upload the file. When the API is finished running, the form will clear itself.
Display an uploaded file in an image component
This is a short guide on how to display a jpeg file that was uploaded via a FilePicker component in an Image component. Instructions for uploading and displaying other types of data can be found below:
Files uploaded via the FilePicker are temporarily stored in your browser and do not persist between sessions. Consider uploading files to an external storage location (e.g.,
Amazon S3
) for permanent storage.
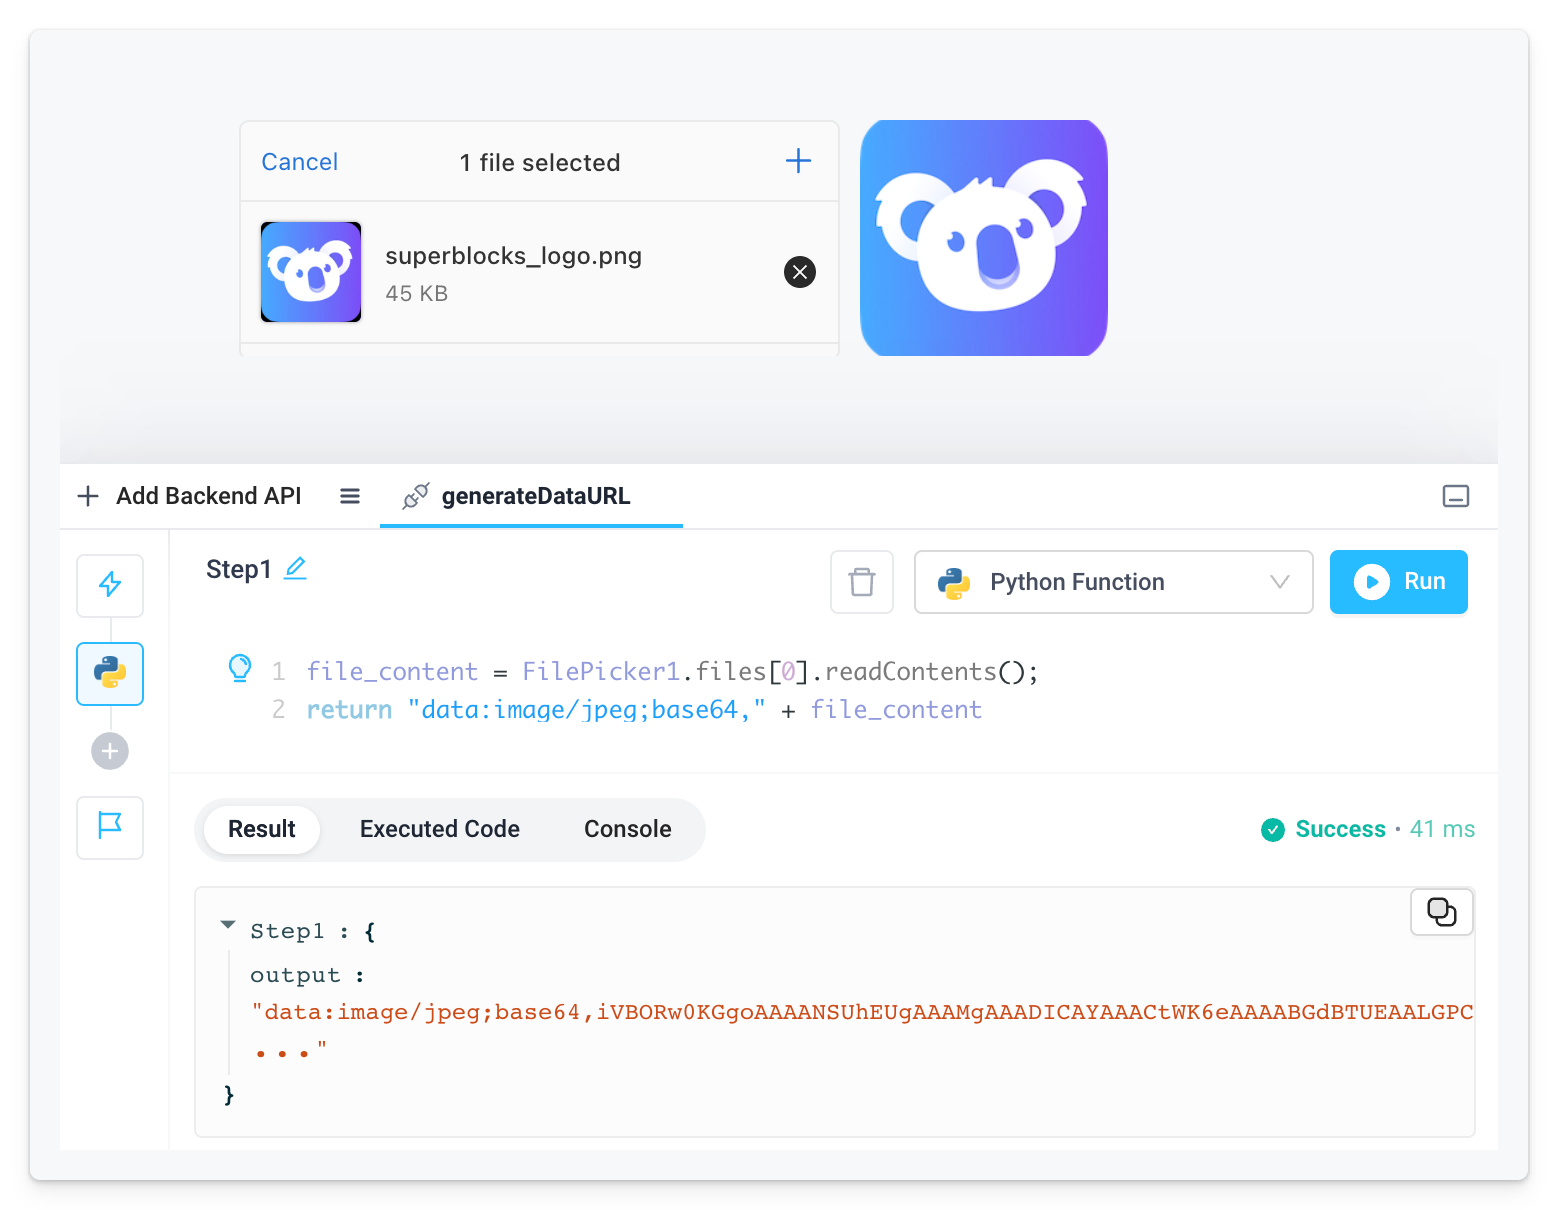
- Add a FilePicker component to the canvas.
- Add an Image component to the canvas.
- Add a new Backend API that has a single Python step.
- Add the following code to the Python step to construct a Data URL from the file content:
file_content = FilePicker1.files[0].readContents();
return "data:image/jpeg;base64," + file_content
- Rename the API to
generateDataURL. - Click on the Image component and set the Image property to
{{generateDataURL.response}}. - Upload a
.jpegfile via the FilePicker. - Run the Backend API by clicking the blue Run button.
What are Data URLs?
Data URLs, also known as data URIs (Uniform Resource Identifiers), are a type of URI scheme that allows data to be embedded directly within a URL. In other words, a data URL contains the actual data itself instead of pointing to a separate resource.
Data URLs consist of four components: a prefix (data:), a MIME type that specifies the data type, an optional base64 token when dealing with non-textual data, and the actual data. The mediatype is a MIME type:
data:[<mediatype>][;base64],<data>
Replace the Data URL in the guide above with an example from the table below if you want to upload and display a file of a different data type:
| File type | Data URL |
|---|---|
| jpeg | data:image/jpeg;base64," + file_content |
| png | data:image/png;base64," + file_content |
| gif | data:image/gif;base64," + file_content |
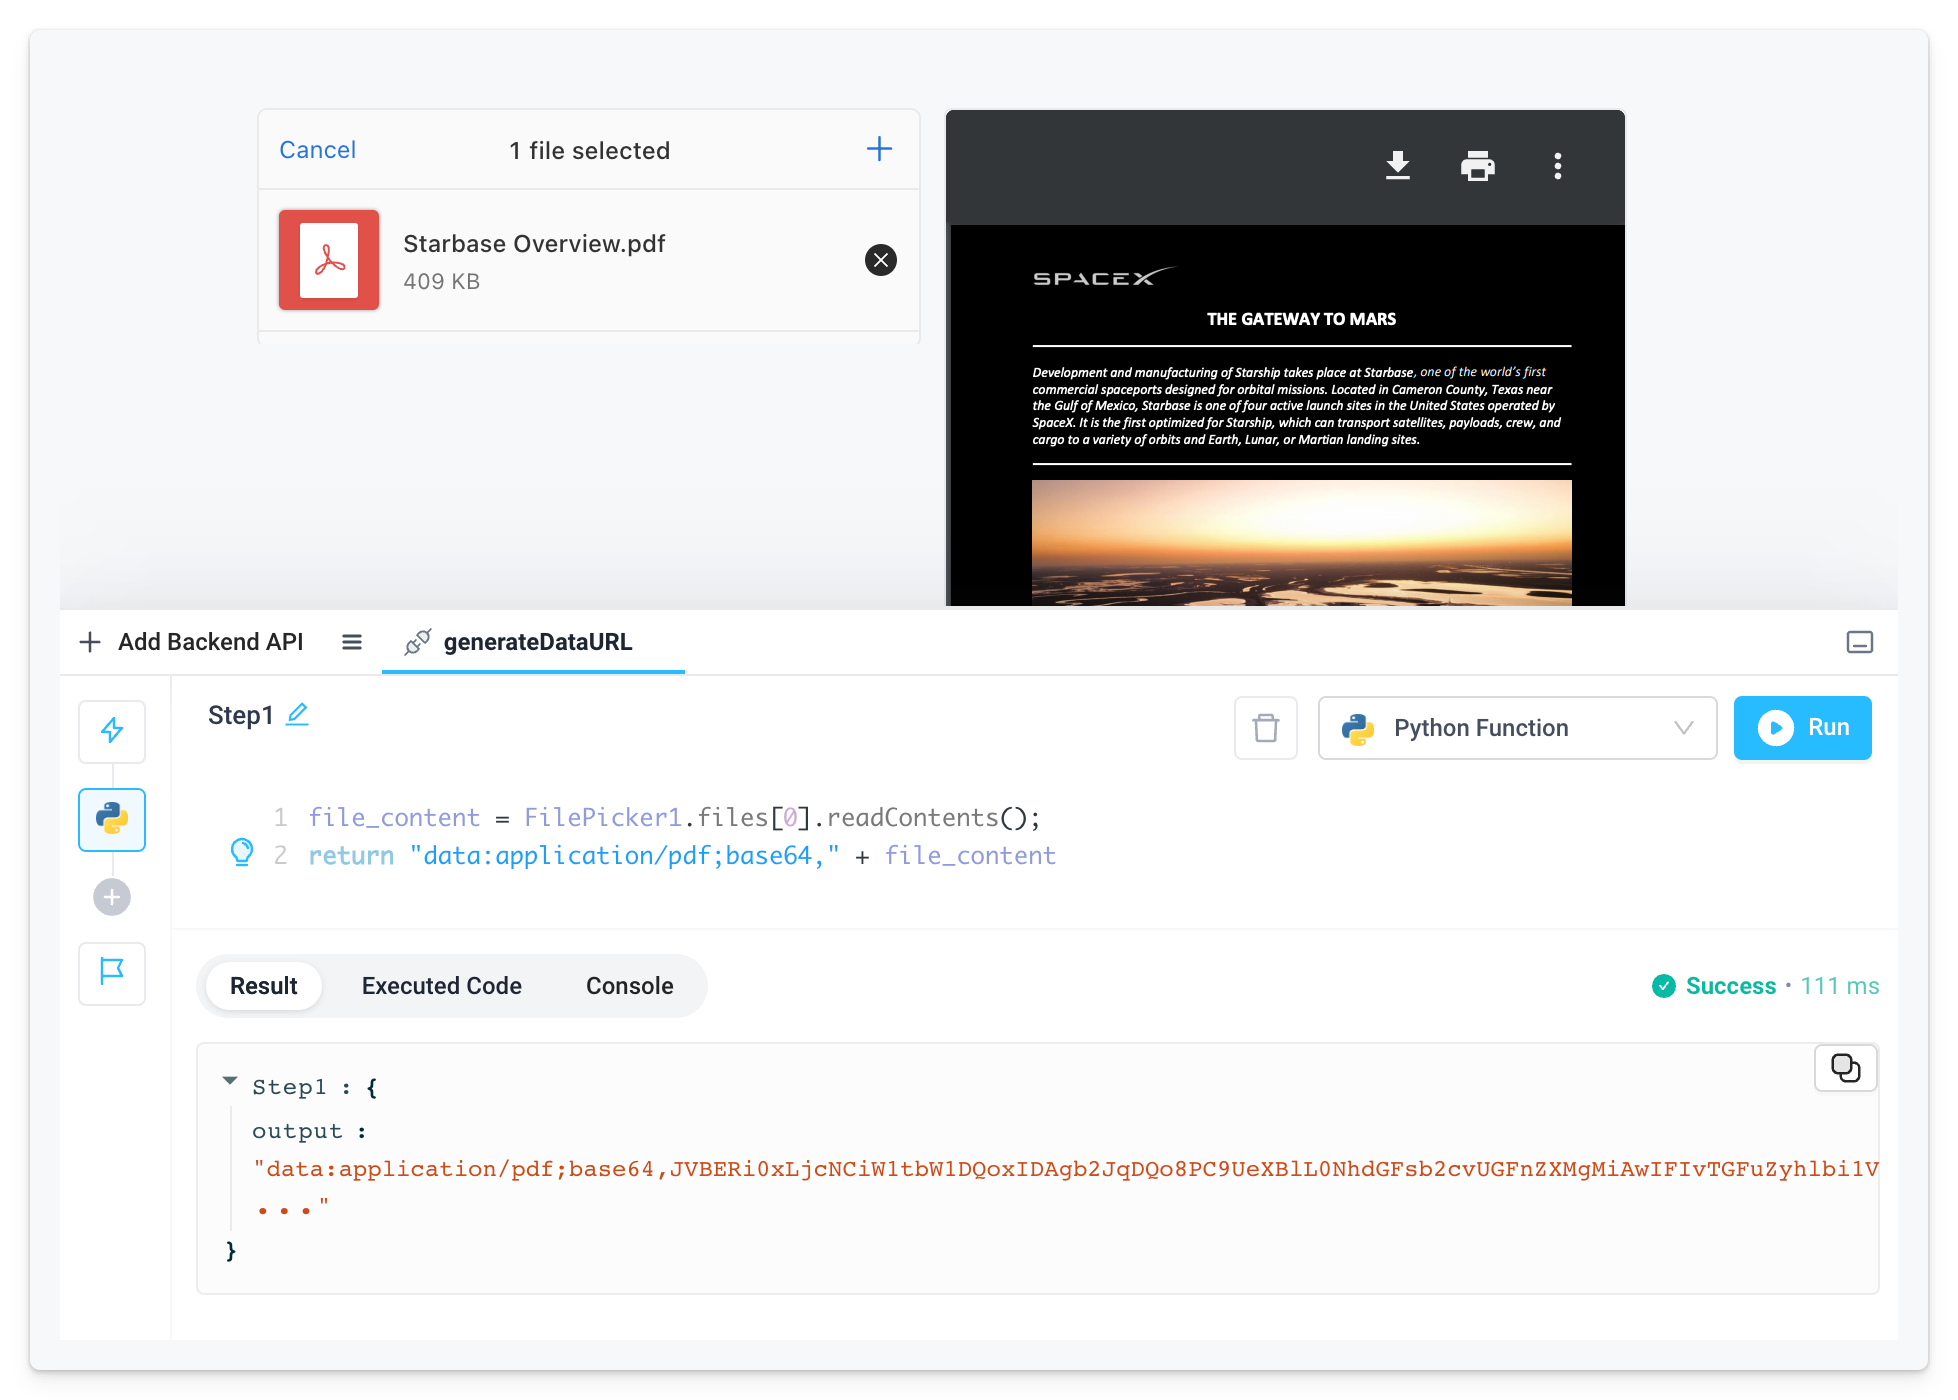
| data:application/pdf;base64," + file_content | |
| ... | find more types here. |
Example: Display a pdf file uploaded via a file picker in a PDF viewer component:
The PDF files that are uploaded via the File Picker component and passed to the PDF viewer component must be < 2 MB.
