Prerequisites
To follow this guide, you’ll need:- An Okta account with the following permissions:
- An existing Superblocks SSO configuration using Okta OIDC
- A Snowflake account with
ACCOUNTADMINpermission
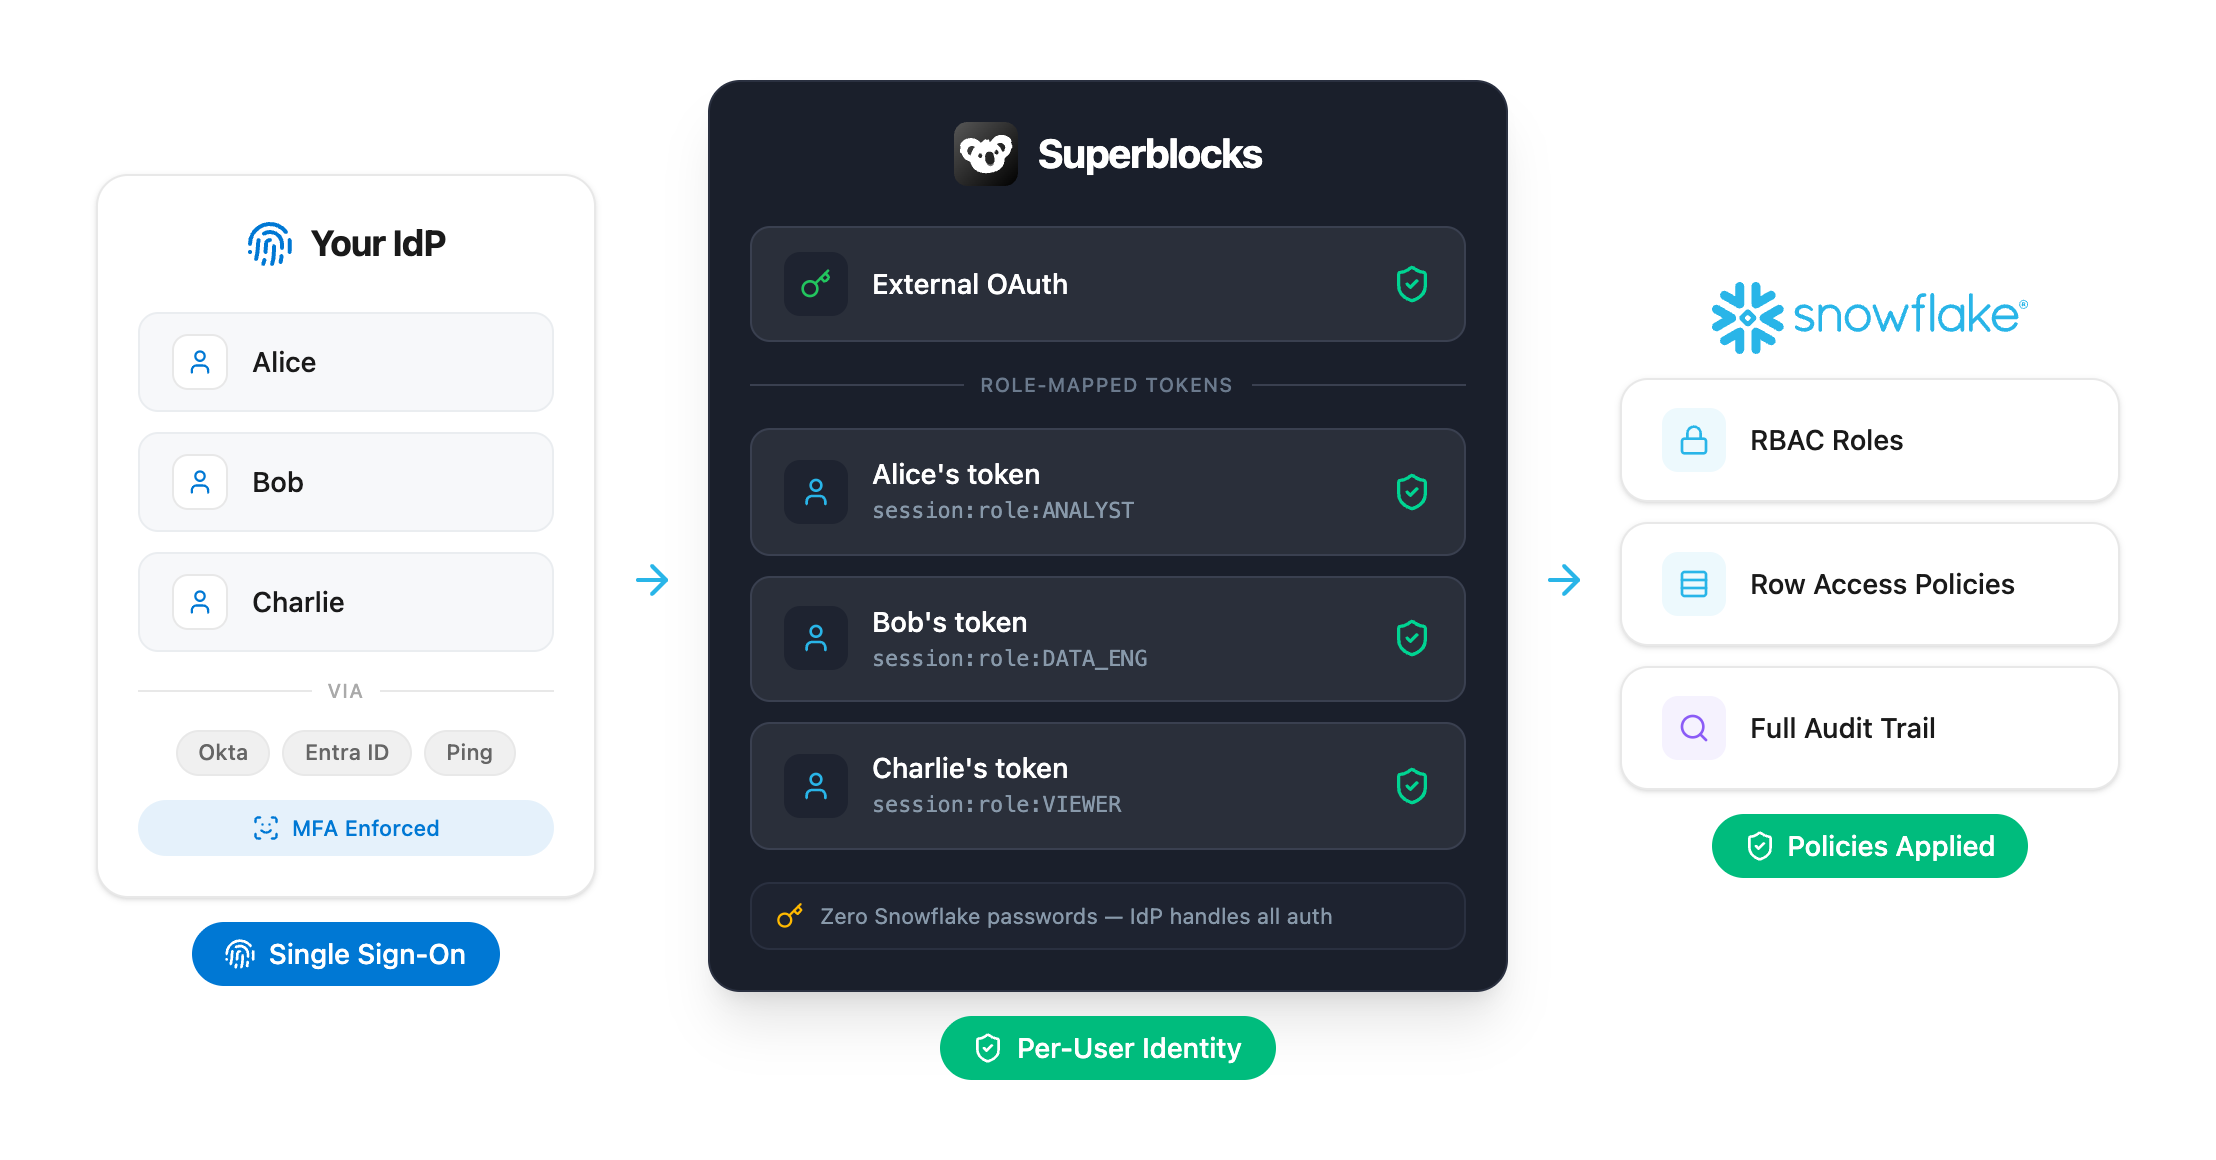
External OAuth flow
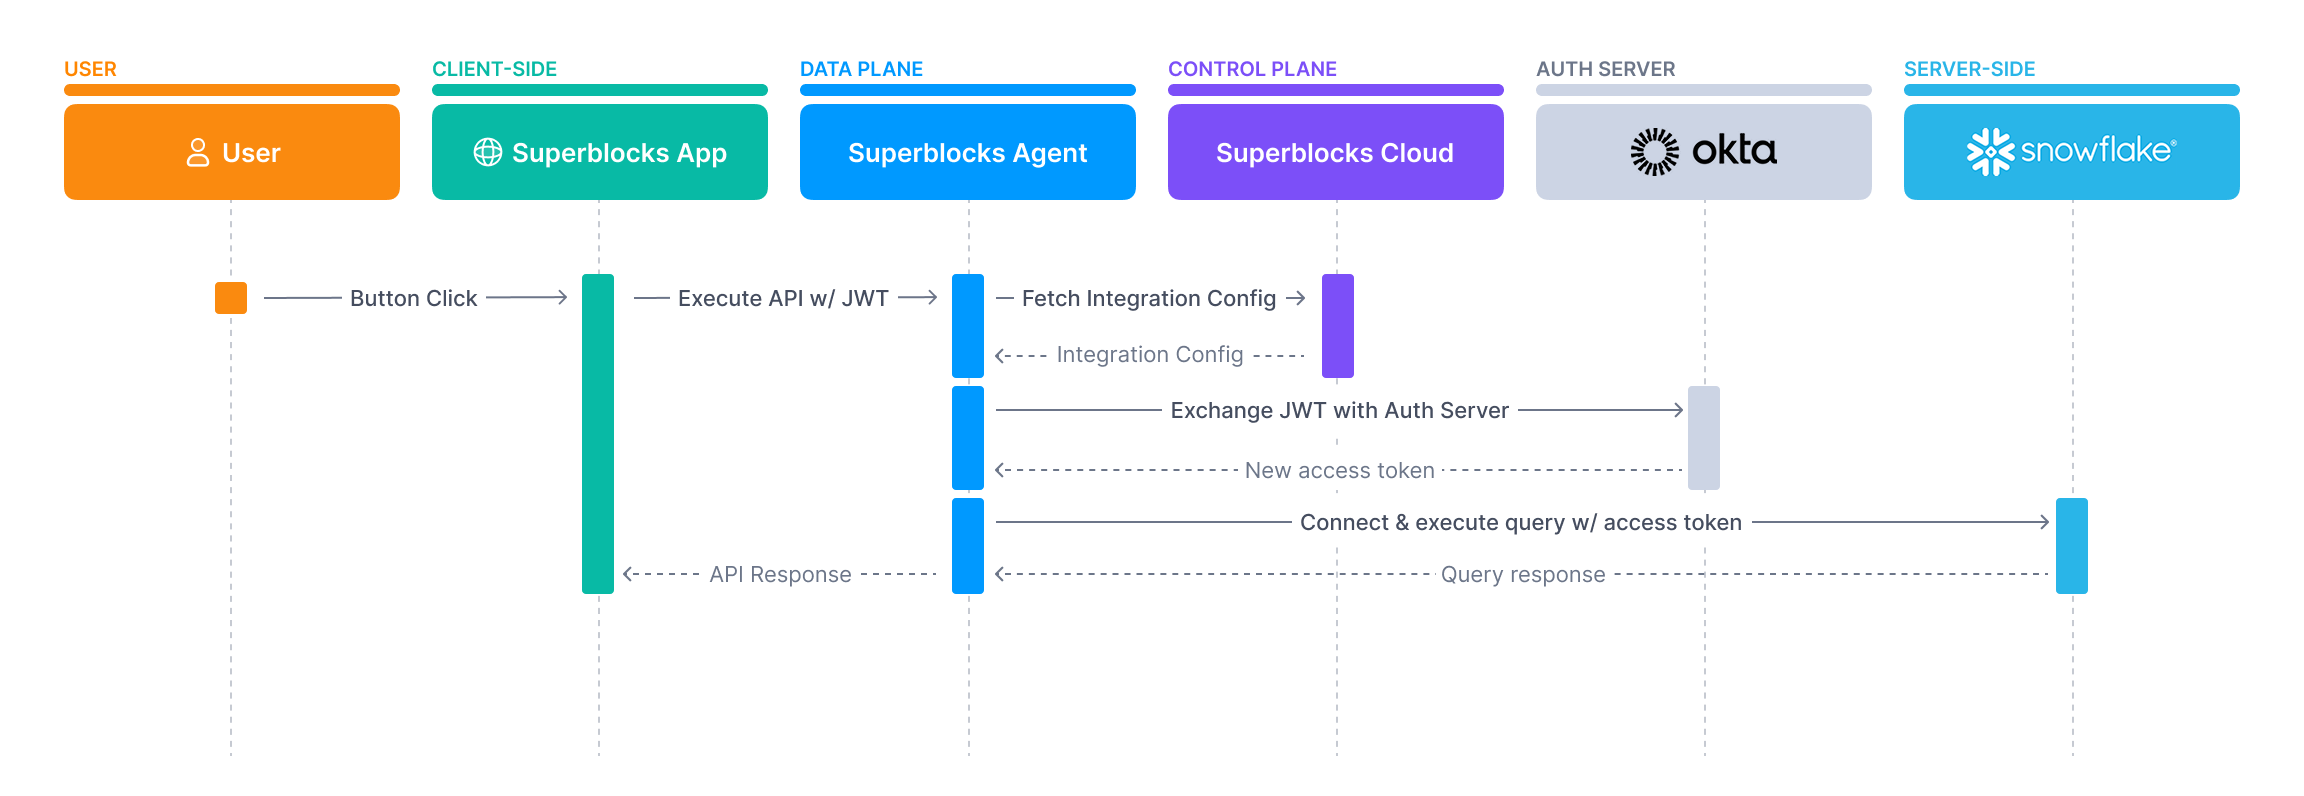
- Your user will log in to Superblocks using your Okta OIDC app
- When the user executes an API, a request is sent from the browser to the Superblocks Agent that includes the user’s Okta JWT
- If the API includes a step to query Snowflake, the Superblocks Agent will make a request to your Okta authorization server to exchange the user’s Okta JWT for a new access token intended for Snowflake
- The Okta authorization server will validate the user’s JWT and grants a new access token with the necessary
sub,aud, andscpto access Snowflake - The Superblocks Agent connects to Snowflake using this access token
- Your Snowflake instance validates the JWT and decodes it to authenticate the user to Snowflake
- Provided the user is authenticated, Superblocks executes their query and returns data to the browser
- Snowflake’s docs to Configure Okta for External OAuth
- Okta’s docs on Authorization Servers
- Superblocks docs on OAuth 2.0 - On-Behalf-Of Token Exchange
Setup instructions
The following instructions show how to configure Okta, Snowflake, and Superblocks to perform the token exchange.Create an API in Okta
To perform the token exchange, you’ll need to create an API application that the Superblocks Agent will use to act as an OAuth client.- Log in to Okta and go to the Admin Console
- Navigate to Applications → Applications
- Click Create App Integration
- Select API Services followed by Next
- Name the app something like Superblocks Integration and click Save
- Click Edit in the General Settings section of the General tab
- Uncheck the checkbox for Require Demonstrating Proof of Possession (DPoP) header in token requests
- Check the checkbox for Token Exchange and click Save
- Make a note of the
Client IDin the Client Credentials section and theClient Secretin the CLIENT SECRETS section
Create an authorization server
During the token exchange, the Superblocks Agent exchanges the user’s OpenID access token granted during log in with an Okta Authorization Server configured to issue tokens for Snowflakes.Create the authorization server
- In the Admin Console, go to Security → API
- On the Authorization Servers tab
- Click Add Authorization Server and in the dialog enter the following:
- Name: Snowflake Authorization Server
- Description: Issue access tokens for Snowflake
- Audience: The URL of the Snowflake account you want to connect to. For example
https://<your-snowflake-account>.snowflakecomputing.com
- Click Save
Finding your Snowflake Account URL
Finding your Snowflake Account URL
If you don’t know your Snowflake account URL, log into Snowflake and click on the profile icon, as shown below, to copy the URL.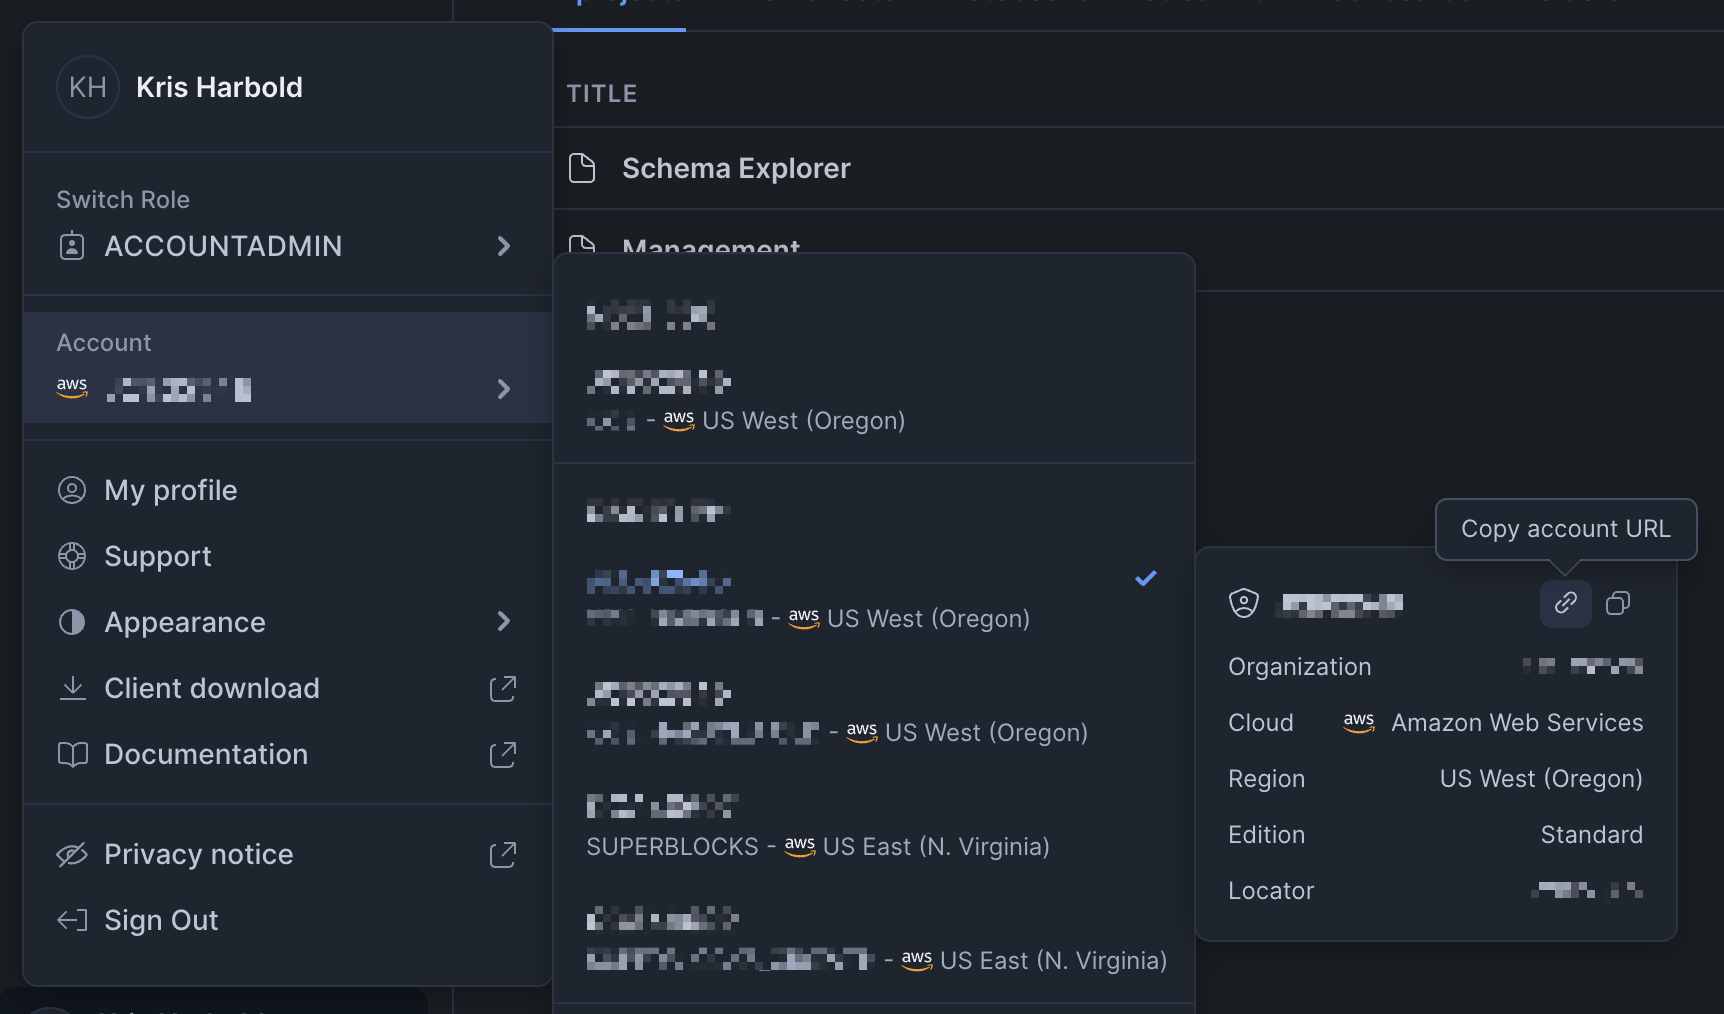
Add session:role-any scope
- From the authorization server, select the Scopes tab
- Click Add scopes
- In the dialog, enter the following:
- Name:
session:role-any - Display phrase:
session:role-any - Description: Ask Snowflake to let Superblocks assume the user’s roles
- User consent: Implicit
- Metadata: Include in public metadata
- Name:
- Click Save

Create access policies and rules
- From the authorization server, select the Access Policies tab and click Add Policy
-
In the Add Policy dialog that appears, enter the following:
- Name: Access Superblocks
- Description: Enter a description
- Assign to: Select The following clients and search for your organization’s Superblocks SSO application
- Click Create Policy
-
Click Add Rule and in the dialog that appears, enter the following:
- Name: Superblocks App to Agent
- AND Scopes requested: Select The following scopes and enter
openid
- Click Create rule
-
Repeat steps 1 - 5 to create a policy and a rule that lets the Superblocks Agent talk to Snowflake.
Use the following values for the policy:
- Name: Access Snowflake
- Assign to: Select The following clients, start typing the name of the API that you created earlier
- Name: Agent to Snowflake
- AND Scopes requested: Select The following scopes, and select the
session:role-anyscope - AND Refresh token lifetime is: Unlimited (this is recommmended but not required)
Collect Okta information
- From the authorization server, select the Settings tab
- Click on the Metadata URI link to open the metadata document
- In this document, locate the following values:
| Metadata Value | Example | Snowflake Reference Value |
|---|---|---|
issuer | https://dev-111111.oktapreview.com/oauth2/auslh9j9vf9ej7NfT0h7 | OKTA_ISSUER |
jwks_uri | https://dev-111111.oktapreview.com/oauth2/auslh9j9vf9ej7NfT0h7/v1/keys | OKTA_JWS_KEY_ENDPOINT |
token_endpoint | https://dev-111111.oktapreview.com/oauth2/auslh9j9vf9ej7NfT0h7/v1/token | OKTA_OAUTH_TOKEN_ENDPOINT |
Create Snowflake security integration
With the information you’ve gathered from your Okta Authorization Server, you’ll now create a security integration in Snowflake. The security integration ensures that Snowflake can communicate with Okta securely, validates the tokens from Okta, and provides the appropriate Snowflake data access to users based on the user role associated with the OAuth token. For more information, see Snowflake’s docs on CREATE SECURITY INTEGRATION- Log in to your Snowflake account
- Change your current role to
ACCOUNTADMINor to a role with the globalCREATE INTEGRATIONprivilege - Run the following SQL command
Update SSO metadata
Superblocks SSO by default uses your Okta Org Authorization Server. To use token exchange flows, we’ll need to update your SSO configuration to a Custom Authorization Server. To do this, we will need to know the.well-known/openid-configuration URL of the Snowflake Authorization Server you just created. To locate this URL:
- Go to the Settings tab of your Snowflake Authorization Server
- Copy the Metadata URI shown in the Settings section
- Replace
oauth-authorization-serverwithopenid-configuration - Send this link to support@superblocks.com with the Subject Update Okta SSO to us Token Exchange
Configure Snowflake integration
Once you’ve gotten confirmation from Superblocks that we’ve updated your SSO to use the new Authorization Server, you’re ready to configure your Snowflake integration. To do so:- Navigate to the Integrations page and locate your Snowflake integration or create a new one
- In the Connection method dropdown, select External OAuth
- Choose Login Identity Provider as the Subject token source
-
Specifying the following configuration values:
Field
Required Description Account identifier ✓ Snowflake Account Identifier Token URL ✓ Set to the OKTA_OAUTH_TOKEN_ENDPOINTvalueClient ID ✓ The client_idof the API created earlierClient secret ✓ The client_secretof the API created earlierAudience ✓ SNOWFLAKE_ACCOUNT_URLScopes ✓ session:role-any
Testing & troubleshooting
Test your integration
With your integration updated to use your Okta authorization server, you’re ready to start writing queries.- In an Application create a new Backend API
- Add a step that uses your Snowflake Integration
- Run the SQL comment
SELECT CURRENT_USER(); - Click Run API
Common errors
There are several common errors you may see when using token exchange. The table below include error messages, why they happen, and how to address them.Error message | Why it’s happening | Resolution |
|---|---|---|
Could not find identity provider token | Your organization either doesn’t use SSO or it’s configured in a way that doesn’t support token exchange | Follow docs to set up Okta SSO or contact support@superblocks.com to update your configuration |
Identity provider token expired | Your Okta session has expired so the authorization server won’t issue an access token | Refresh your browser, you should be prompted to reauthenticate. If you’re not, log out and back in. |
Could not find a user JWT | The Superblocks Agent doesn’t have a user JWT so can’t extract a subject_token to send to Okta. It most likely is occurring because the integration is being used in a Workflow, Scheduled Job, or public App. | Refactor your code to use the integration in a Backend API |
Token exchange failed | Superblocks couldn’t successfully complete the token exchange with the Okta authorization server. | See the additional error details provided by Okta. You may also be able to find additional error information in your Okta system logs. |