Connection Options
There are multiple ways to connect to your integrations depending on how you deploy Superblocks (Cloud or On-Premise Agent) as well as the integration type.
- Connect from Superblocks Cloud
- Direct - Third-party SaaS APIs
- IP allowlist - Databases and non-public internal APIs
- SSH tunnel - Databases where direct access is restricted
- Connect from On-Premise Agent
Connect from Superblocks Cloud
By default, Superblocks Cloud acts as a proxy to your integrations. This makes it simple to get started and simple to manage.
Direct
For integrations with public third-party SaaS REST APIs, Superblocks Cloud can connect directly without any networking configuration.
IP allowlist
For databases and non-public internal APIs, we recommend using IP allowlists to protect your environment. When using the Superblocks Cloud deployment model, add the following IP addresses to your ingress allowlist in the network where your data sources reside.
- US Instance
- EU Instance
| NAT hostname | Current DNS | Last Recorded IPs |
|---|---|---|
| nat.superblocks.com | A Records | 107.22.228.2443.93.101.12434.209.17.5034.227.169.5135.155.119.17835.171.116.21435.86.18.13744.232.244.9354.148.33.216 |
| NAT hostname | Current DNS | Last Recorded IPs |
|---|---|---|
| nat.eu.superblocks.com | A Records | 52.17.136.21999.81.159.154.220.65.10713.50.50.6613.50.81.3013.51.231.18 |
info
Superblocks aims to rarely change these addresses. For the most up to date IP addresses, reference the current A records link above.
Implementation guide - AWS and GCP
- AWS
- GCP
- Log in to the AWS Console
- Navigate to the resource that you would like Superblocks to connect to
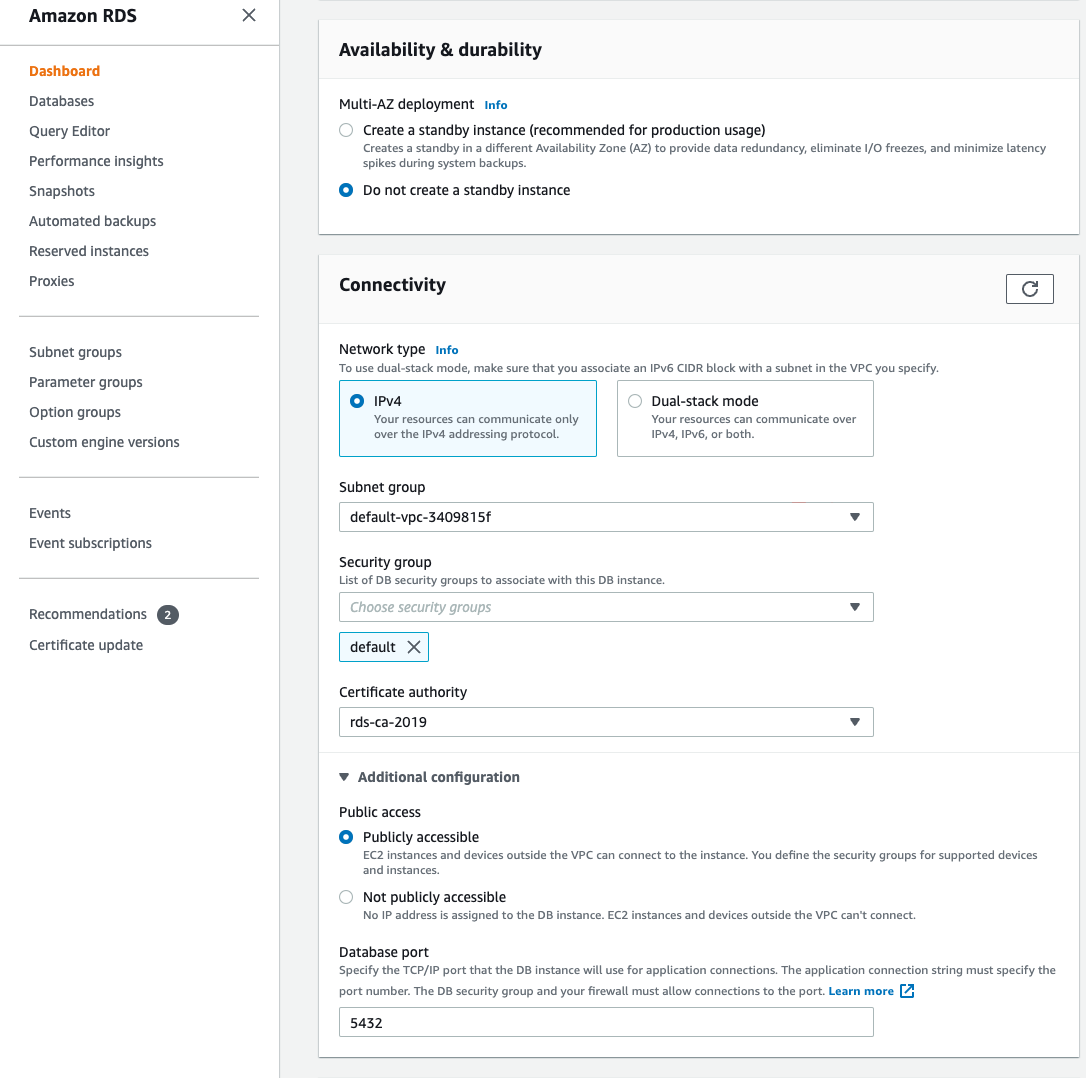
- If you are applying an allowlist to an RDS instance, the instance must be set to
Publicly accessible(this is found under Connectivity -> Additional configuration)

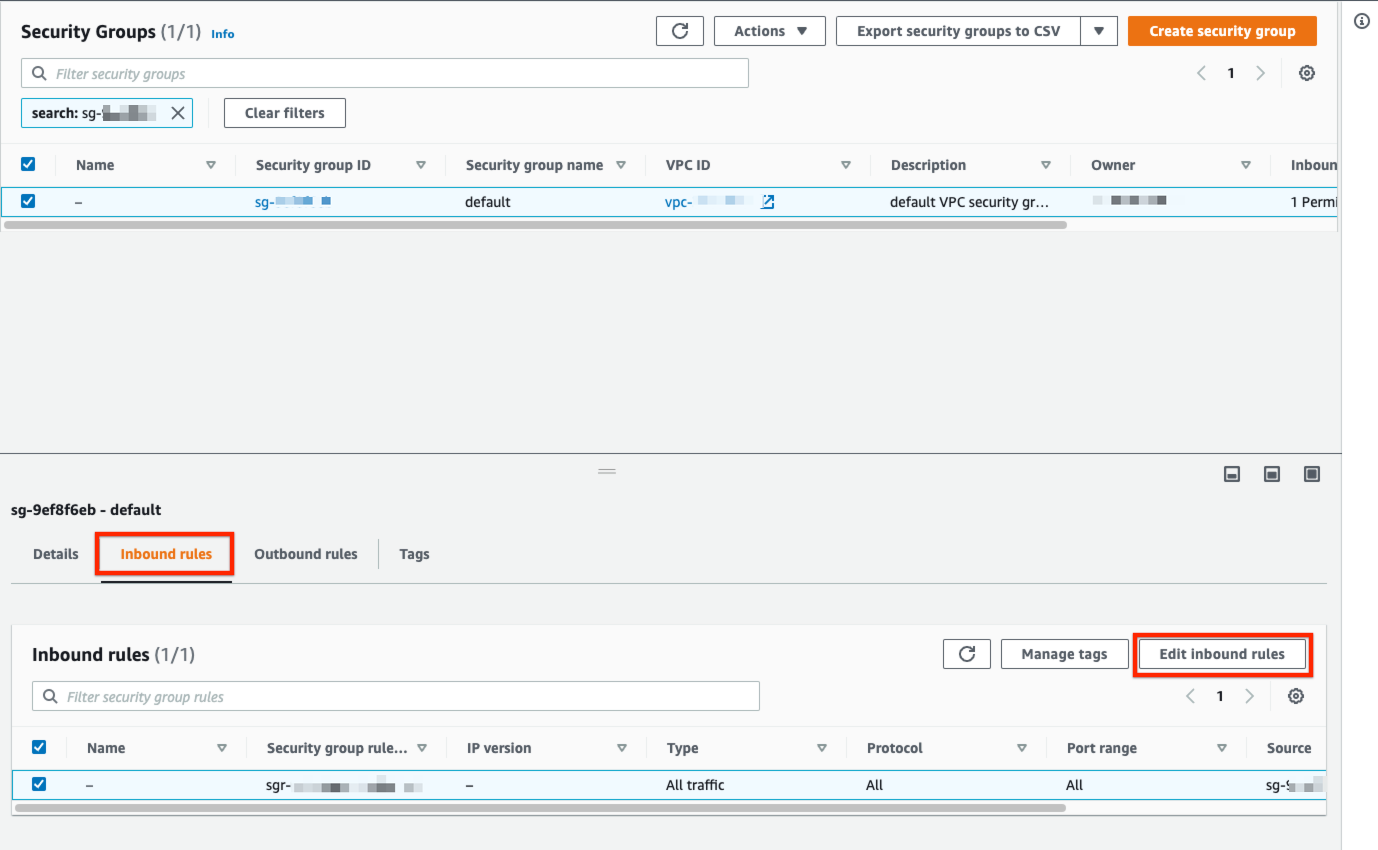
- Select an existing Security Group or create a new one
- Select the Inbound rules tab at the bottom and click Edit inbound rules

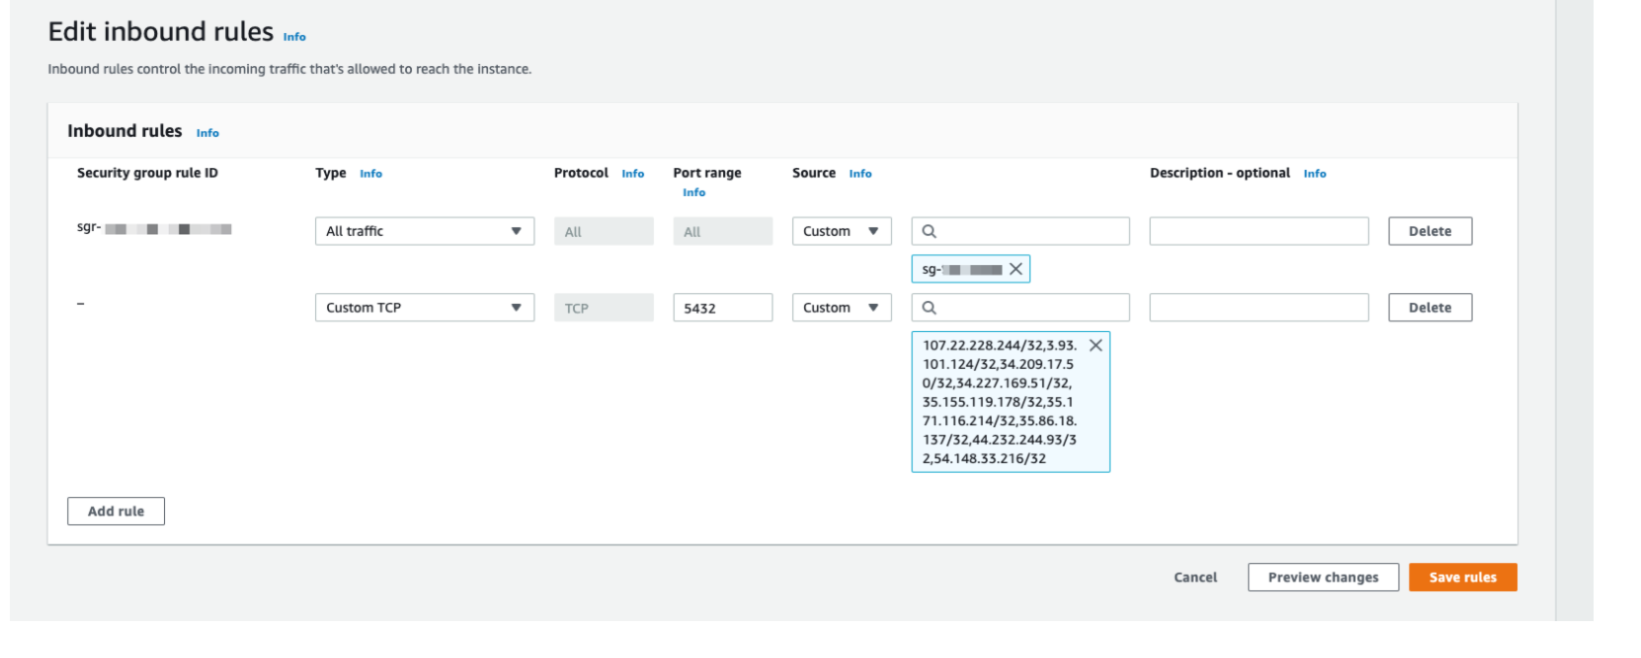
- Choose the port (defaults: Postgres: 5432, MySQL: 3306, MSSQL: 1433)
- Set Source to "Custom" and enter the following IP addresses:
107.22.228.244/32, 3.93.101.124/32, 34.209.17.50/32, 34.227.169.51/32, 35.155.119.178/32, 35.171.116.214/32, 35.86.18.137/32, 44.232.244.93/32, 54.148.33.216/32

- Click Save rules
- Log in to the GCP Console
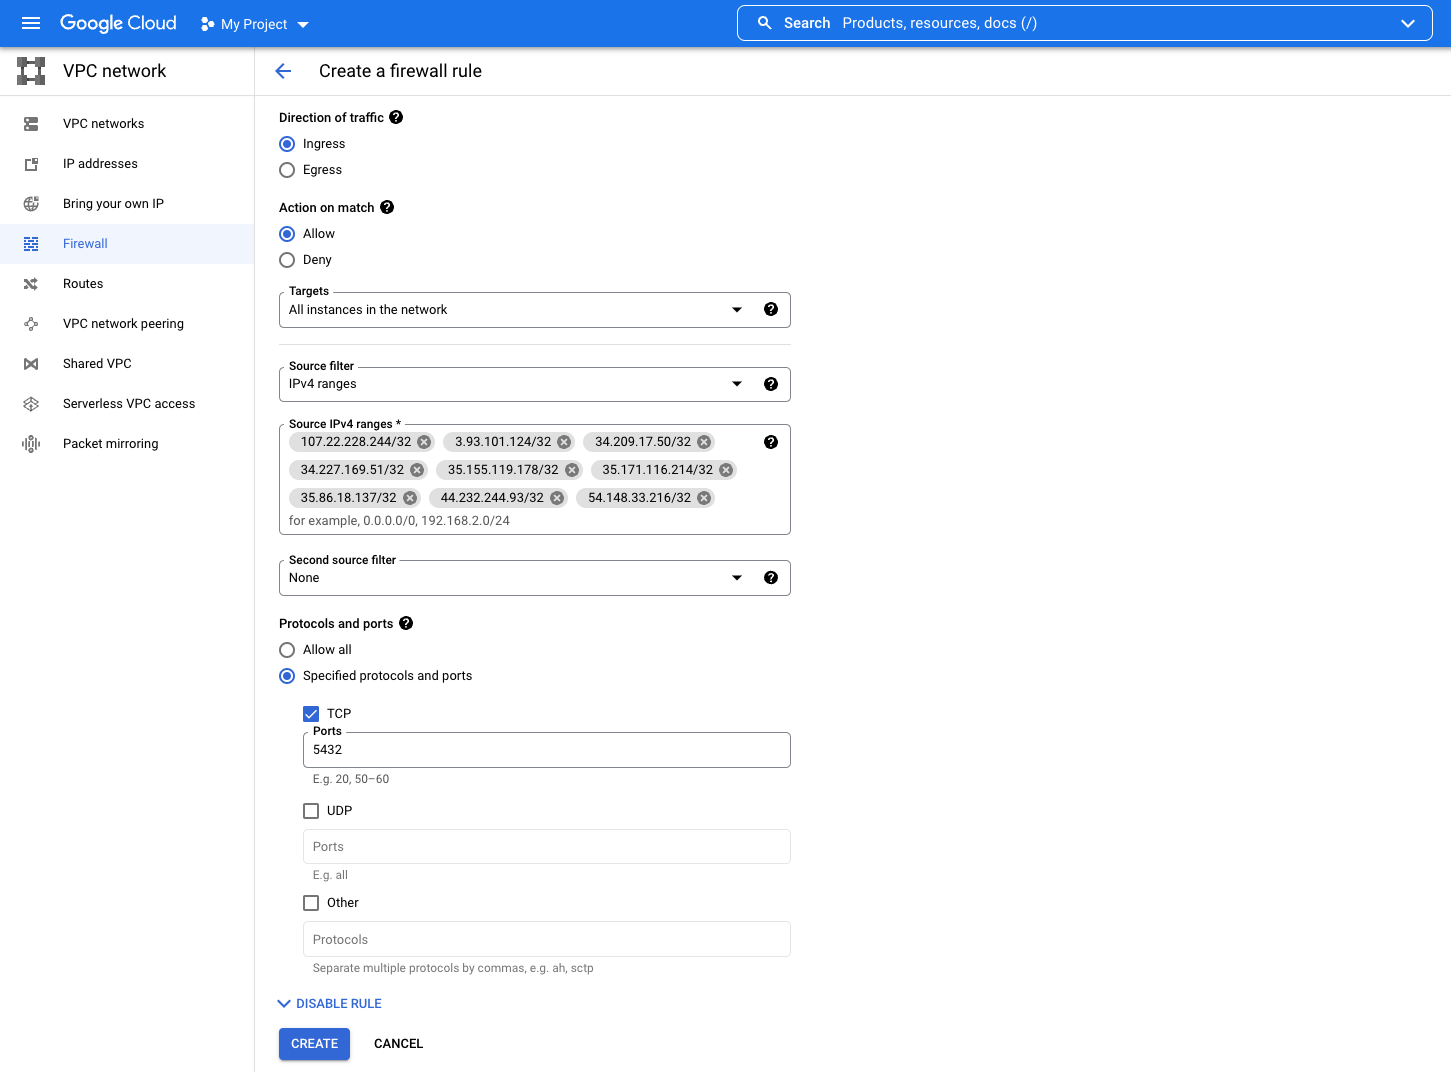
- Navigate to VPC Network -> Firewall
- Select an existing Firewall Rule or create a new one
- Set the following:
- Direction of traffic: Ingress
- Action on match: Allow
- Targets: All instances on network
- Source filter: IPv4 ranges
- Source IPv4 ranges: Add the following IP addresses:
107.22.228.244/32, 3.93.101.124/32, 34.209.17.50/32, 34.227.169.51/32, 35.155.119.178/32, 35.171.116.214/32, 35.86.18.137/32, 44.232.244.93/32, 54.148.33.216/32 - Protocols and ports: Specified protocols and ports, TCP Ports (defaults: Postgres: 5432, MySQL: 3306, MSSQL: 1433)

- Click Create/Save
SSH tunnel
Superblocks supports connecting via an SSH tunnel for the following database integrations:
To setup SSH tunneling:
Select the Use SSH Tunnel checkbox in the Superblocks integration form, and configure the following settings:
Setting Description Authentication Method Auth method used by the bastion server to connect to your instance. Choose between User-defined Private Key and Password. Bastion Host Bastion destination address to connect to for SSH port forwarding Bastion Port Bastion destination port to connect to for SSH port forwarding Bastion Username Username for bastion host Configure authentication settings based on the previously chosen Authentication Method:
- User-defined Private Key - Add your public and private keys in Superblocks. Both
RSAandEd25519are supported. - Password - Add bastion password in Superblocks
- User-defined Private Key - Add your public and private keys in Superblocks. Both
Allow connections from Superblocks to your bastion host (see IP allowlist)
On the bastion host, make sure there is a user account associated with the bastion username. If creating a new account, add the public key into
~/.ssh/authorized_keys.
Connect from On-Premise Agent
When using the On-Premise Agent deployment model, an agent running inside your own network connects to your integrations. As such, you do not need to open any inbound firewall rules. See the On-Premise Agent docs for more details.