When you embed a Superblocks app into your website, you have several options for authentication:
  • Public: anyone can view your app, no login required
  • Private: users log in to Superblocks directly and must have apps:view permission to the application
  • SSO: use your application’s existing login flow so users only have to log in once to access the embedded Superblocks app
Public and Private embeds have no added set up. Follow instructions below to configure SSO.

SSO authentication flow

With SSO embedding, users access your embedded app without needing a separate Superblocks login. Instead, you’ll log users in with your app’s existing auth and issue them a Superblocks session token for embedded auth. Using the Superblocks session token, your user’s identity, level of access, and metadata are securely transmitted to Superblocks so they can’t be modified by users client-side. The following diagram illustrates the authentication flow for SSO embed users:
Sequence diagram showing how to request a session token for an embedded user

Set up embedded SSO

Use the following instructions to have your application authenticate users with Superblocks.

Step 1. Generate an access token

Only organization Admins can create Embed access tokens.
To get Superblocks session tokens for your embed users, you’ll need to create an Embed access token. Follow the instructions below to create an access token, or learn more about Access tokens.
  1. Click your avatar in the upper-left corner of the home page and click Organization Settings
    Menu for switching to settings menus
  2. In the left sidebar, click Access Tokens
  3. Click +Create token
  4. In the Name field give your token a descriptive name
  5. Select an Expiration date, or use the default 90 day expiration.
  6. Select Embed as the token type
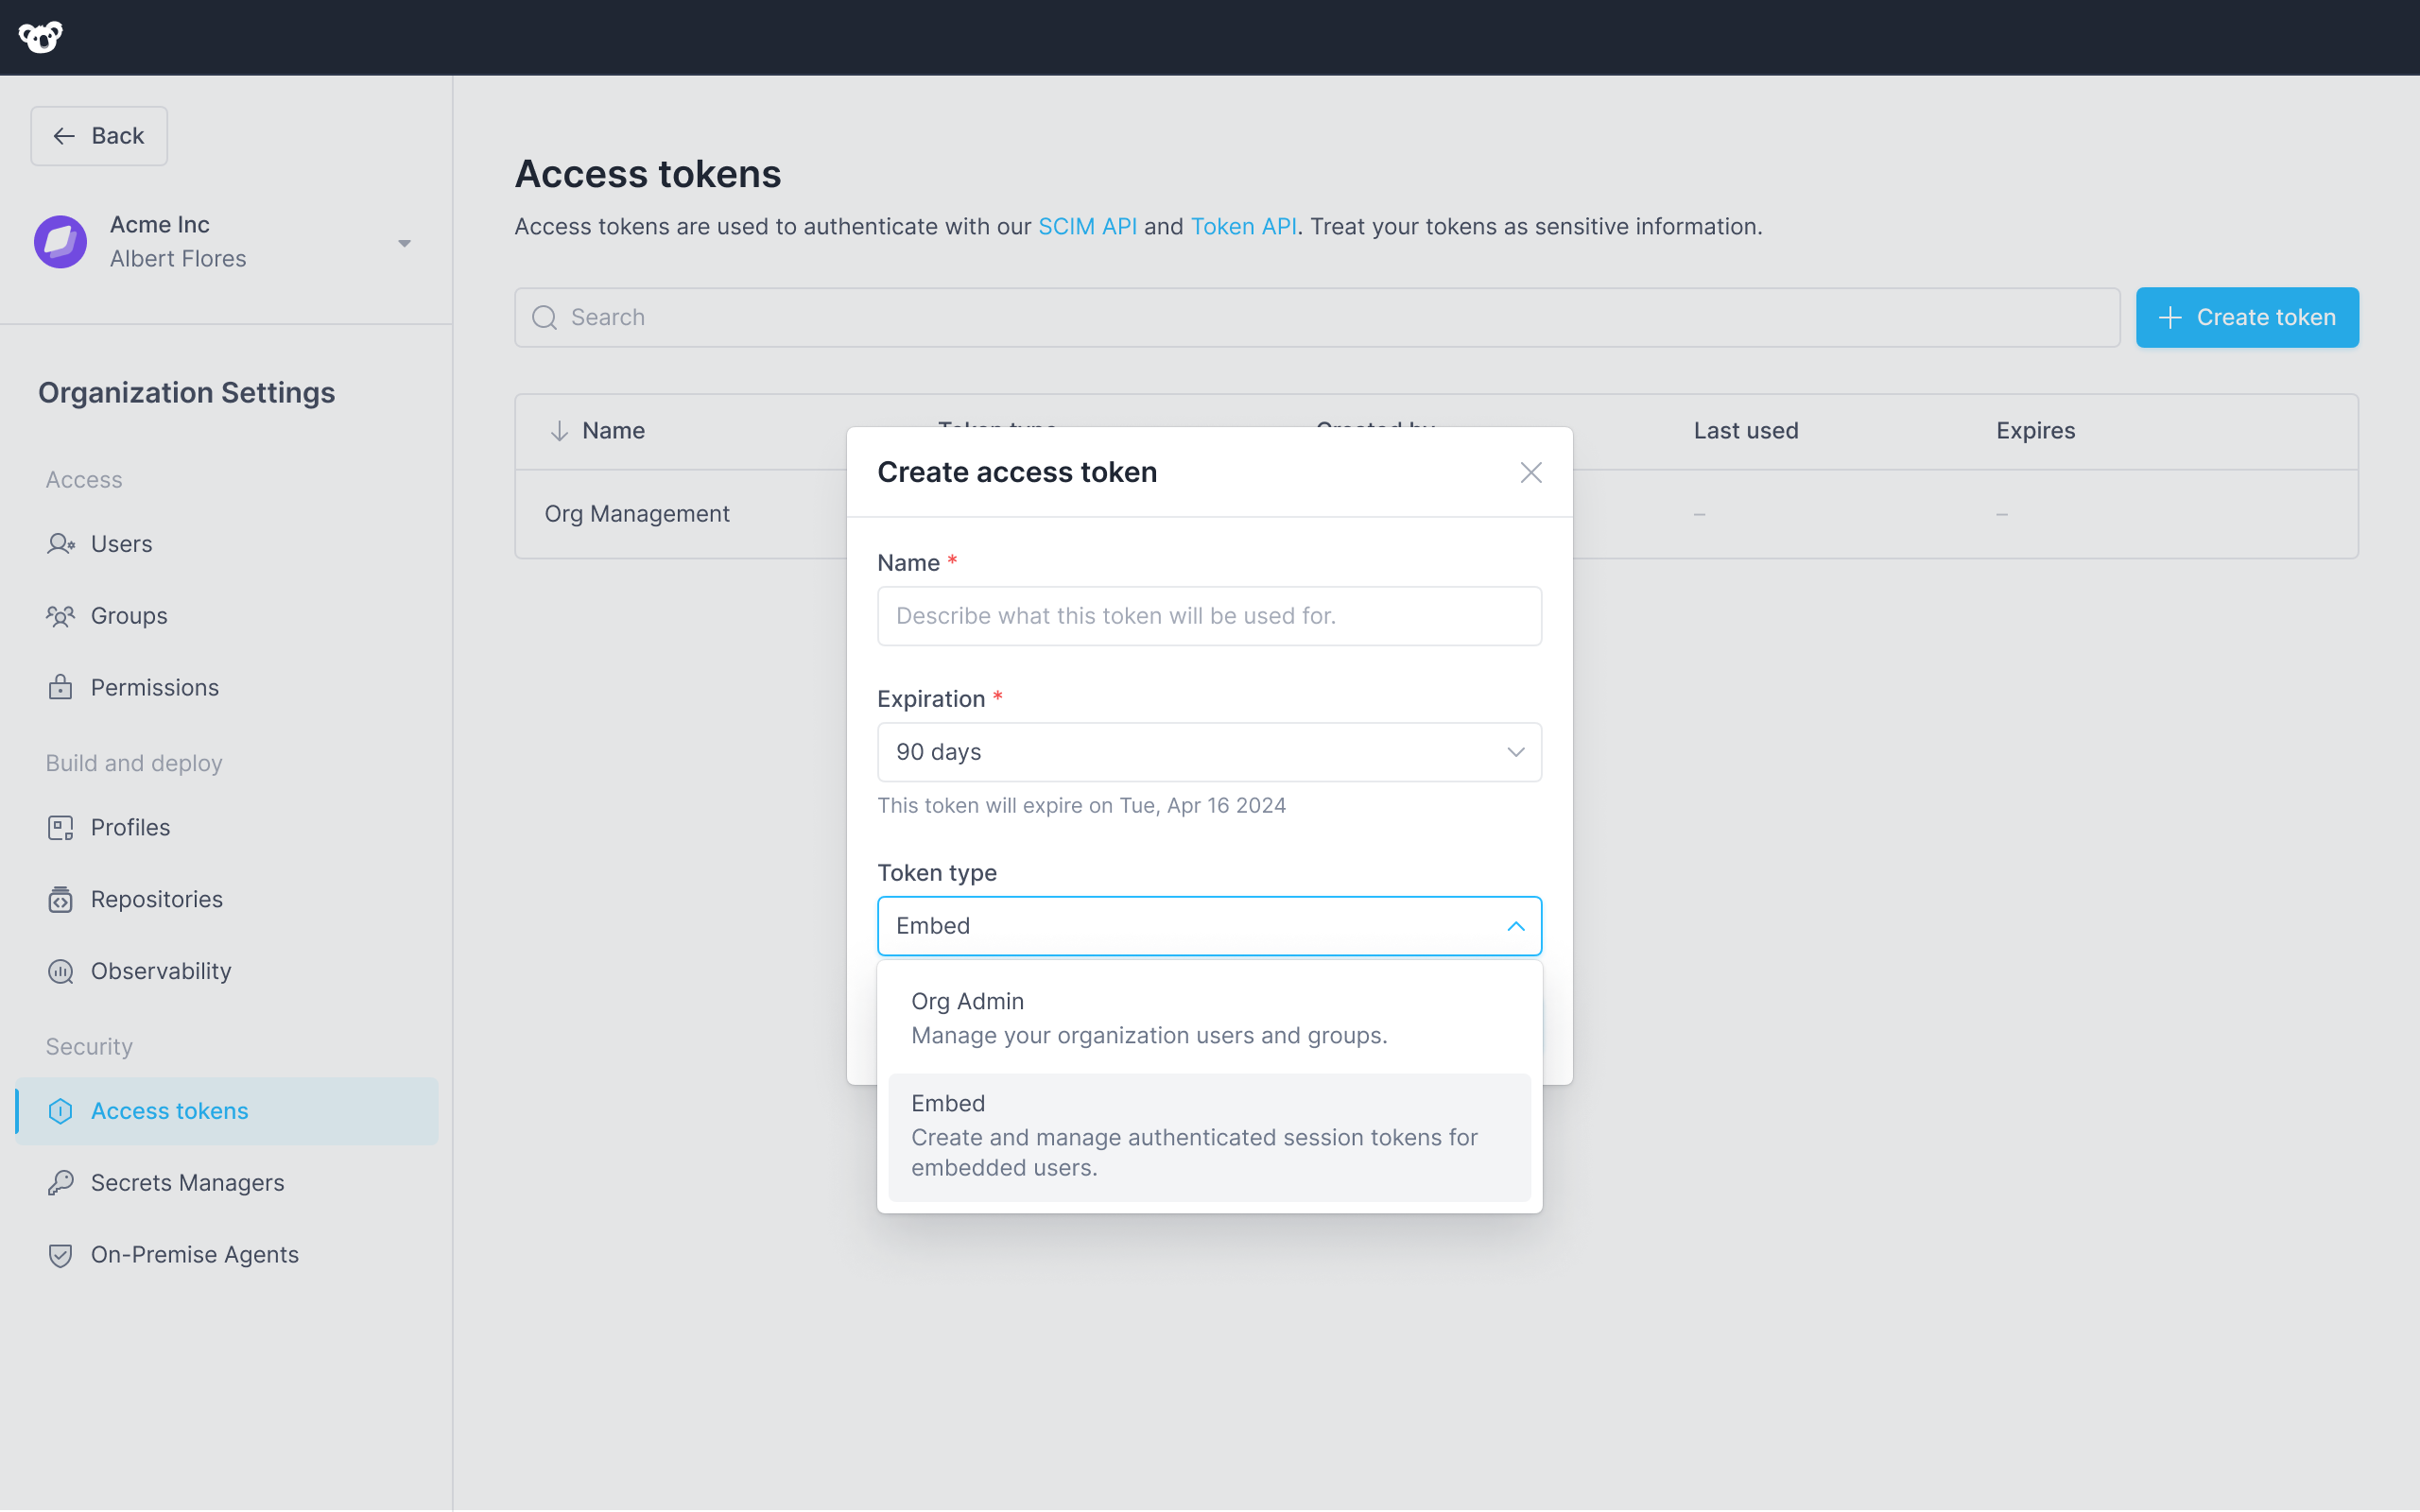
 Interface for creating an embed access token
  7. Click Create
Save your tokens immediately
Your access token is visible one time, immediately after you create it. If you leave or refresh the page where the token is displayed, it will be obscured and no longer visible. You must copy and store new access tokens somewhere secure before you leave the creation page, or you will lose access to the token.

Step 2. Add token endpoint to your web-server

Add an endpoint to your web-server that requests user session tokens from Superblocks. You can add this as a new endpoint, or to your existing authentication flow.
server.js
// Get user session token from Superblocks API
app.get('/api/superblocks/token', checkAuthentication, async (req, res) => {

  // Assuming getUser returns the currently authenticated user
  const user = getUser(req);

  const config = {
    url: `https://app.superblocks.com/api/v1/public/token`,
    method: 'post',
    headers: {
      'Authorization': `Bearer ${YOUR_ACCESS_TOKEN_HERE}`,
      'Content-Type': 'application/json',
    },
    data: {
      email: user.email,
      name: `${user.firstName} ${user.lastName}`,
      metadata: {
        externalUserId: user.id,
        externalOrgId: user.organization.id
      }
    }
  };

  // Call endpoint to request a Superblocks session token on-behalf-of the authenticated user
  axios(config)
    .then((response) => {
      if (response.status === 200) {
        res.json(response.data);
      } else {
        throw new Error('Could not authenticate user with Superblocks');
      }
    })
    .catch((error) => {
      res.status(401).json({ error: 'unathorized', message: error.message });
    });
});
Make sure to replace the payload with information for the currently authenticated user.
Make sure your web server has CORS enabled if it’s running on a different domain than your host application.
For a detailed explanation of the parameters, request format, and response format for the /token endpoint, please refer to the full API specification below.

Step 3. Request token client-side

Add code to your web application to request a session token from the token endpoint you just added to your application’s web server.
src/utils.tsx
export const getSBToken = () => {
  return fetch(`https://${YOUR_API_DOMAIN}/api/superblocks/token`).then(
      res => res.json()
  ).then(
      data => data.access_token
  ).catch(
    err => {
      throw new Error('Superblocks Auth Error');
    }
  );
}

Step 4. Pass the token to your embed

src/views/embed_page.tsx
import React, { useState, useEffect } from 'react';
import { SuperblocksEmbed } from '@superblocksteam/embed-react';
import { getSBToken } from '../utils';

const PageWithEmbed = () => {
  const [token, setToken] = useState(null);

  useEffect(() => {
    getSBToken()
      .then((token) => setToken(token))
      .catch(err => console.log('Failed to get Superblocks auth token'));
  }, []);

  const handleFailedAuth = (err) => {
    console.log('Superblocks auth token invalid');
  }

  return <>
    { token ?
      <SuperblocksEmbed
        src='https://app.superblocks.com/code-mode/embed/applications/<APP_ID>'
        token={token}
        onAuthError={handleFailedAuth}
      /> :
      <div>Loading...</div>
    }
  </>;
}

Manage user access

Embed users must have the apps:view permission to the Superblocks app they’re trying to access. 
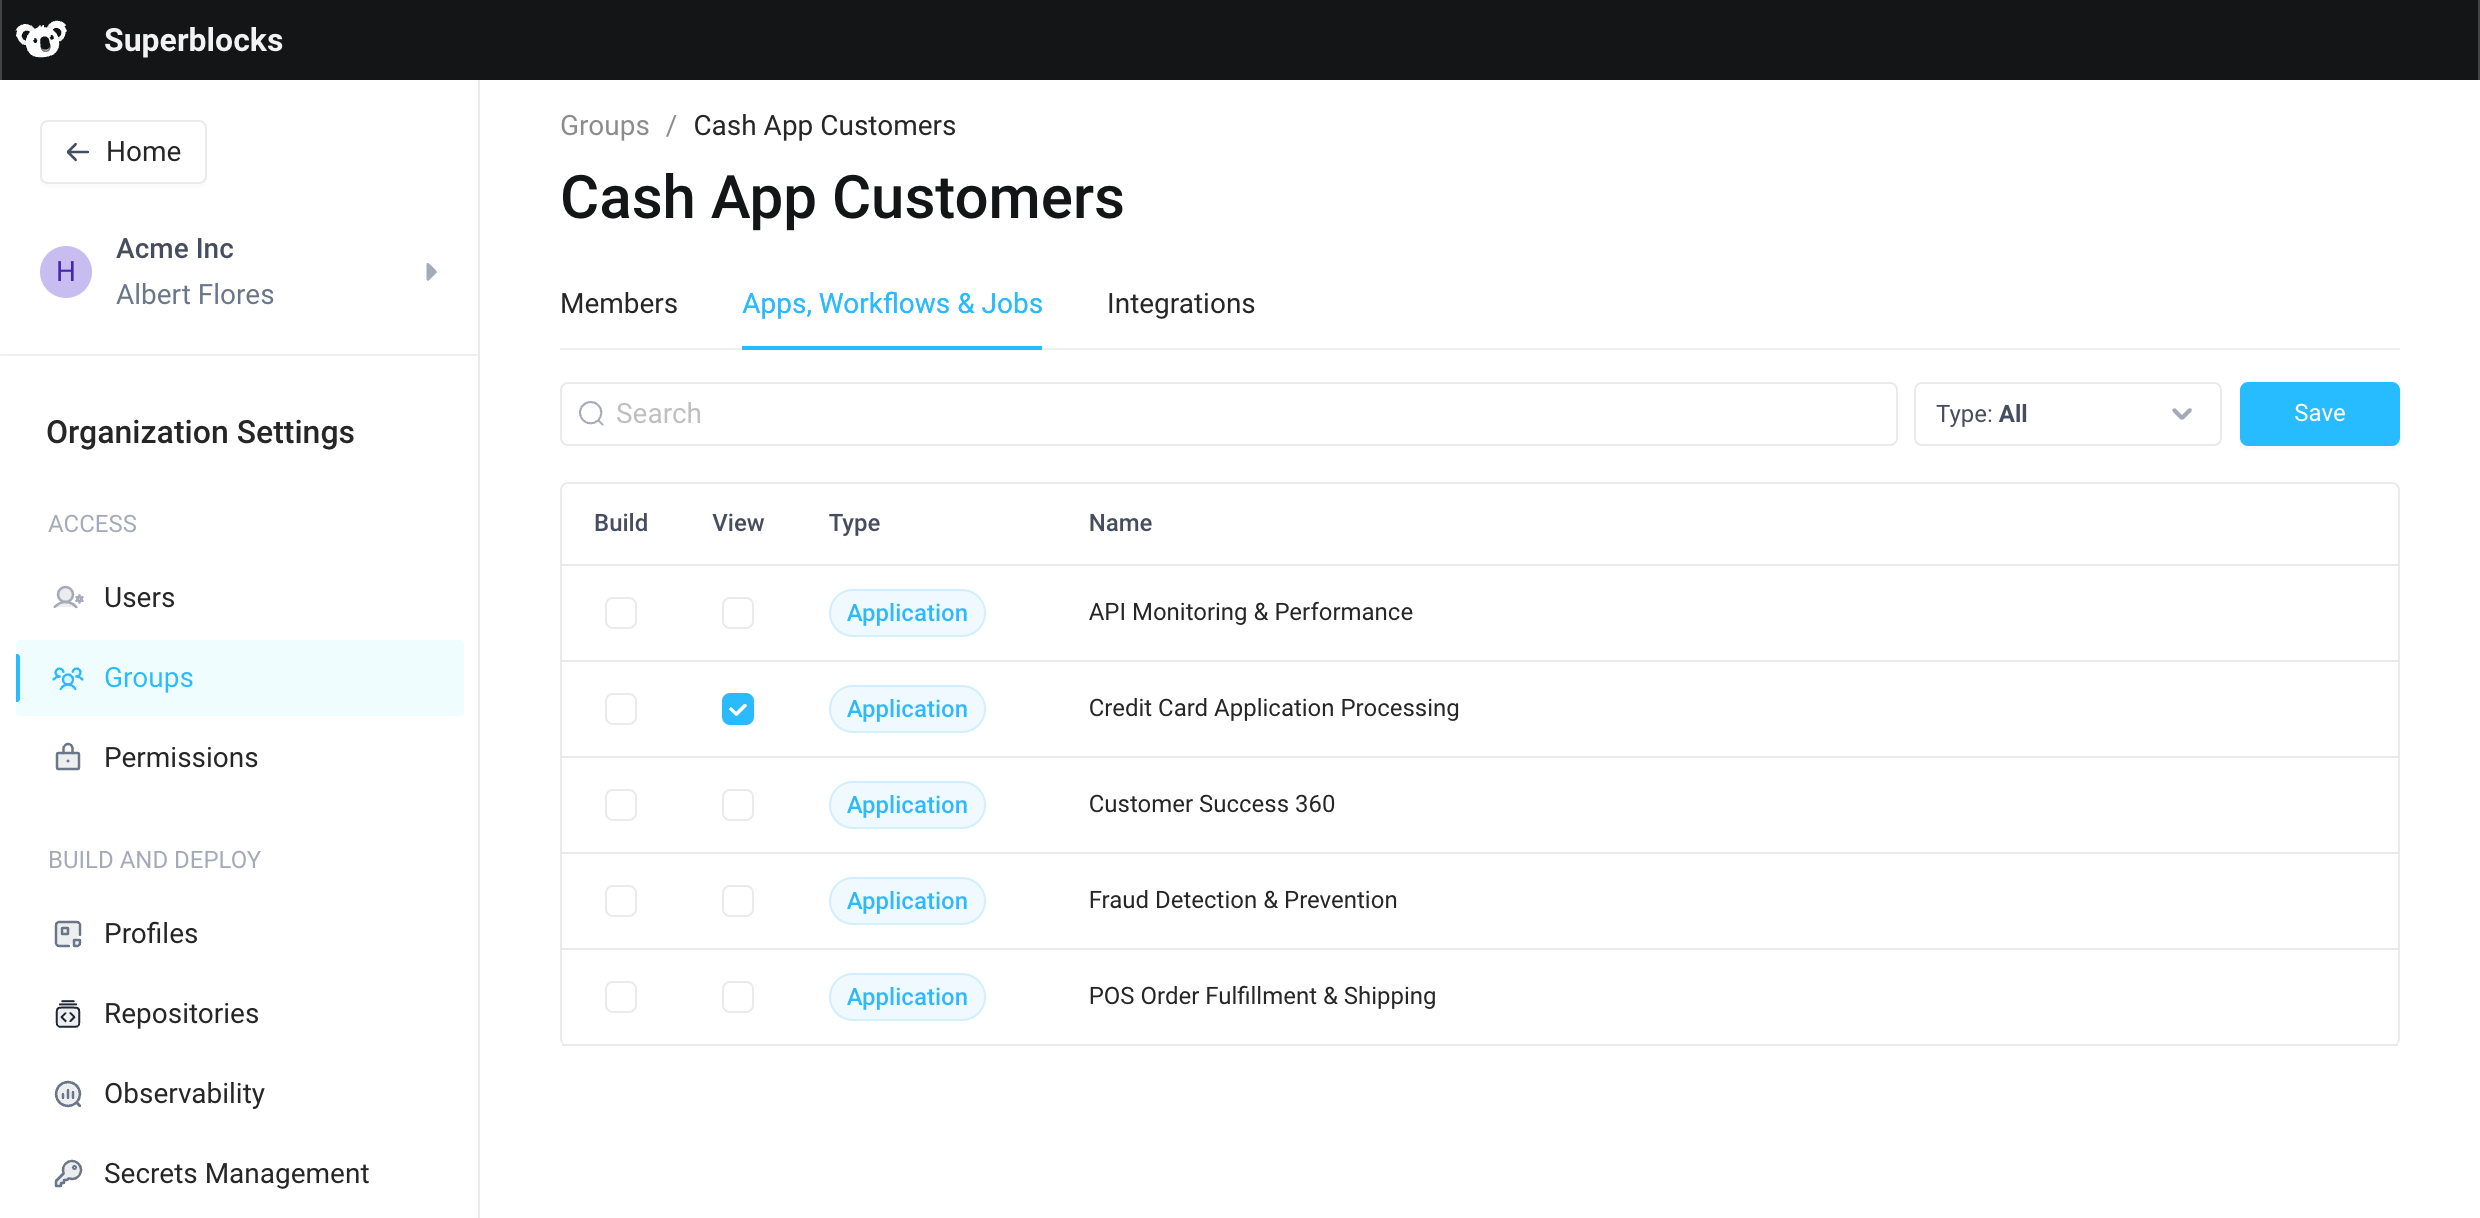
Grant users access by associating them with a Group with the necessary access level. To associate an embed user with a group:
  1. Click your avatar in the upper-left corner of the home page
  2. In the menu, click Organization Settings
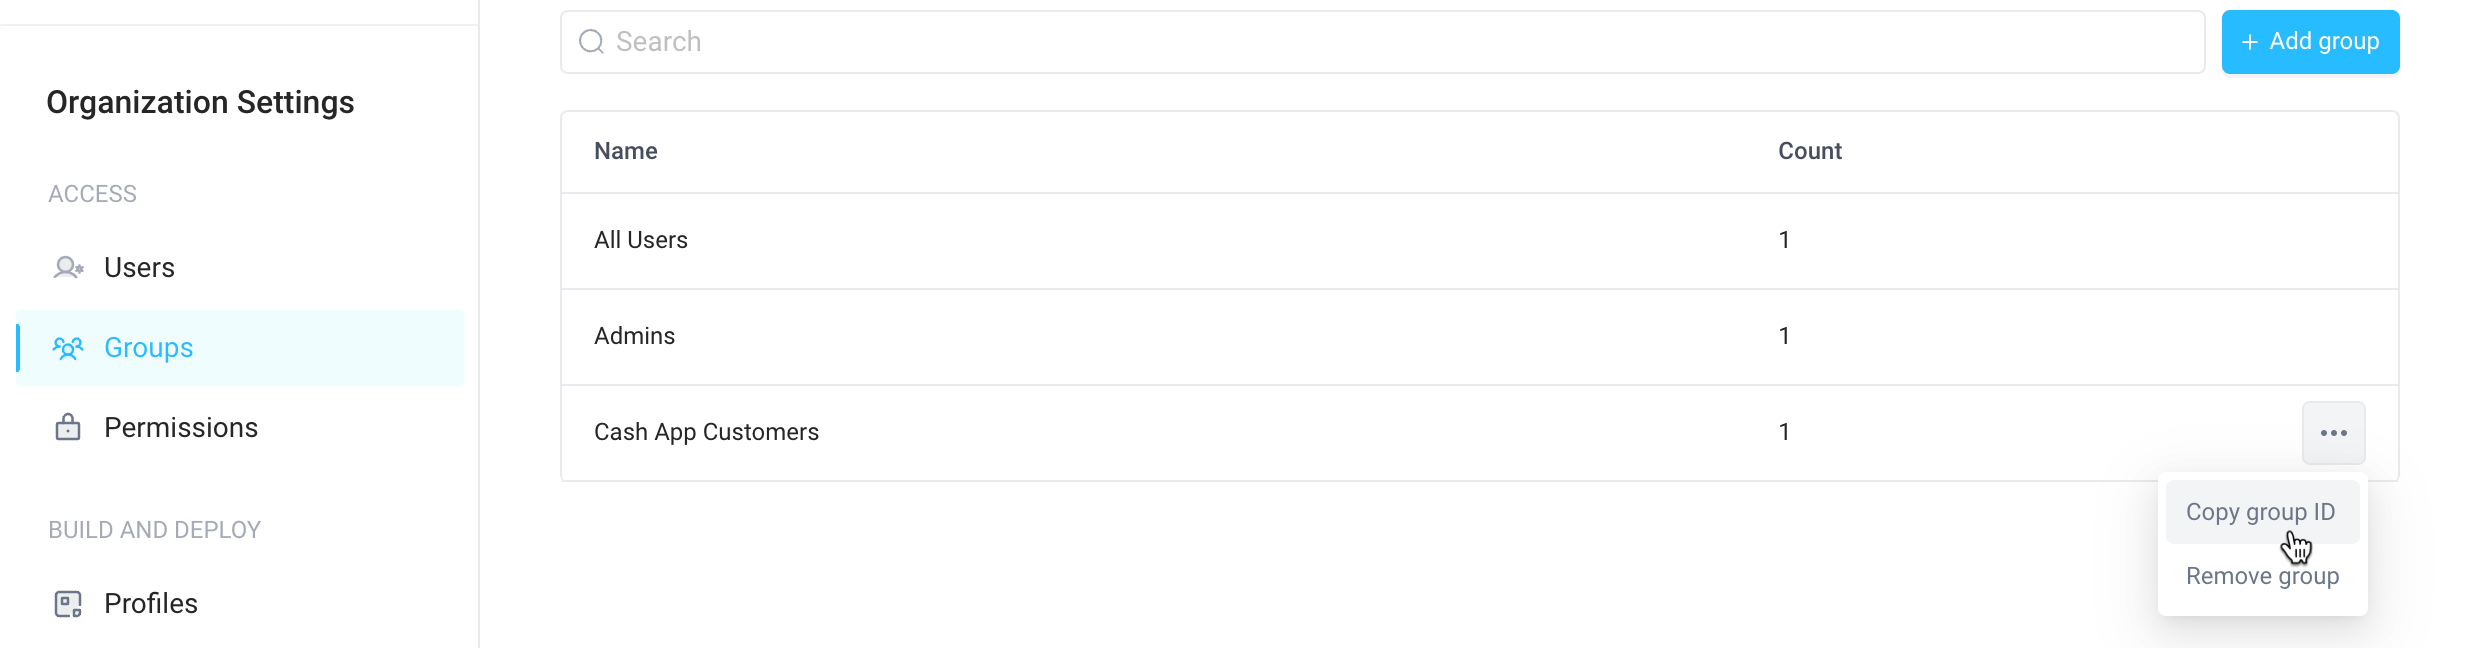
  3. In the left sidebar, click Groups
  4. Either select + Add group or click into an existing group
  5. On the Permissions tab, enable View access for apps you want the user(s) to have access to Cash App Customer user group with view access to "Credit Card Application Processing" tool
  6. Go back to the Groups page and copy the group’s ID by selecting Copy group ID Groups page with options menu open showing option to copy the group's ID
  7. Update your server endpoint by adding a list of groupIds you want users to be associated with
fetch("https://app.superblocks.com/api/v1/public/token", {
  ...
  body: JSON.stringify({
      'email': user.email,
      'name': `${user.firstName} ${user.lastName}`,

      // Superblocks Group IDs which grant view access to apps embedded in this website
      'groupIds': [
        'cc07e026-02c7-4ab5-b33b-232d57e7c804'
      ]
  })
});
Embed users aren’t permanent members of groups and won’t show up on the Members tab of groups. They are associated with the group for permissions purposes for the duration of the token’s session.

Customize user metadata

User metadata lets you attach additional information to a user beyond the standard attributes. This can be useful for storing extra data relevant to your application or business logic. To customize user metadata, include a metadata field in your request payload with JSON representing the metadata you want to add. For example:
fetch("https://app.superblocks.com/api/v1/public/token", {
    method: 'POST',
    ...
    body: JSON.stringify({
        'email': user.email,
        'name': `${user.firstName} ${user.lastName}`,
        'metadata': {
            'externalUserId': user.id,
            'externalOrgId': user.organization.id,

            // Additional user metadata to customize app behavior
            'isAdmin': user.roles.includes('Admin')
        }
    })
});
Metadata is associated with the user’s current session and encoded in the session JWT as custom claims. This ensures that the metadata cannot be modified client-side, providing an additional layer of protection against unauthorized tampering. You can prompt Clark to build any conditional logic based on this user metadata. For example, display, hide, or disable a certain component based on an isAdmin metadata attribute Under the hood, Clark leverages the 
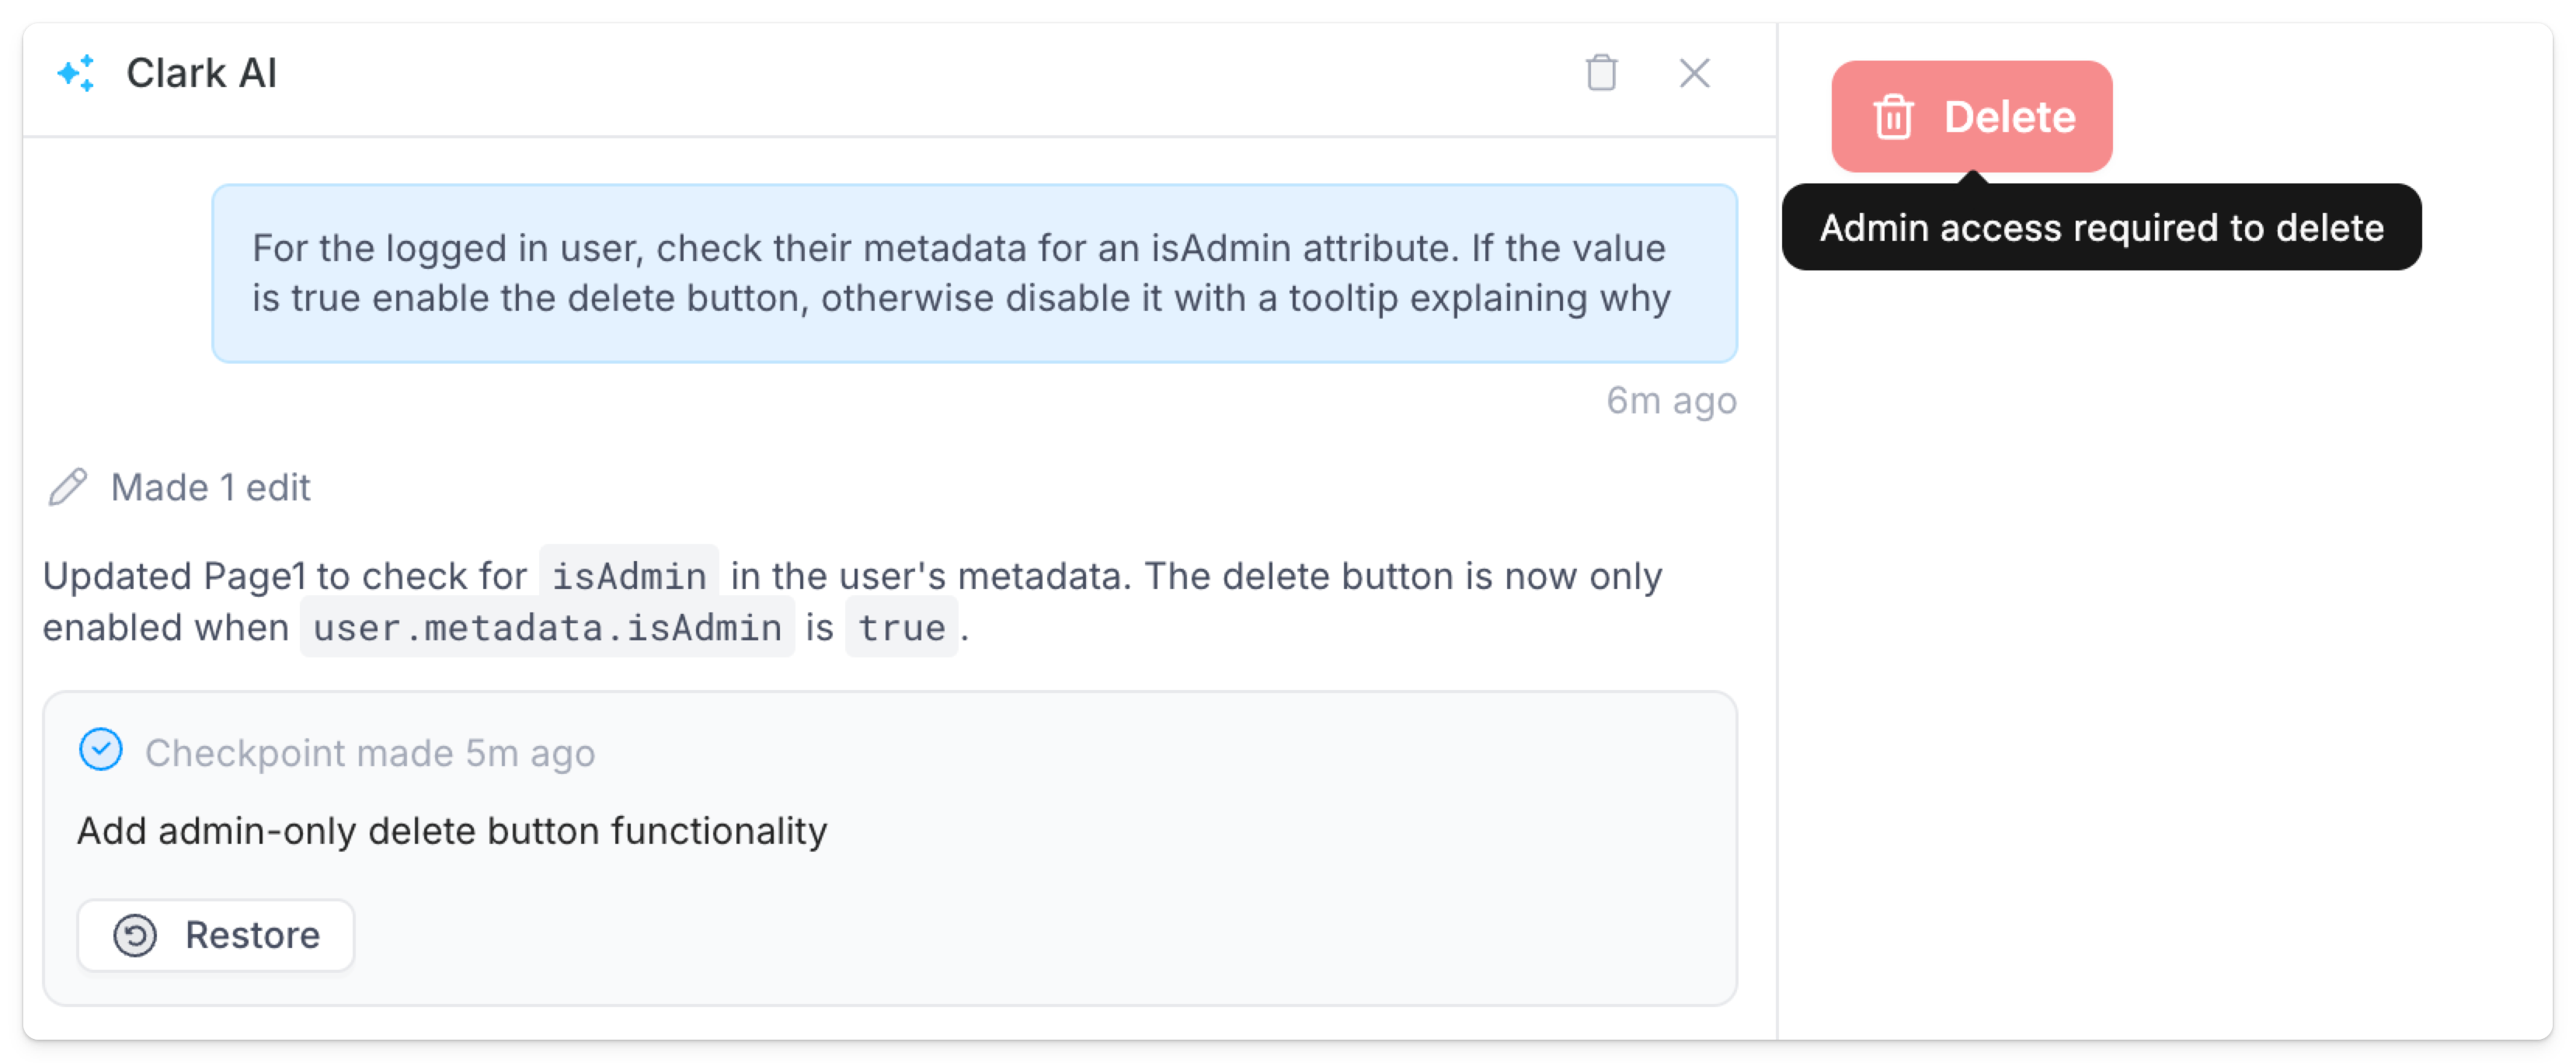
useSuperblocksUser() function to get the logged in user and check their metadata. Here is the code generated from the prompt above.
index.tsx
import { useSuperblocksUser } from "@superblocksteam/library";
import { Button } from "@/components/ui/button";
import { Icon } from "@/components/ui/icon";
import { Tooltip } from "@/components/ui/tooltip";

export default function Page1Component() {
  const user = useSuperblocksUser();

  const isAdmin = user?.metadata?.isAdmin === true;

  const deleteButton = (
    <Button variant="destructive" disabled={!isAdmin}>
      <Icon icon="trash-2" />
      Delete
    </Button>
  );

  return (
    <div className="min-h-svh overflow-auto p-4">
      {isAdmin ? (
        deleteButton
      ) : (
        <Tooltip tooltip="Admin access required to delete">
          {deleteButton}
        </Tooltip>
      )}
    </div>
  );
}
If you prefer to edit and review this logic directly, see developing apps in code.

Token API specification

POST /api/v1/public/token

Use this endpoint to request a session token for an embedded user. Request parameters application/json
ParameterRequiredTypeDescription
emailStringThe user’s email address, which uniquely identifies them in Superblocks.
nameStringThe user’s full display name.
groupIdsArraySuperblocks Group IDs to associate the embed user with.
metadataObjectObject containing additional metadata about the user.
isSuperblocksUserBooleanIf TRUE, the token will be associated with the Superblocks platform user with the email specified. If no platform user exists with that email, the user will get an Unauthorized error.
subject_token_typeStringThe type of token being passed in subject_token. Required when using subject_token. Must be set to urn:ietf:params:oauth:token-type:access_token. See On-Behalf-Of Token Exchange for more details.
subject_tokenStringAn access token from an external identity provider (e.g., Okta, Auth0, your web server) that will be used in OAuth2.0 Token Exchange auth flows. See On-Behalf-Of Token Exchange for more details.
curl --request POST
    --url 'https://{REGION}.superblocks.com/api/v1/public/token' \
    --header 'authorization: Bearer {YOUR_ACCESS_TOKEN_HERE}' \
    --header 'content-type: application/json' \
    --data-raw '{
        "email":"[email protected]",
        "name": "Jane Wind",
        "metadata": {
            "externalUserId": "d942c6...72f362",
            "externalOrgId": "c32979...acf711"
        }
    }'
Response Sample
HTTP/1.1 200 OK
Content-Type: application/json
{
  "access_token":"eyJz93a...k4laUWw",
  "token_type":"Bearer",
  "expires_in":86400
}