> ## Documentation Index
> Fetch the complete documentation index at: https://docs.superblocks.com/llms.txt
> Use this file to discover all available pages before exploring further.
# OAuth 2.0 authentication / authorization
export const Alert = ({type, title, children}) => {
const getIcon = () => {
switch (type) {
case 'info':
return "data:image/svg+xml,%3Csvg xmlns='http://www.w3.org/2000/svg' width='20' height='20' viewBox='0 0 20 20' fill='none'%3E%3Cpath d='M10 0C4.477 0 0 4.477 0 10s4.477 10 10 10 10-4.477 10-10S15.523 0 10 0zm0 15c-.552 0-1-.448-1-1s.448-1 1-1 1 .448 1 1-.448 1-1 1zm1-3H9V6h2v6z' fill='%230099FF'/%3E%3C/svg%3E";
case 'success':
return "data:image/svg+xml,%3Csvg width='20' height='20' viewBox='0 0 20 20' fill='none' xmlns='http://www.w3.org/2000/svg'%3E%3Cpath fill-rule='evenodd' clip-rule='evenodd' d='M10 0C4.477 0 0 4.477 0 10s4.477 10 10 10 10-4.477 10-10S15.523 0 10 0zm4.293 6.293L9 11.586 5.707 8.293c-.391-.391-1.024-.391-1.414 0s-.391 1.024 0 1.414l4 4c.391.391 1.024.391 1.414 0l6-6c.391-.391.391-1.024 0-1.414s-1.024-.391-1.414 0z' fill='%230CC26D'/%3E%3C/svg%3E";
case 'warning':
return "data:image/svg+xml;charset=utf-8;base64,PHN2ZyB4bWxucz0naHR0cDovL3d3dy53My5vcmcvMjAwMC9zdmcnIHhtbDpzcGFjZT0ncHJlc2VydmUnIHdpZHRoPScxMDgwJyBoZWlnaHQ9JzEwODAnPjxyZWN0IHdpZHRoPScxMDAlJyBoZWlnaHQ9JzEwMCUnIGZpbGw9J3RyYW5zcGFyZW50Jy8+PHBhdGggZD0nTTEzLjc5NCAxMC43NSA4LjMgMS4yNWExLjUgMS41IDAgMCAwLTIuNiAwbC01LjQ5NCA5LjVBMS40OTQgMS40OTQgMCAwIDAgMS41IDEzaDExYTEuNDkzIDEuNDkzIDAgMCAwIDEuMjk0LTIuMjVNNi41IDUuNWEuNS41IDAgMCAxIDEgMFY4YS41LjUgMCAwIDEtMSAwek03IDExYS43NS43NSAwIDEgMSAwLTEuNS43NS43NSAwIDAgMSAwIDEuNScgc3R5bGU9J3N0cm9rZTpub25lO3N0cm9rZS13aWR0aDoxO3N0cm9rZS1kYXNoYXJyYXk6bm9uZTtzdHJva2UtbGluZWNhcDpidXR0O3N0cm9rZS1kYXNob2Zmc2V0OjA7c3Ryb2tlLWxpbmVqb2luOm1pdGVyO3N0cm9rZS1taXRlcmxpbWl0OjQ7ZmlsbDojZmY5ZjM1O2ZpbGwtcnVsZTpub256ZXJvO29wYWNpdHk6MScgdHJhbnNmb3JtPSd0cmFuc2xhdGUoLjAyIDE5LjMwNSlzY2FsZSg3Ny4xNCknLz48L3N2Zz4=";
case 'danger':
return "data:image/svg+xml,%3Csvg width='20' height='20' viewBox='0 0 20 20' fill='none' xmlns='http://www.w3.org/2000/svg'%3E%3Cpath d='M10 0C4.477 0 0 4.477 0 10s4.477 10 10 10 10-4.477 10-10S15.523 0 10 0zm5.707 4.293L10 9.586 4.293 4.293c-.391-.391-1.024-.391-1.414 0s-.391 1.024 0 1.414L8.586 11l-5.707 5.293c-.391.391-.391 1.024 0 1.414s1.024.391 1.414 0L10 12.414l5.707 5.293c.391.391 1.024.391 1.414 0s.391-1.024 0-1.414L11.414 11l5.707-5.293c.391-.391.391-1.024 0-1.414s-1.024-.391-1.414 0z' fill='%23F45252'/%3E%3C/svg%3E";
case 'note':
return "data:image/svg+xml,%3Csvg xmlns='http://www.w3.org/2000/svg' width='20' height='20' viewBox='0 0 20 20' fill='none'%3E%3Cpath d='M10 0C4.477 0 0 4.477 0 10s4.477 10 10 10 10-4.477 10-10S15.523 0 10 0zm0 15c-.552 0-1-.448-1-1s.448-1 1-1 1 .448 1 1-.448 1-1 1zm1-3H9V6h2v6z' fill='%230099FF'/%3E%3C/svg%3E";
default:
return "";
}
};
return
{title &&
{title}
}
{children}
;
};
Superblocks supports many [OAuth 2.0](https://datatracker.ietf.org/doc/html/rfc6749) flows. OAuth 2.0 is most commonly used by [REST APIs](/integrations/integrations-library/rest-api) and [GraphQL](/integrations/integrations-library/graphql), but can also be used by some cloud databases.
## OAuth 2.0 overview
OAuth 2.0 is an industry standard protocol for user authentication and authorization. Using OAuth 2.0, a remote API server can grant access to a client securely by issuing a short-lived access token.
### Glossary
The OAuth 2.0 spec, and it's usage in Superblocks, comes with some important terms:
* **Client**: The app that wants to access data
* **App type**: The type of Superblocks tool trying to access the data (App, Workflow, Scheduled Job)
* **Resource server**: The API that stores the data the client wants to access
* **Resource owner**: The owner of the data in the server
* **Authorization server**: The server that manages access and issues access tokens
* **Access token**: The token issued by the authorization server in exchange for the grant
* **ID token**: An optional token that contains information about the end user in the form of claims
* **Refresh token**: An optional token that is exchanged for a new access token if the access token has expired
### OAuth 2.0 flows
OAuth 2.0 flows are often called "multi-legged" authorization flows because they involve multiple requests exchanged between the client, user, and server. For example, a usual OAuth 2.0 Authorization Code flow runs as follows:
1. A client makes a request for the user to authorize access to their data
2. If the user grants access, the client requests an access token by passing the authorization grant to an authorization server
3. If the grant is valid, the authorization server returns an access token, possibly alongside a refresh and/or ID token
4. The client uses the access token in requests to the API server
5. When the token expires, the client uses the refresh token to automatically request a new access token
In Superblocks, OAuth 2.0 flows are performed by exchanging requests between the user's browser, the Superblocks Agent, and resource server. Once an access token is received, it is always sent to the resource server by the Superblocks Agent when steps are executed.
## Choosing an OAuth 2.0 flow
The OAuth 2.0 flow you use depends on your use case and flows supported by your API server. Reference API documentation to determine the flows supported by the API you intend to use.
If your API supports multiple flows, use the following table to help decide which flow to use:
| App type
| Resource owner
| Shared token
| User prompt
| OAuth 2.0 flow |
| ----------------------------------------- | ---------------------------------------------- | ------------------------------------------- | ------------------------------------------ | ------------------------------------------------------------------------------------------------------------------------------------------------------------------------------------------------------------------ |
| Workflow/Job | Server | ✓ | ✗ | [Client credentials](#client-credential) |
| Workflow/Job | User | ✓ | ✗ | [Authorization Code](#authorization-code) w/ shared token
[Password Grant (Legacy)](#password-grant-legacy) w/ shared token
[On-Behalf-Of Token Exchange](#on-behalf-of-token-exchange) w/ static token |
| Application | Server | ✓ | ✗ | [Client credentials](#client-credential) |
| Application | User | ✓ | ✗ | [Authorization Code](#authorization-code) w/ shared token
[Password Grant (Legacy)](#password-grant-legacy) w/ shared token
[On-Behalf-Of Token Exchange](#on-behalf-of-token-exchange) w/ static token |
| Application | User | ✗ | ✗ | [On-Behalf-Of Token Exchange](#on-behalf-of-token-exchange) w/ IdP token |
| Application | User | ✗ | ✓ | [Authorization Code](#authorization-code), [Implicit](#implicit), or [Password Grant (Legacy)](#password-grant-legacy) |
## Using OAuth 2.0
### Authorization Code
Authorization Code grants require a user to authenticate with the authorization server before an access token can be issued. After authenticating and granting access, an authorization code is sent back to Superblocks. The Superblocks Agent sends this token to the `/token` endpoint of the auth server to get an access token.
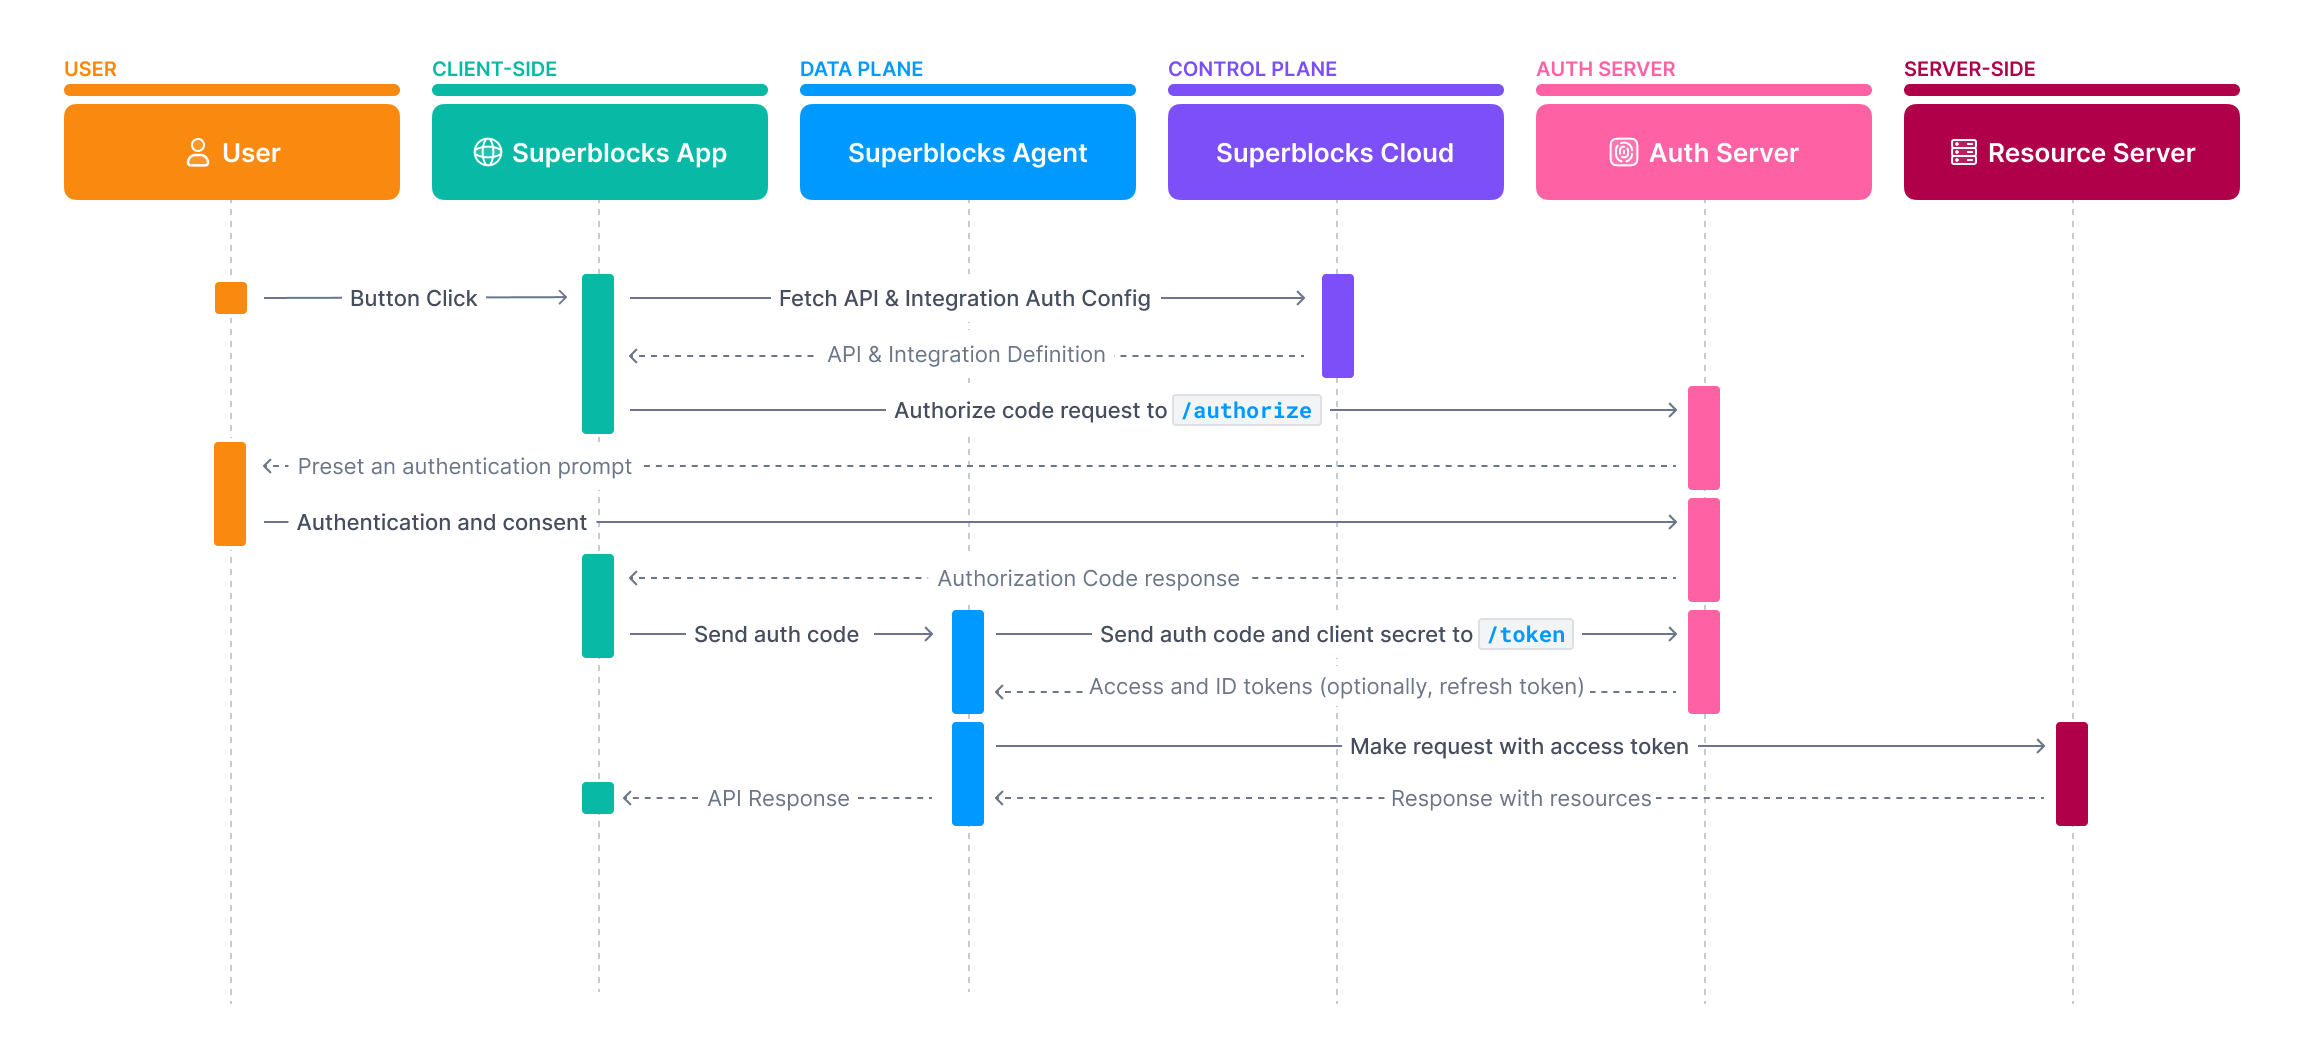 To use the authorization code flow:
1. In the Integration configuration select **OAuth2 - Authorization Code**
2. Copy the **Callback URL** provided and add it to the **Allowed Callback URLs** of your OAuth client
3. Specify the following configuration values:
|
To use the authorization code flow:
1. In the Integration configuration select **OAuth2 - Authorization Code**
2. Copy the **Callback URL** provided and add it to the **Allowed Callback URLs** of your OAuth client
3. Specify the following configuration values:
| Field
| Required | Description |
| -------------------------------------- | ------------------------------------------ | ----------------------------------------------------------------------------------------------------------------------------------------------------------------------------------------------------- |
| **Authorization URL** | ✓ | The endpoint users will be redirected to in order to log in and authorize access.
**Note**: this value is not required for public APIs and is set by Superblocks |
| **Token URL** | ✓ | The token endpoint of the authorization server, used to exchange an authorization code for an access token.
**Note**: this value is not required for public APIs and is set by Superblocks |
| **Client ID** | ✓ | The ID issued to your OAuth client during registration. |
| **Client secret** | ✓ | The secret issued to your OAuth client during registration. |
| **Audience** | ✗ | The intended recipient of the token, usually in a format like
`https://api-a.example.com`. Check API docs for the format. |
| **Prompt** | ✗ | Determines if the user is prompted for consent. To skip the prompt and perform silent authentication, set to `none` |
| **Scopes** | ✗ | The scopes that you want to request authorization for. These must be separated by spaces. |
| **Client authentication** | ✗ | If the `Client ID` and `Client secret` will be sent to the `Token URL` in the body or as a basic auth header. |
| **Send state** | ✗ | When checked, an opaque value will be added to the Authorization URL call and used on redirect to prevent CSRF attacks. |
4. If available, select **Share access token across all users** to use the same access token for all clients. If selected, click the **Connect** button to initiate the authorization flow.
If the shared token option is not selected, integrations with this auth method cannot be used in Workflows or Scheduled Jobs
5. Use the [`oauth` object](#the-oauth-object) in **Headers** or **Params** to define how the token response is used. For example, to send the access token to subsequent requests in the Authorization header, set:
 If you're not using the shared token option, this flow will be initiated in the user's browser when an API using this Integration executes. After an access token is retrieved it is cached for future use. If a refresh token is provided, Superblocks will refresh the token when it expires without reprompting the user to authenticate. Learn more about [token caching and refresh](#token-caching-and-refresh)
#### 1. `GET` Authorization URL
Prompt user to log in and get an authorization code
If you're not using the shared token option, this flow will be initiated in the user's browser when an API using this Integration executes. After an access token is retrieved it is cached for future use. If a refresh token is provided, Superblocks will refresh the token when it expires without reprompting the user to authenticate. Learn more about [token caching and refresh](#token-caching-and-refresh)
#### 1. `GET` Authorization URL
Prompt user to log in and get an authorization code
##### Request
```bash theme={null}
GET {authorization_url}?
client_id={client_id}&
audience={audience}&
scope={scopes}&
response_type=code&
redirect_uri=https%3A%2F%2Fapp.superblocks.com%2Foauth%2Fcallback&
state=STATE
```
##### Expected Response
```bash theme={null}
HTTP/1.1 302 Found
Location: https://app.superblocks.com/oauth/callback?code=AUTHORIZATION_CODE&state=STATE
```
#### 2. `POST` Token URL
Exchange authorization code with authorization server for an access token
##### Request
If **Client authentication** is set to **Send client credentials in body**
```bash theme={null}
curl --request POST \
--url '{token_url}' \
--header 'Accept: application/json' \
--header 'Content-Type: application/x-www-form-urlencoded' \
--data-urlencoded 'grant_type=authorization_code' \
--data-urlencoded 'client_id={client_id}' \
--data-urlencoded 'client_secret={client_secret}' \
--data-urlencoded 'code=AUTHORIZATION_CODE' \
--data-urlencoded 'redirect_uri=https://app.superblocks.com/oauth/callback'
```
If **Client authentication** is set to **Send as basic auth header**
```bash theme={null}
curl --request POST \
--url '{token_url}' \
--header 'Accept: application/json' \
--header 'Authorization: Basic {Base64-encoded client_id and client_secret}' \
--header 'Content-Type: application/x-www-form-urlencoded' \
--data-urlencoded 'grant_type=authorization_code' \
--data-urlencoded 'code=AUTHORIZATION_CODE' \
--data-urlencoded 'redirect_uri=https://app.superblocks.com/oauth/callback'
```
##### Expected Response
```bash theme={null}
HTTP/1.1 200 OK
Content-Type: application/json
{
"token_type": "Bearer",
"expires_in": 86400,
"access_token": "eyJz93a...k4laUWw",
"refresh_token": "GEbRxBN...edjnXbL",
"id_token": "eyJ0XAi...4faeEoQ"
}
```
### On-Behalf-Of Token Exchange
This flow can only be used by organizations with an OIDC-based [Single Sign-On](/admin/org-administration/auth/single-sign-on) flow configured. If you're not sure how you SSO provider is configured, contact support for assistance.
The On-Behalf-Of Token Exchange is a delegated access flow that lets a client exchange an access token received from an upstream client for a new token by interacting with an authorization server. In the case of Superblocks, this flows lets Superblocks exchange access tokens issued when a user logs in via an IdP, with an authorization server to get an access token to send to downstream servers.
For example, let's say your backend API is secured using tokens issued by Okta. This flow allows you to exchange a user's Superblocks access token with an Okta authorization server to obtain access tokens for your backend API without requiring the user to log in again.
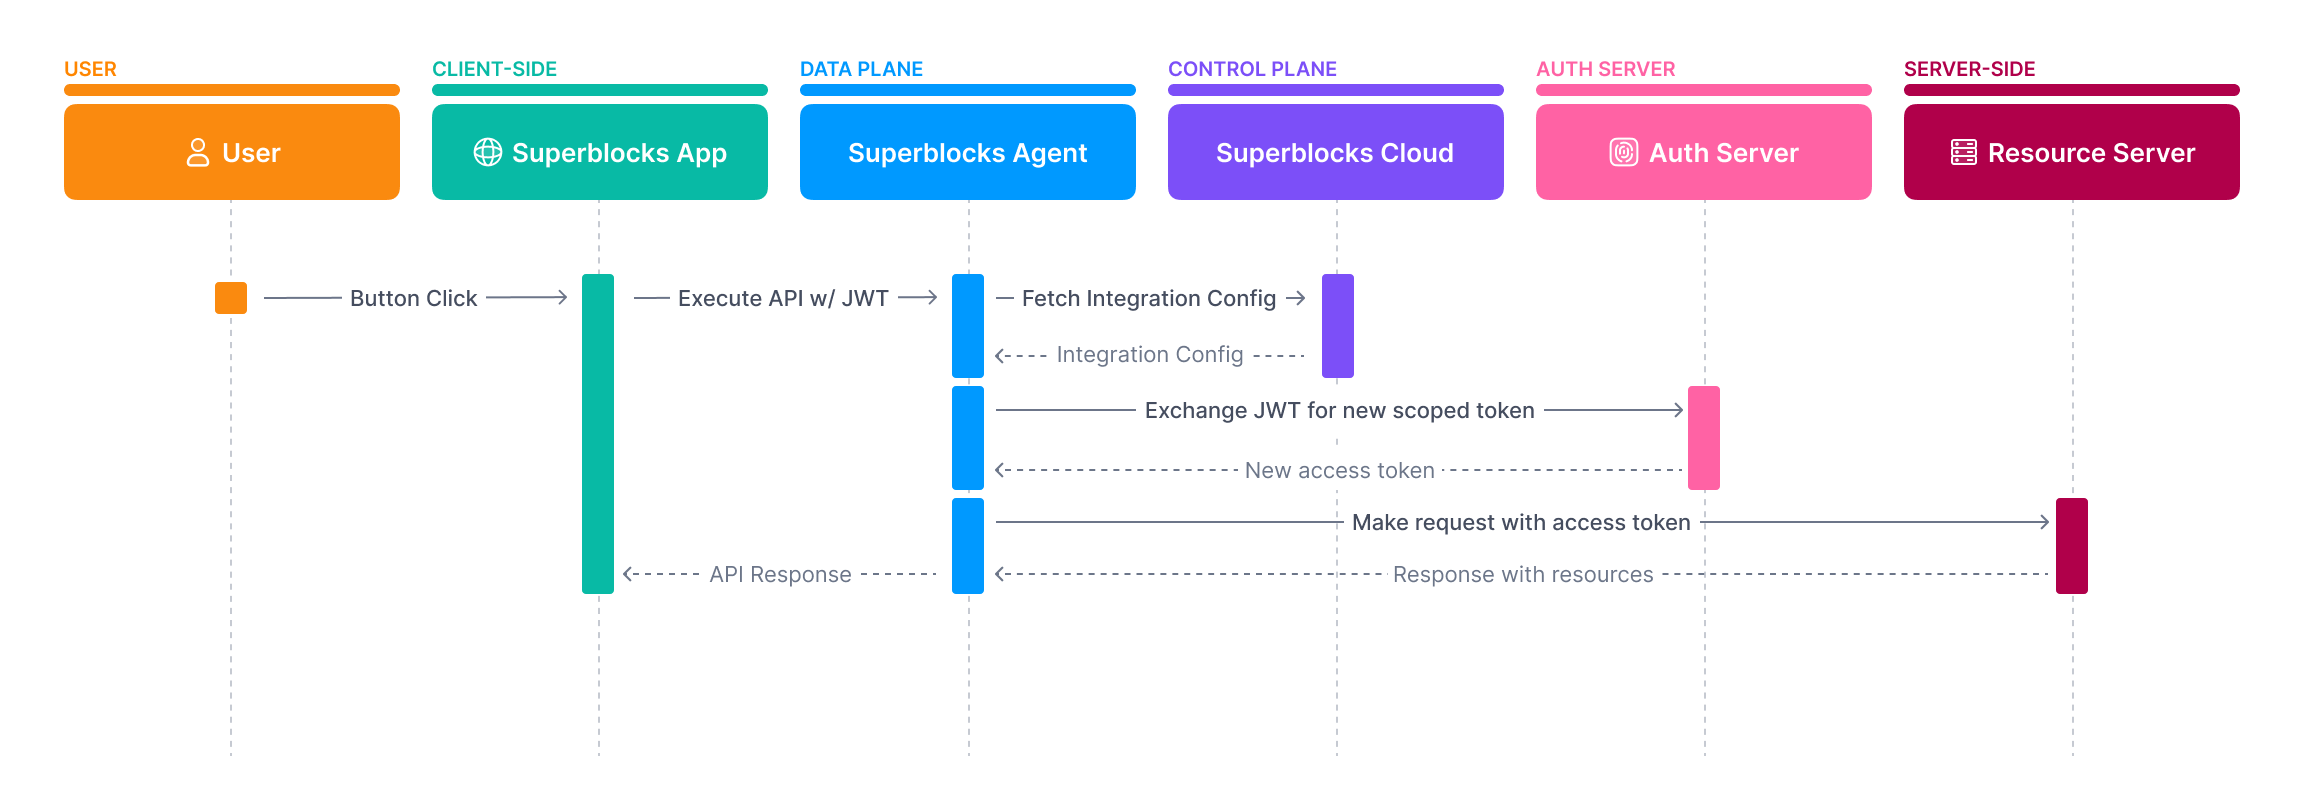 To use the on-behalf-of token exchange flow:
1. In the Integration configuration select **OAuth2 - On-Behalf-Of Token Exchange**
2. Select a **Subject token source**
* **Login Identity Provider**: Use the token issued to Superblocks when users logged in as the `subject_token`
* **Static Token**: Provide a static token to use as the `subject_token`
If you choose **Login Identity Provider**, this integration can't be used in Workflows or Scheduled Jobs since it will require a user's JWT to authenticate
3. Specifying the following configuration values:
|
To use the on-behalf-of token exchange flow:
1. In the Integration configuration select **OAuth2 - On-Behalf-Of Token Exchange**
2. Select a **Subject token source**
* **Login Identity Provider**: Use the token issued to Superblocks when users logged in as the `subject_token`
* **Static Token**: Provide a static token to use as the `subject_token`
If you choose **Login Identity Provider**, this integration can't be used in Workflows or Scheduled Jobs since it will require a user's JWT to authenticate
3. Specifying the following configuration values:
| Field
| Required | Description |
| -------------------------------------- | ------------------------------------------ | --------------------------------------------------------------------------------------------------------------------------------------------------------------------------- |
| **Subject token type** | ✗ | The type of security token provided in the **Static token** field or by your IdP when logging into Superblocks. Defaults to `urn:ietf:params:oauth:token-type:access_token` |
| **Token URL** | ✓ | The token endpoint of the authorization server, used to exchange an authorization code for an access token |
| **Client ID** | ✓ | The ID issued to your OAuth client during registration. |
| **Client secret** | ✓ | The secret issued to your OAuth client during registration. |
| **Audience** | ✗ | The intended recipient of the token, usually in a format like
`https://api-a.example.com`. Check API docs for the format. |
| **Scopes** | ✗ | The scopes that you want to request authorization for. These must be separated by spaces. |
4. Use the [`oauth` object](#the-oauth-object) in **Headers** or **Params** to define how the token response should be sent to the resource server. For example, to send the access token as an Authorization header, set:
When an API with this auth type executes, the Superblocks Agent will send a request to the `/token` endpoint of the authorization server, including in the request a `subject_token` based on the source selected. After an access token is returned, it is cached to improve future API performance. Once the token expires, Superblocks reinitiates the token exchange for you.
If you use your IdP as the source of the subject token and the IdP token has expired, the user will be prompted to log in again to obtain a new subject token.
Learn more about [token caching and refresh](#token-caching-and-refresh)
#### `POST` Token URL
Exchanging user's JWT issued at login or static token for new access token
##### Request
```bash theme={null}
curl --location --request POST \
--url '{token_url}' \
--header 'Accept: application/json' \
--header 'Content-Type: application/x-www-form-urlencoded' \
--data-urlencode 'grant_type=urn:ietf:params:oauth:grant-type:token-exchange' \
--data-urlencode 'client_id={client_id}' \
--data-urlencode 'client_secret={client_secret}' \
--data-urlencode 'subject_token_type={subject_token_type or urn:ietf:params:oauth:token-type:access_token}' \
--data-urlencode 'subject_token={current user JWT issued at login or static token}' \
--data-urlencode 'scope={scopes}' \
--data-urlencode 'audience={audience}'
```
##### Expected Response
```bash theme={null}
HTTP/1.1 200 OK
Content-Type: application/json
{
"token_type": "Bearer",
"expires_in": 3600,
"access_token": "eyJraWQiOiJR.....ajXZIk3GryDPC8OIhLsQ",
"scope": "customScope",
"issued_token_type": "urn:ietf:params:oauth:token-type:access_token"
}
```
### Client Credential
Client credential grant types are typically not used to access user data but instead for machine-to-machine communication. When an API executes, Superblocks exchanges OAuth client information with the authorization server to get an access token. That token is then used in the subsequent request.
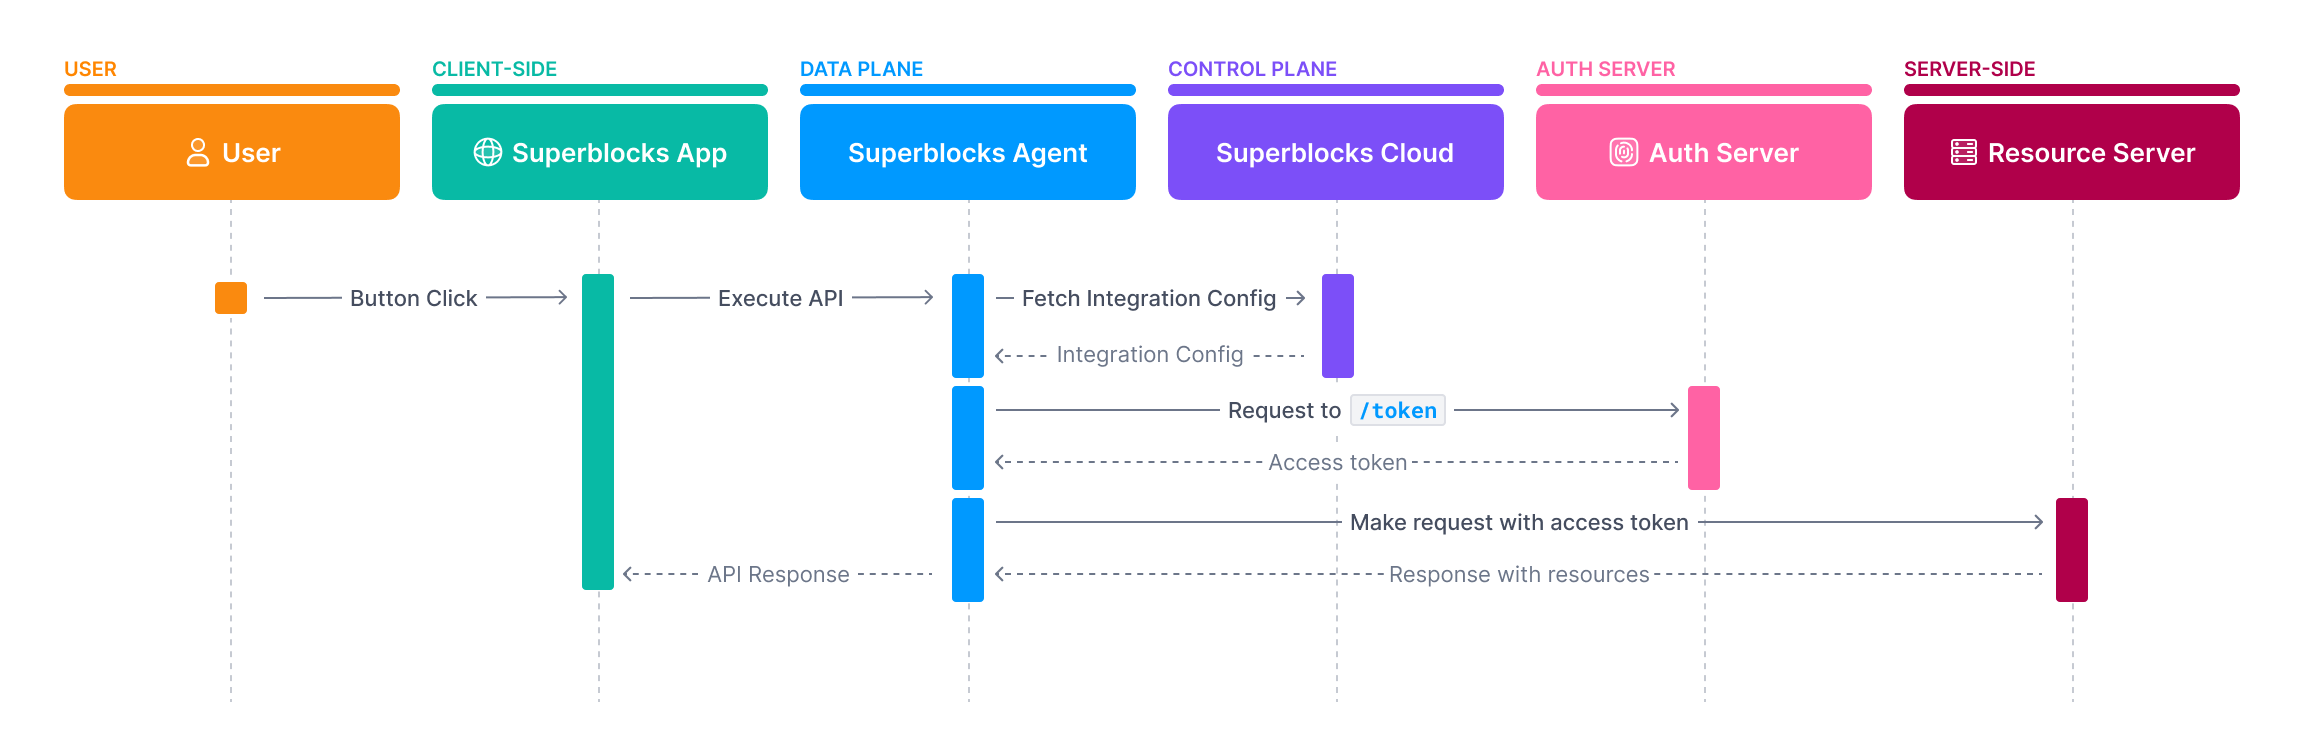 To use the client credential flow:
1. In the Integration configuration select **OAuth2 - Client Credentials Grant**
2. Specify the following configuration values:
|
To use the client credential flow:
1. In the Integration configuration select **OAuth2 - Client Credentials Grant**
2. Specify the following configuration values:
| Field
| Required | Description |
| -------------------------------------- | ------------------------------------------ | ----------------------------------------------------------------------------------------------------------------------------------------------------------------------------------------------------- |
| **Token URL** | ✓ | The token endpoint of the authorization server, used to exchange an authorization code for an access token.
**Note**: this value is not required for public APIs and is set by Superblocks |
| **Client ID** | ✓ | The ID issued to your OAuth client during registration. |
| **Client secret** | ✓ | The secret issued to your OAuth client during registration. |
| **Audience** | ✗ | The intended recipient of the token, usually in a format like
`https://api-a.example.com`. Check API docs for the format. |
| **Scopes** | ✗ | The scopes that you want to request authorization for. These must be separated by spaces. |
3. Use the [`oauth` object](#the-oauth-object) in **Headers** or **Params** to define how the token response should be sent to the resource server. For example, to send the access token as an Authorization header, set:
After an access token is retrieved it is cached to improve future API performance. Once the token expires, Superblocks reinitiates the token exchange to get a new token. Learn more in [token caching and refresh](#token-caching-and-refresh).
#### `POST` Token URL
Get an access token using the client ID and client secret
##### Request
```bash theme={null}
curl --request POST \
--url {token_url} \
--header 'Accept: application/json' \
--header 'Authorization: Basic {Base64-encoded client_id and client_secret}' \
--header 'Cache-Control: no-cache' \
--header 'Content-Type: application/x-www-form-urlencoded' \
--data-urlencoded 'grant_type=client_credentials' \
--data-urlencoded 'scope={scopes}' \
--data-urlencoded 'audience={audience}'
```
##### Expected Response
```bash theme={null}
HTTP/1.1 200 OK
Content-Type: application/json
{
"token_type": "Bearer",
"expires_in": 86400,
"access_token": "eyJhbG[...]1LQ",
"scope": "customScope"
}
```
### Implicit
Implicit flows are primarily intended for browser-based apps that don't support Cross-Origin Resource Sharing (CORS) or lack modern cryptography APIs. In this flow, the client doesn't make a request to a `/token` endpoint, but instead receives the access token in the redirect from the `/authorize` endpoint.
This flow is less secure, it's recommended to use [Authorization Code](#authorization-code) if available. Because it is intended for less-trusted clients, it doesn't support refresh tokens.
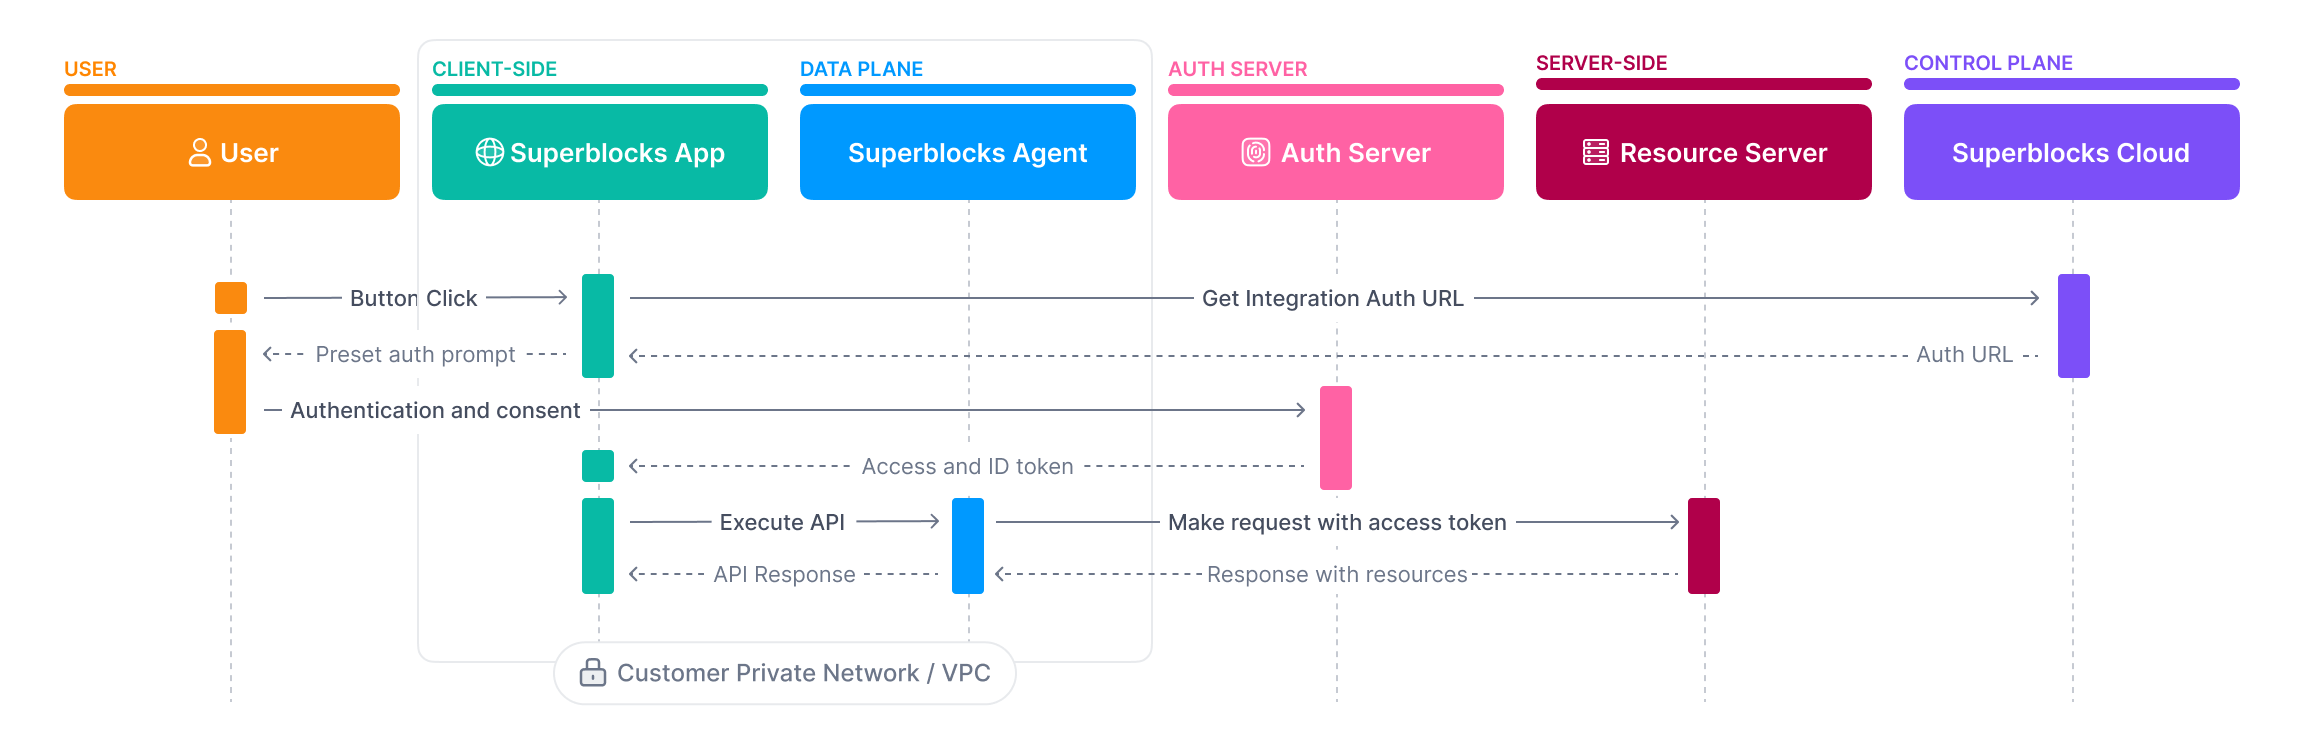 To use the implicit flow:
1. In the Integration configuration select **OAuth2 - Implicit Grant**
2. Copy the **Callback URL** provided and add it to the **Allowed Callback URLs** of your OAuth client
3. Specify the following configuration values:
|
To use the implicit flow:
1. In the Integration configuration select **OAuth2 - Implicit Grant**
2. Copy the **Callback URL** provided and add it to the **Allowed Callback URLs** of your OAuth client
3. Specify the following configuration values:
| Field
| Required | Description |
| -------------------------------------- | ------------------------------------------ | --------------------------------------------------------------------------------------------------------------------------------------------------------------------------- |
| **Authorization URL** | ✓ | The endpoint users will be redirected to in order to log in and authorize access.
**Note**: this value is not required for public APIs and is set by Superblocks |
| **Client ID** | ✓ | The ID issued to your OAuth client during registration. |
| **Audience** | ✗ | The intended recipient of the token, usually in a format like
`https://api-a.example.com`. Check API docs for the format. |
| **Prompt** | ✗ | Determines if user is prompted for consent. To skip the prompt and perform silent authentication, set to `none` |
| **Scopes** | ✗ | The scopes that you want to request authorization for. These must be separated by spaces. |
4. Use the [`oauth` object](#the-oauth-object) in **Headers** or **Params** to define how the token response should be sent to the resource server. For example, to send the access token as an Authorization header, set:
This flow is initiated in the user's browser when an API using this Integration executes. After an access token is returned, it is saved as an HTTP-Only secure cookie in the user's browser. Once the token expires, Superblocks will reprompt the user to log in. Learn more about [token caching](#token-caching-and-refresh).
Since a user must log in, integrations that use this auth method can't be used in Workflows or Scheduled Jobs
#### `GET` Authorization URL
##### Request
```bash theme={null}
GET {authorization_url}?
client_id={client_id}&
scope={scopes}}&
audience={audience}&
response_type=token&
redirect_uri=https%3A%2F%2Fapp.superblocks.com%2Foauth%2Fcallback&
state=STATE&
nonce=NONCE
```
##### Expected Response
```bash theme={null}
HTTP/1.1 302 Found
Location: https://app.superblocks.com/oauth/callback#access_token=TOKEN&
state=STATE&
token_type=Bearer&
scope={scopes}&
expires_in=SECONDS
```
### Password Grant (Legacy)
The Password Grant (Legacy) flow, sometimes referred to as a Resource Owner Password flow, is an OAuth flow intended for highly-trusted apps that can't do redirects. With this flow, either the Integration Configurer or an end-user will provide a username and password. These credentials will be sent to the `/token` endpoint, which then responds with a short-lived access token.
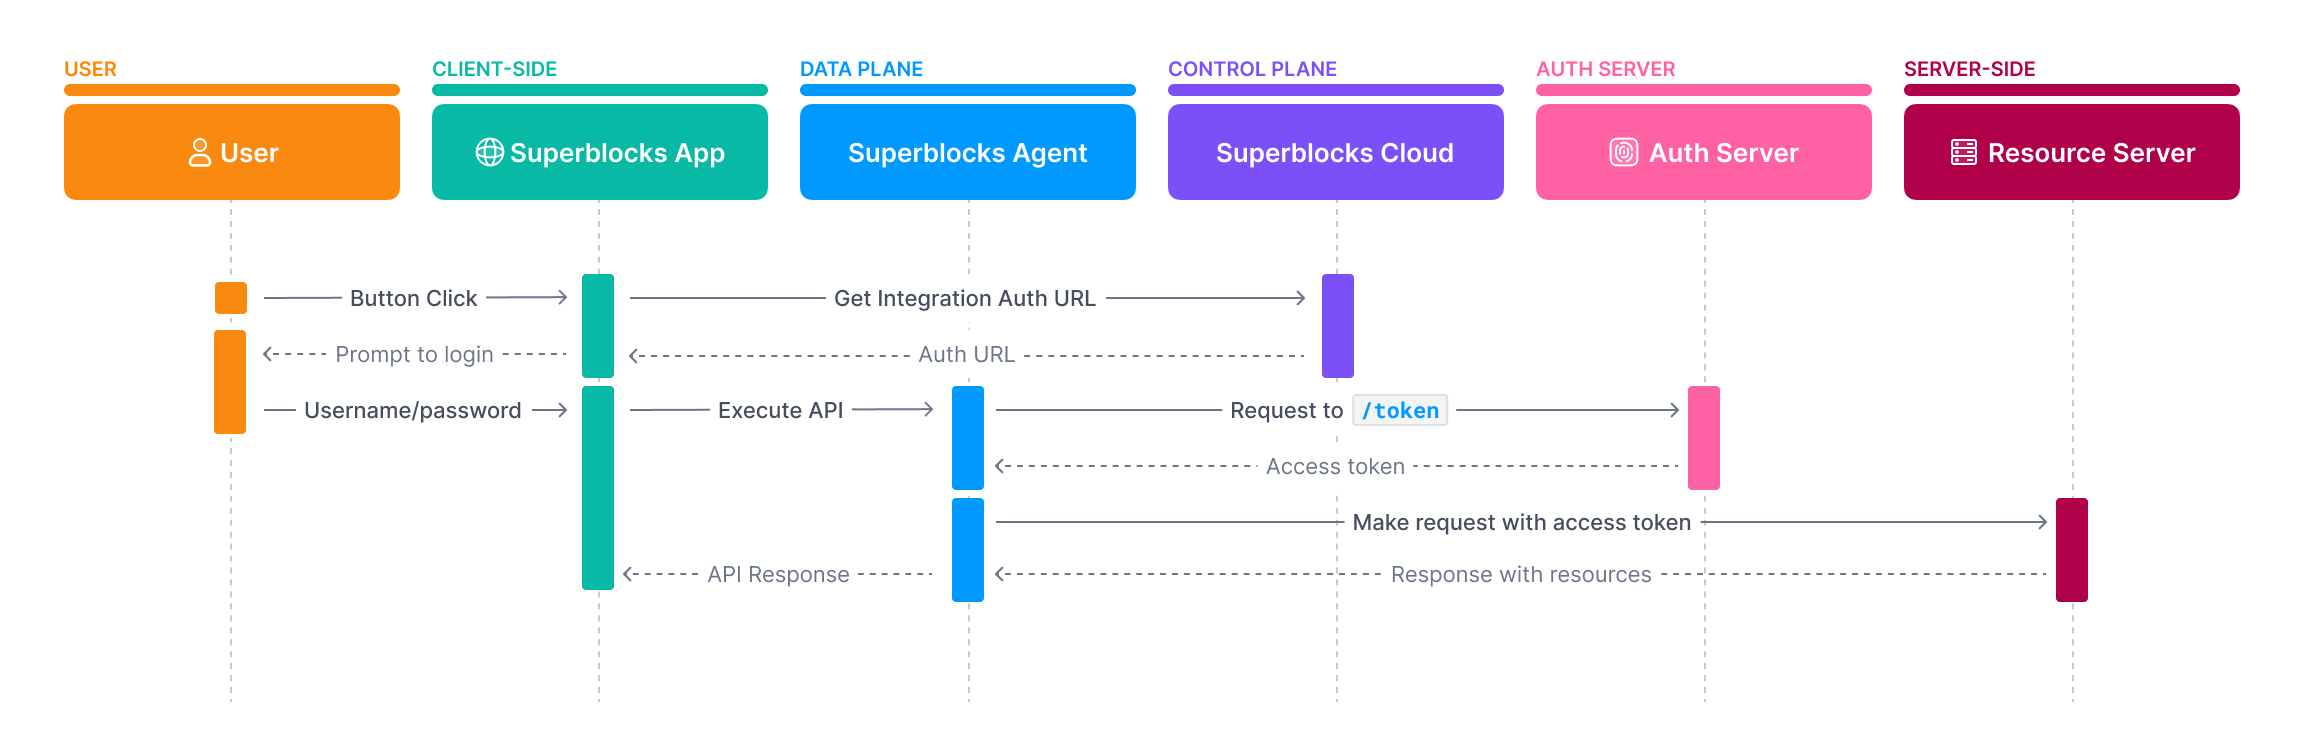 To use the password grant (legacy) flow:
1. In the Integration configuration select **OAuth2 - Password Grant (Legacy)**
2. Specify the following configuration values:
|
To use the password grant (legacy) flow:
1. In the Integration configuration select **OAuth2 - Password Grant (Legacy)**
2. Specify the following configuration values:
| Field
| Required | Description |
| -------------------------------------- | ------------------------------------------ | ----------------------------------------------------------------------------------------------------------------------------------------------------------------------------------------------------- |
| **Token URL** | ✓ | The token endpoint of the authorization server, used to exchange an authorization code for an access token.
**Note**: this value is not required for public APIs and is set by Superblocks |
| **Client ID** | ✓ | The ID issued to your OAuth client during registration. |
| **Client secret** | ✓ | The secret issued to your OAuth client during registration. |
| **Audience** | ✗ | The intended recipient of the token, usually in a format like
`https://api-a.example.com`. Check API docs for the format. |
3. If you want to use shared credentials, check **Share username/password across all users** and provide the shared username & password
If the shared credentials option is not selected, integrations with this auth method cannot be used in Workflows or Scheduled Jobs
4. Use the [`oauth` object](#the-oauth-object) in **Headers** or **Params** to define how the token response should be sent to the resource server. For example, to send the access token as an Authorization header, set:
If shared credentials aren't used, users will be prompted for a username/password before APIs can execute.
Once an access token is returned, it is saved as an HTTP-Only secure cookie in the browser. Superblocks will prompt the user to log back in when the token expires. Learn more about [token caching](#token-caching-and-refresh).
#### `POST` Token URL
###### Request
```bash theme={null}
curl --request POST \
--url {token_url} \
--header 'Accept: application/json' \
--header 'Content-Type: application/x-www-form-urlencoded' \
--data-urlencoded 'grant_type=password' \
--data-urlencoded 'client_id={client_id}' \
--data-urlencoded 'client_secret={client_secret}' \
--data-urlencoded 'username=USERNAME' \
--data-urlencoded 'password=PASSWORD' \
--data-urlencoded 'scope={scopes}' \
--data-urlencoded 'audience={audience} \
```
##### Expected Response
```bash theme={null}
HTTP/1.1 200 OK
Content-Type: application/json
{
"token_type": "Bearer",
"expires_in": 86400,
"access_token": "eyJz93a...k4laUWw",
"id_token": "eyJhb[...]yosFQ",
"scope": "customScope"
}
```
## The **`oauth`** object
The results of an OAuth 2.0 exchange can be referrenced in your Integration configuration using the `oauth` object. The `oauth` object has the following properties.
| Property | Datatype | Description | Full Path |
| --------------- | -------- | ---------------------------------------------------- | -------------------- |
| `token` | `STRING` | The access token returned by the OAuth flow | `oauth.token` |
| `idToken` | `STRING` | The ID token returned by the OAuth flow if available | `oauth.idToken` |
| `tokenDecoded ` | `OBJECT` | A JSON object of the decoded ID token claims | `oauth.tokenDecoded` |
## Token caching and refresh
This section includes specifics on how OAuth 2.0 access tokens are handled. For more information on sessions management see our guide on [Credential & Session Management](/integrations/auth/credential-and-session-management)
### How tokens are cached
OAuth 2.0 flows result in an access token that is used when making requests to a service. Once an access token is obtained through an OAuth flow, it is cached by Superblocks based on both the OAuth client generating the token (`client_id`, `audience`, `scopes`, etc) and the user for whom the token was issued.
Because tokens are cached based on the OAuth client, you can use the same OAuth client across integrations. If a user already has a cached token for the OAuth client from a different integration, Superblocks will use that cached token, even when executing requests with integrations the user has never used.
Caching reduces the need for repeated authentication requests, improving performance and the user experience of your Superblocks app.
### Cache locations
Tokens are either cached in the user's browser or Superblocks Cloud server depending on the nature of the token generated. See the table below to understand where tokens are cached based on the OAuth 2.0 flow.
Tokens are only ever cached in the browser if the OAuth 2.0 flow is a high-trust flow that exposes tokens to the client. These tokens are stored in HTTP-Only Secure cookies that are not accessible to client-side JavaScript.
| OAuth 2.0 Flow | Shared Credentials | Cache location |
| ----------------------------------------------------------- | ------------------------------------------ | -------------- |
| [Authorization Code](#authorization-code) | ✗ | Server-side |
| [Authorization Code](#authorization-code) | ✓ | Server-side |
| [On-Behalf-Of Token Exchange](#on-behalf-of-token-exchange) | ✗ | Server-side |
| [On-Behalf-Of Token Exchange](#on-behalf-of-token-exchange) | ✓ | Server-side |
| [Client Credential](#client-credential) | | Server-side |
| [Implicit](#implicit) | | Client-side |
| [Password Grant (Legacy)](#password-grant-legacy) | ✗ | Client-side |
| [Password Grant (Legacy)](#password-grant-legacy) | ✓ | Server-side |
### Refreshing access tokens
During certain OAuth 2.0 flows, the authorization server returns a long-lived refresh token. When refresh token is present, Superblocks will automatically use it to refresh expired access tokens in the background before executing requests. The refreshed access token is then [cached](#how-tokens-are-cached) for future use.
The following OAuth methods support token refresh flows:
* [Authorization Code](#authorization-code)
* [Password Grant (Legacy)](#password-grant-legacy)