> ## Documentation Index
> Fetch the complete documentation index at: https://docs.superblocks.com/llms.txt
> Use this file to discover all available pages before exploring further.

# Set up Snowflake External OAuth with Okta as your IdP

export const Alert = ({type, title, children}) => {
  const getIcon = () => {
    switch (type) {
      case 'info':
        return "data:image/svg+xml,%3Csvg xmlns='http://www.w3.org/2000/svg' width='20' height='20' viewBox='0 0 20 20' fill='none'%3E%3Cpath d='M10 0C4.477 0 0 4.477 0 10s4.477 10 10 10 10-4.477 10-10S15.523 0 10 0zm0 15c-.552 0-1-.448-1-1s.448-1 1-1 1 .448 1 1-.448 1-1 1zm1-3H9V6h2v6z' fill='%230099FF'/%3E%3C/svg%3E";
      case 'success':
        return "data:image/svg+xml,%3Csvg width='20' height='20' viewBox='0 0 20 20' fill='none' xmlns='http://www.w3.org/2000/svg'%3E%3Cpath fill-rule='evenodd' clip-rule='evenodd' d='M10 0C4.477 0 0 4.477 0 10s4.477 10 10 10 10-4.477 10-10S15.523 0 10 0zm4.293 6.293L9 11.586 5.707 8.293c-.391-.391-1.024-.391-1.414 0s-.391 1.024 0 1.414l4 4c.391.391 1.024.391 1.414 0l6-6c.391-.391.391-1.024 0-1.414s-1.024-.391-1.414 0z' fill='%230CC26D'/%3E%3C/svg%3E";
      case 'warning':
        return "data:image/svg+xml;charset=utf-8;base64,PHN2ZyB4bWxucz0naHR0cDovL3d3dy53My5vcmcvMjAwMC9zdmcnIHhtbDpzcGFjZT0ncHJlc2VydmUnIHdpZHRoPScxMDgwJyBoZWlnaHQ9JzEwODAnPjxyZWN0IHdpZHRoPScxMDAlJyBoZWlnaHQ9JzEwMCUnIGZpbGw9J3RyYW5zcGFyZW50Jy8+PHBhdGggZD0nTTEzLjc5NCAxMC43NSA4LjMgMS4yNWExLjUgMS41IDAgMCAwLTIuNiAwbC01LjQ5NCA5LjVBMS40OTQgMS40OTQgMCAwIDAgMS41IDEzaDExYTEuNDkzIDEuNDkzIDAgMCAwIDEuMjk0LTIuMjVNNi41IDUuNWEuNS41IDAgMCAxIDEgMFY4YS41LjUgMCAwIDEtMSAwek03IDExYS43NS43NSAwIDEgMSAwLTEuNS43NS43NSAwIDAgMSAwIDEuNScgc3R5bGU9J3N0cm9rZTpub25lO3N0cm9rZS13aWR0aDoxO3N0cm9rZS1kYXNoYXJyYXk6bm9uZTtzdHJva2UtbGluZWNhcDpidXR0O3N0cm9rZS1kYXNob2Zmc2V0OjA7c3Ryb2tlLWxpbmVqb2luOm1pdGVyO3N0cm9rZS1taXRlcmxpbWl0OjQ7ZmlsbDojZmY5ZjM1O2ZpbGwtcnVsZTpub256ZXJvO29wYWNpdHk6MScgdHJhbnNmb3JtPSd0cmFuc2xhdGUoLjAyIDE5LjMwNSlzY2FsZSg3Ny4xNCknLz48L3N2Zz4=";
      case 'danger':
        return "data:image/svg+xml,%3Csvg width='20' height='20' viewBox='0 0 20 20' fill='none' xmlns='http://www.w3.org/2000/svg'%3E%3Cpath d='M10 0C4.477 0 0 4.477 0 10s4.477 10 10 10 10-4.477 10-10S15.523 0 10 0zm5.707 4.293L10 9.586 4.293 4.293c-.391-.391-1.024-.391-1.414 0s-.391 1.024 0 1.414L8.586 11l-5.707 5.293c-.391.391-.391 1.024 0 1.414s1.024.391 1.414 0L10 12.414l5.707 5.293c.391.391 1.024.391 1.414 0s.391-1.024 0-1.414L11.414 11l5.707-5.293c.391-.391.391-1.024 0-1.414s-1.024-.391-1.414 0z' fill='%23F45252'/%3E%3C/svg%3E";
      case 'note':
        return "data:image/svg+xml,%3Csvg xmlns='http://www.w3.org/2000/svg' width='20' height='20' viewBox='0 0 20 20' fill='none'%3E%3Cpath d='M10 0C4.477 0 0 4.477 0 10s4.477 10 10 10 10-4.477 10-10S15.523 0 10 0zm0 15c-.552 0-1-.448-1-1s.448-1 1-1 1 .448 1 1-.448 1-1 1zm1-3H9V6h2v6z' fill='%230099FF'/%3E%3C/svg%3E";
      default:
        return "";
    }
  };
  return <div className={`alert alert--${type}`}>
      <div className="alert-icon" style={{
    backgroundImage: `url("${getIcon()}")`,
    backgroundRepeat: 'no-repeat',
    backgroundPosition: 'center center',
    backgroundSize: '20px',
    width: '24px',
    height: '24px',
    position: 'absolute',
    left: '16px',
    top: '16px'
  }} />
      <div className="alert-content">
        {title && <div className="alert-title">{title}</div>}
        <div className="alert-body">{children}</div>
      </div>
    </div>;
};

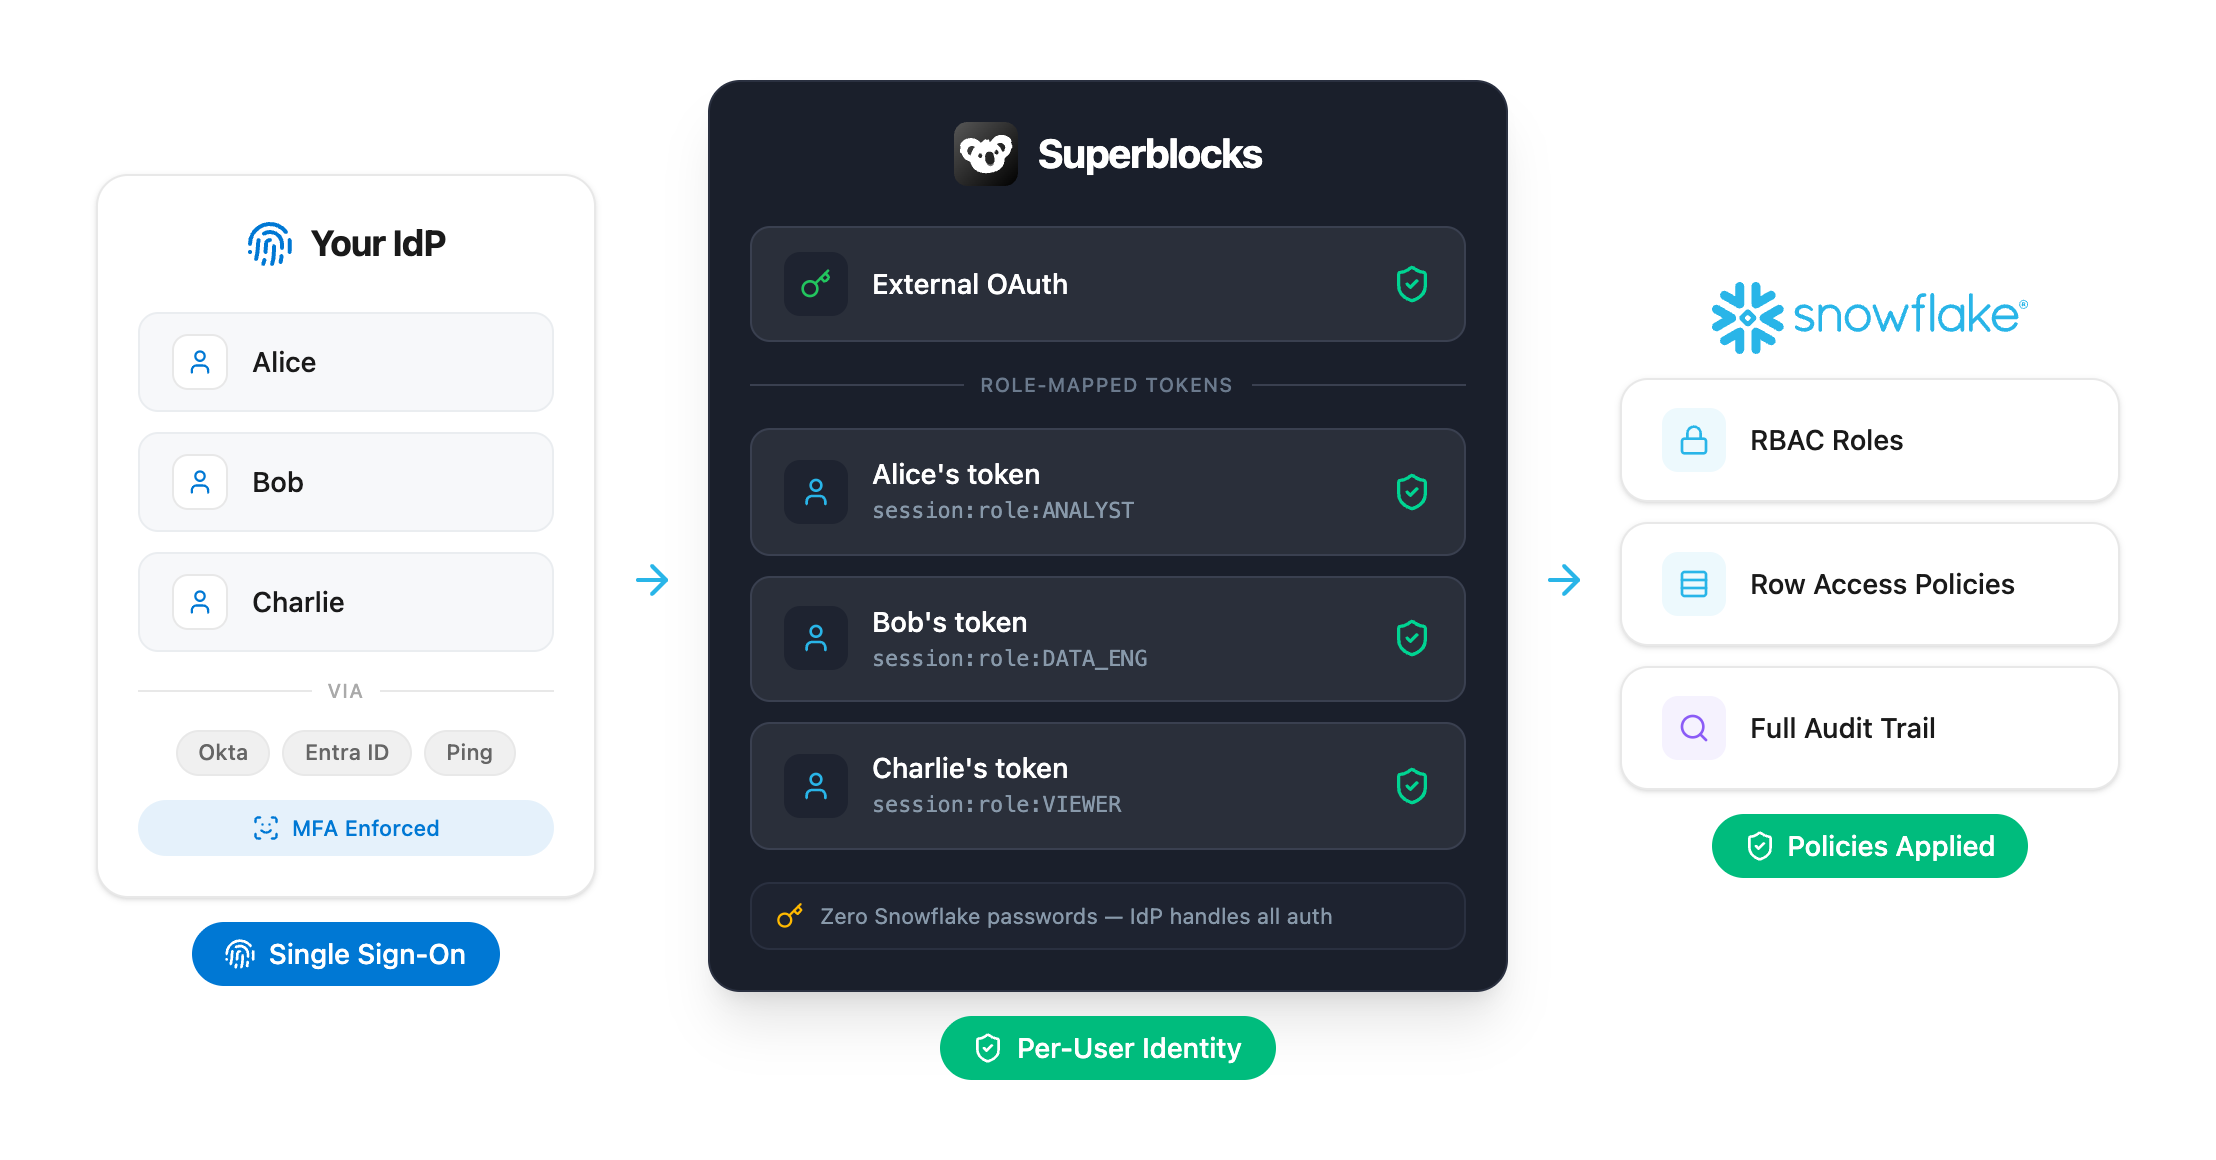
This guide describes how to use the **External OAuth** auth method of the [Snowflake Integration](/integrations/integrations-library/snowflake). It includes instructions for configuring Snowflake as an OAuth Resource and Okta as an External OAuth authorization server to use with Superblocks.

Once configured, you'll be able to connect to Snowflake on behalf of the current Superblocks user and enforce data access using your already defined roles and permissions in Snowflake.

<img src="https://mintcdn.com/superblocks/4CaXR9yMYhYSXJSi/images/integrations/authentication/superblocks-snowflake-architecture.png?fit=max&auto=format&n=4CaXR9yMYhYSXJSi&q=85&s=6dd06234e301ae798220798e303533d1" alt="" width="2216" height="1160" data-path="images/integrations/authentication/superblocks-snowflake-architecture.png" />

## Prerequisites

To follow this guide, you'll need:

* An Okta account with the following permissions:
  * [API Access Management Administrator](https://help.okta.com/okta_help.htm?type=\&locale=en\&id=csh-administrators-api-access-mgmt-admin)
  * [Application Administrator](https://help.okta.com/en-us/content/topics/security/administrators-app-admin.htm?cshid=csh-administrators-app-admin)
* An existing Superblocks SSO configuration using [Okta OIDC](/admin/org-administration/auth/single-sign-on/okta#create-an-oidc-integration)
* A Snowflake account with `ACCOUNTADMIN` permission
<Alert type="warning">
  If your Superblocks SSO currently uses a SAML-based flow, please reach out to our [support team](/enterprise/support/help) for assistance migrating to an OIDC-based log-in flow
</Alert>

## External OAuth flow

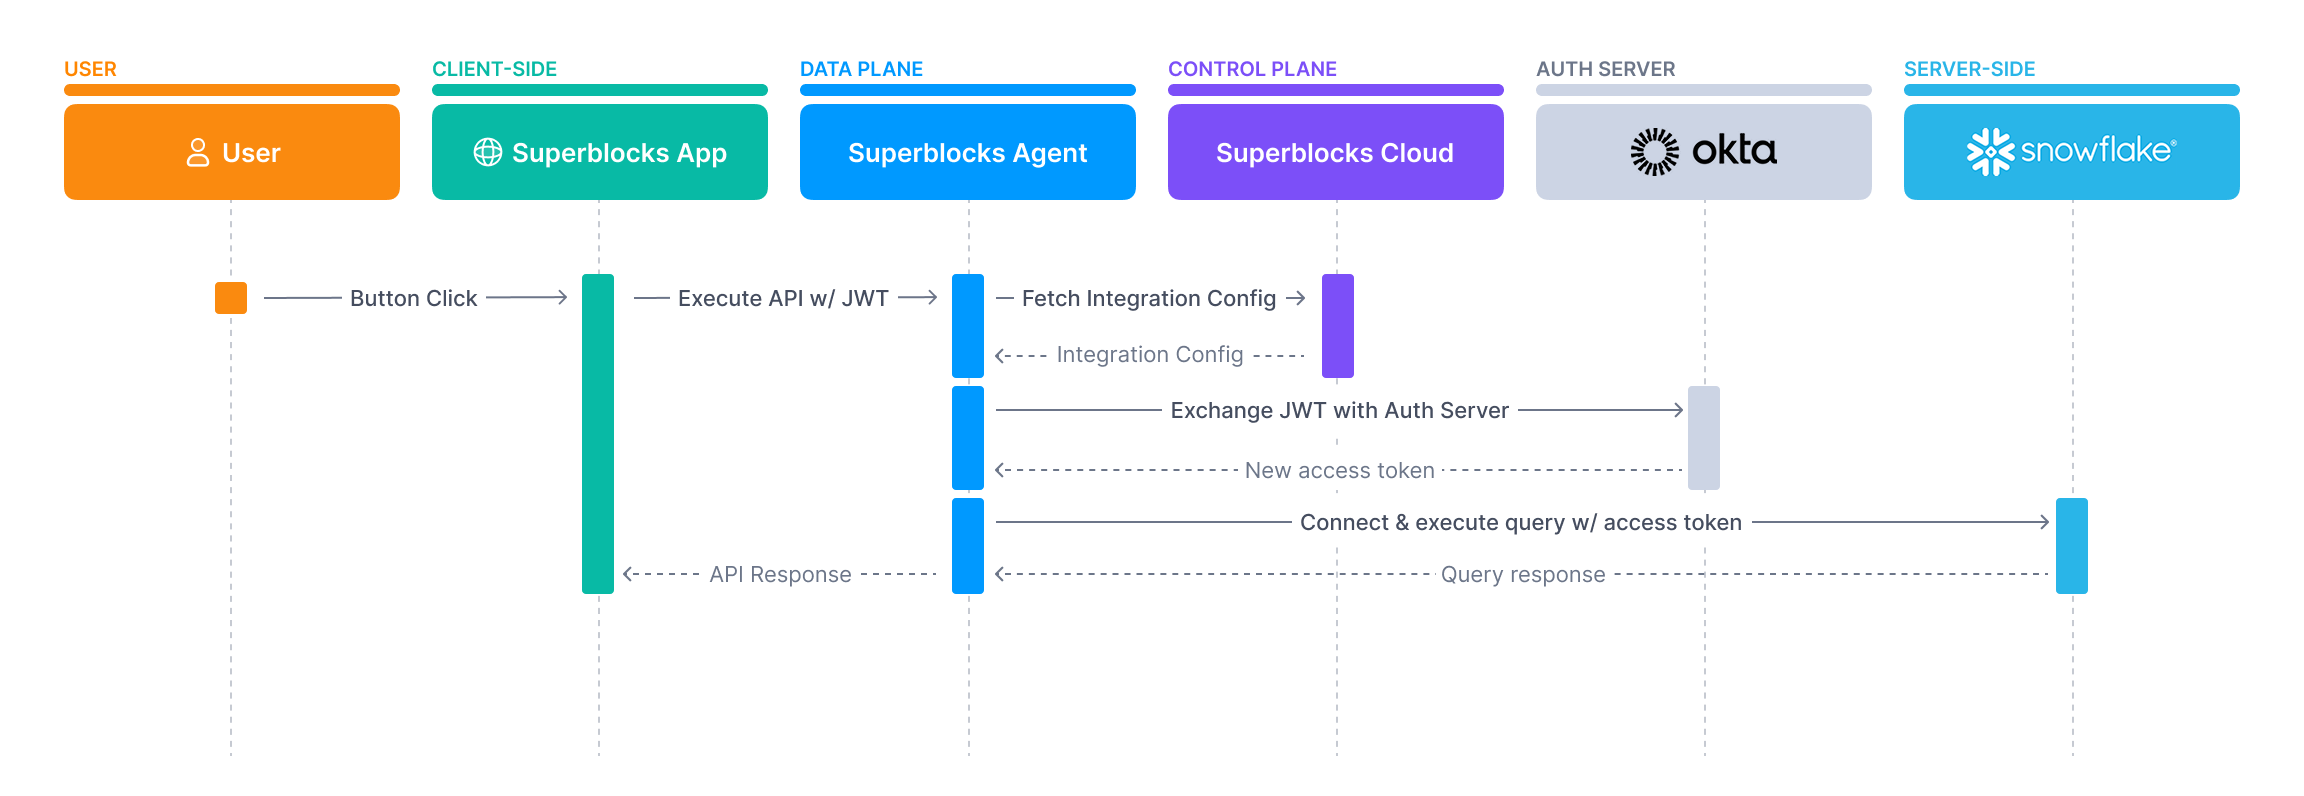
<img src="https://mintcdn.com/superblocks/TqcwM8ac6ozIt6Fv/images/integrations/authentication/obh-token-exchange-snowflake.png?fit=max&auto=format&n=TqcwM8ac6ozIt6Fv&q=85&s=da32509f2ed427526d987cd2361bde03" alt="On-Behalf-Of Token Exchange flow sequence diagram" width="2304" height="796" data-path="images/integrations/authentication/obh-token-exchange-snowflake.png" />

<Alert type="info">
  **Note**: This flow assumes the user is already logged into Superblocks
</Alert>

When using this flow:

1. Your user will log in to Superblocks using your [Okta OIDC app](/admin/org-administration/auth/single-sign-on/okta#create-an-oidc-integration)
2. When the user executes an API, a request is sent from the browser to the Superblocks Agent that includes the user's Okta JWT
3. If the API includes a step to query Snowflake, the Superblocks Agent will make a request to your [Okta authorization server](#create-an-authorization-server) to exchange the user’s Okta JWT for a new access token intended for Snowflake
4. The Okta authorization server will validate the user’s JWT and grants a new access token with the necessary `sub`, `aud`, and `scp` to access Snowflake
5. The Superblocks Agent connects to Snowflake using this access token
6. Your Snowflake instance validates the JWT and decodes it to authenticate the user to Snowflake
7. Provided the user is authenticated, Superblocks executes their query and returns data to the browser

For more resources on this auth flow, see:

* Snowflake's docs to [Configure Okta for External OAuth](https://docs.snowflake.com/en/user-guide/oauth-okta)
* Okta's docs on [Authorization Servers](https://developer.okta.com/docs/concepts/auth-servers/)
* Superblocks docs on [OAuth 2.0 - On-Behalf-Of Token Exchange](/integrations/auth/oauth-20#on-behalf-of-token-exchange)

## Setup instructions

The following instructions show how to configure Okta, Snowflake, and Superblocks to perform the token exchange.

### Create an API in Okta

To perform the token exchange, you'll need to create an API application that the Superblocks Agent will use to act as an OAuth client.

1. Log in to Okta and go to the **Admin Console**
2. Navigate to **Applications** → **Applications**
3. Click **Create App Integration**
4. Select **API Services** followed by **Next**
5. Name the app something like **Superblocks Integration** and click **Save**
6. Click **Edit** in the **General Settings** section of the **General** tab
7. Uncheck the checkbox for **Require Demonstrating Proof of Possession (DPoP) header in token requests**
8. Check the checkbox for **Token Exchange** and click **Save**
9. Make a note of the `Client ID` in the **Client Credentials** section and the `Client Secret` in the **CLIENT SECRETS** section

### Create an authorization server

During the token exchange, the Superblocks Agent exchanges the user's OpenID access token granted during log in with an [Okta Authorization Server](https://developer.okta.com/docs/guides/customize-authz-server/main) configured to issue tokens for Snowflakes.

#### Create the authorization server

1. In the Admin Console, go to **Security** → **API**
2. On the **Authorization Servers** tab
3. Click **Add Authorization Server** and in the dialog enter the following:
   * **Name**: Snowflake Authorization Server
   * **Description**: Issue access tokens for Snowflake
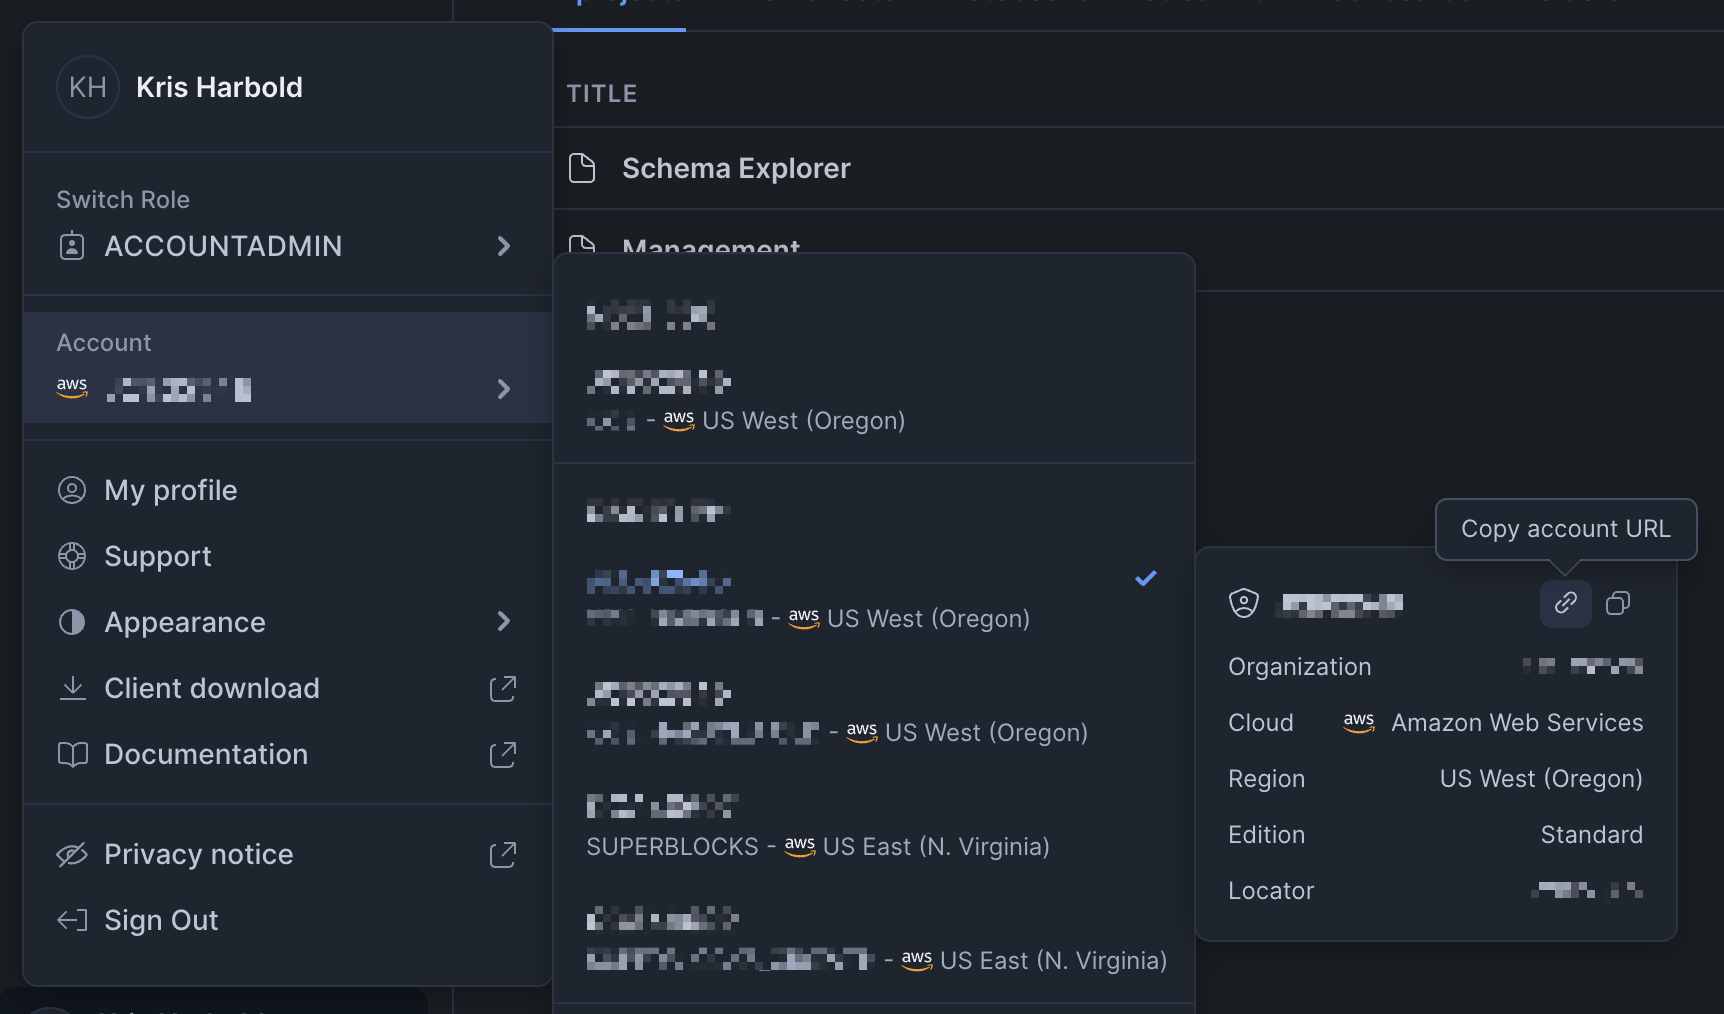
   * **Audience**: The URL of the Snowflake account you want to connect to. For example `https://<your-snowflake-account>.snowflakecomputing.com`
4. Click **Save**

<Accordion title="Finding your Snowflake Account URL">
  If you don't know your Snowflake account URL, log into Snowflake and click on the profile icon, as shown below, to copy the URL.

  <img src="https://mintcdn.com/superblocks/G-ib4vcIpqKg18lL/images/integrations/authentication/snowflake-account-url.png?fit=max&auto=format&n=G-ib4vcIpqKg18lL&q=85&s=3cbb984859821c03dd8e5bd2dd978b44" alt="Click profile and open organization and account menu to find Account URL" width="1724" height="1014" data-path="images/integrations/authentication/snowflake-account-url.png" />
</Accordion>

#### Add `session:role-any` scope

1. From the authorization server, select the **Scopes** tab
2. Click **Add scopes**
3. In the dialog, enter the following:
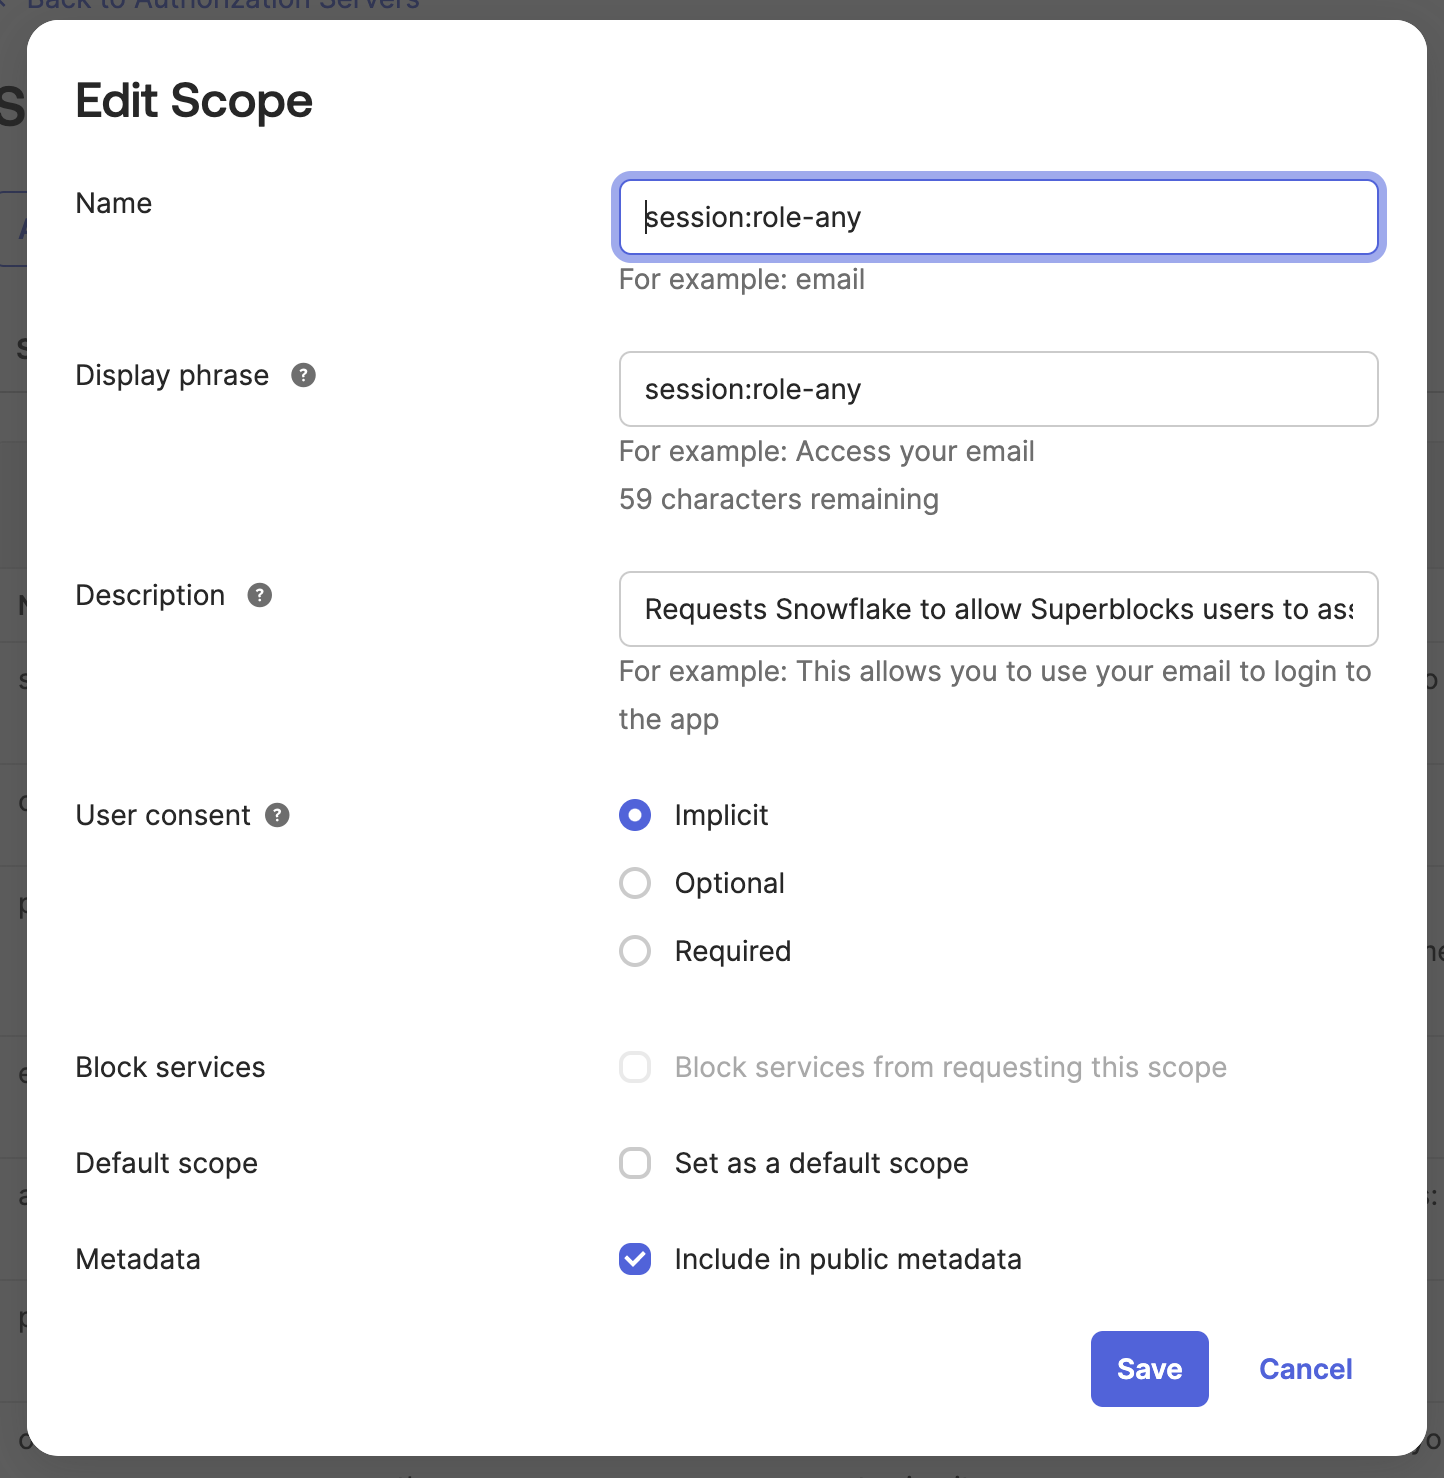
   * **Name**: `session:role-any`
   * **Display phrase**: `session:role-any`
   * **Description**: Ask Snowflake to let Superblocks assume the user's roles
   * **User consent**: Implicit
   * **Metadata**: Include in public metadata
4. Click **Save**

<img src="https://mintcdn.com/superblocks/G-ib4vcIpqKg18lL/images/integrations/authentication/snowflake-token-exchange-scopes.png?fit=max&auto=format&n=G-ib4vcIpqKg18lL&q=85&s=fe40d0ccd0470a2470b823076a4a3f21" alt="Snowflake Okta Auth Server session:role-any scope configuration" title="Snowflake Okta Auth Server session:role-any scope configuration" style={{width: '50%'}} width="1444" height="1478" data-path="images/integrations/authentication/snowflake-token-exchange-scopes.png" />

#### Create access policies and rules

1. From the authorization server, select the **Access Policies** tab and click **Add Policy**
2. In the **Add Policy** dialog that appears, enter the following:
   * **Name**: Access Superblocks
   * **Description**: Enter a description
   * **Assign to**: Select **The following clients** and search for your organization's Superblocks SSO application
3. Click **Create Policy**
4. Click **Add Rule** and in the dialog that appears, enter the following:
   * **Name**: Superblocks App to Agent
   * **AND Scopes requested**: Select **The following scopes** and enter `openid`
5. Click **Create rule**
6. Repeat steps 1 - 5 to create a policy and a rule that lets the Superblocks Agent talk to Snowflake.

   Use the following values for the **policy**:

   * **Name**: Access Snowflake
   * **Assign to**: Select **The following clients**, start typing the name of the [API](#create-an-api-in-okta) that you created earlier

   Use the following values for the **rule**:

   * **Name**: Agent to Snowflake
   * **AND Scopes requested**: Select **The following scopes**, and select the `session:role-any` scope
   * **AND Refresh token lifetime is**: Unlimited (this is recommmended but not required)

Learn more about how to [Create an Okta Authorization Servers](https://developer.okta.com/docs/guides/customize-authz-server/main/#create-an-authorization-server)

### Collect Okta information

1. From the authorization server, select the **Settings** tab
2. Click on the **Metadata URI** link to open the metadata document
3. In this document, locate the following values:

<table style={{tableLayout: "auto", width: "100%"}}>
  <thead>
    <tr>
      <th style={{width: "20%"}}>Metadata Value</th>
      <th style={{width: "50%"}}>Example</th>
      <th style={{width: "30%"}}>Snowflake Reference Value</th>
    </tr>
  </thead>

  <tbody>
    <tr>
      <td><code>issuer</code></td>
      <td style={{wordBreak: "break-word"}}>[https://dev-111111.oktapreview.com/oauth2/auslh9j9vf9ej7NfT0h7](https://dev-111111.oktapreview.com/oauth2/auslh9j9vf9ej7NfT0h7)</td>
      <td><code>OKTA\_ISSUER</code></td>
    </tr>

    <tr>
      <td><code>jwks\_uri</code></td>
      <td style={{wordBreak: "break-word"}}>[https://dev-111111.oktapreview.com/oauth2/auslh9j9vf9ej7NfT0h7/v1/keys](https://dev-111111.oktapreview.com/oauth2/auslh9j9vf9ej7NfT0h7/v1/keys)</td>
      <td><code>OKTA\_JWS\_KEY\_ENDPOINT</code></td>
    </tr>

    <tr>
      <td><code>token\_endpoint</code></td>
      <td style={{wordBreak: "break-word"}}>[https://dev-111111.oktapreview.com/oauth2/auslh9j9vf9ej7NfT0h7/v1/token](https://dev-111111.oktapreview.com/oauth2/auslh9j9vf9ej7NfT0h7/v1/token)</td>
      <td><code>OKTA\_OAUTH\_TOKEN\_ENDPOINT</code></td>
    </tr>
  </tbody>
</table>

### Create Snowflake security integration

With the information you've gathered from your Okta Authorization Server, you'll now create a security integration in Snowflake. The security integration ensures that Snowflake can communicate with Okta securely, validates the tokens from Okta, and provides the appropriate Snowflake data access to users based on the user role associated with the OAuth token.

For more information, see Snowflake's docs on [CREATE SECURITY INTEGRATION](https://docs.snowflake.com/en/sql-reference/sql/create-security-integration-oauth-external)

1. Log in to your Snowflake account
2. Change your current role to `ACCOUNTADMIN` or to a role with the global `CREATE INTEGRATION` privilege
3. Run the following SQL command
   ```sql theme={null}
   create security integration Superblocks_Okta_Security_Integration
       type = external_oauth
       enabled = true
       external_oauth_type = okta
       external_oauth_issuer = '<OKTA_ISSUER>'
       external_oauth_jws_keys_url = '<OKTA_JWS_KEY_ENDPOINT>'
       external_oauth_audience_list = ('<SNOWFLAKE_ACCOUNT_URL>')
       external_oauth_token_user_mapping_claim = 'sub'
       external_oauth_snowflake_user_mapping_attribute = 'login_name';
   ```

### Update SSO metadata

Superblocks SSO by default uses your Okta [Org Authorization Server](https://developer.okta.com/docs/concepts/auth-servers/#org-authorization-server). To use token exchange flows, we'll need to update your SSO configuration to a Custom Authorization Server.

To do this, we will need to know the `.well-known/openid-configuration` URL of the Snowflake Authorization Server you just created. To locate this URL:

1. Go to the **Settings** tab of your Snowflake Authorization Server
2. Copy the **Metadata URI** shown in the **Settings** section
3. Replace `oauth-authorization-server` with `openid-configuration`
4. Send this link to [support@superblocks.com](mailto:support@superblocks.com) with the Subject **Update Okta SSO to us Token Exchange**

<Alert type="info">
  If you want to use the [token exchange flow with you backend APIs](/integrations/auth/guides/on-behalf-of-token-exchange-backend-api) as well as Snowflake, make sure you've added this server as a [trusted server](https://help.okta.com/en-us/content/topics/security/api-add-trusted-servers.htm) to all other auth server you'll use in Superblocks.
</Alert>

### Configure Snowflake integration

Once you've gotten confirmation from Superblocks that we've updated your SSO to use the new Authorization Server, you're ready to configure your Snowflake integration. To do so:

1. Navigate to the **Integrations** page and locate your Snowflake integration or create a new one
2. In the **Connection method** dropdown, select **External OAuth**
3. Choose **Login Identity Provider** as the **Subject token source**
4. Specifying the following configuration values:

   | <div style={{width: 150 }}>Field</div> | Required                                   | Description                                                                                                                                                    |
   | -------------------------------------- | ------------------------------------------ | -------------------------------------------------------------------------------------------------------------------------------------------------------------- |
   | **Account identifier**                 | <span className="table-checkmark">✓</span> | [Snowflake Account Identifier](https://docs.snowflake.com/en/user-guide/admin-account-identifier#non-vps-account-locator-formats-by-cloud-platform-and-region) |
   | **Token URL**                          | <span className="table-checkmark">✓</span> | Set to the `OKTA_OAUTH_TOKEN_ENDPOINT` value                                                                                                                   |
   | **Client ID**                          | <span className="table-checkmark">✓</span> | The `client_id` of the [API](#create-an-api-in-okta) created earlier                                                                                           |
   | **Client secret**                      | <span className="table-checkmark">✓</span> | The `client_secret` of the [API](#create-an-api-in-okta) created earlier                                                                                       |
   | **Audience**                           | <span className="table-checkmark">✓</span> | `SNOWFLAKE_ACCOUNT_URL`                                                                                                                                        |
   | **Scopes**                             | <span className="table-checkmark">✓</span> | `session:role-any`                                                                                                                                             |

<Alert type="info">
  You can choose to set a default warehouse, schema, and role for the integration. If none are set, we will assume the defaults set by the user executing the query.
</Alert>

## Testing & troubleshooting

### Test your integration

With your integration updated to use your Okta authorization server, you're ready to start writing queries.

1. In a Application create a new Backend API
2. Add a step that uses your Snowflake Integration
3. Run the SQL comment `SELECT CURRENT_USER();`
4. Click **Run API**

If everything is working properly, you should see YOUR Snowflake user name returned.

### Common errors

There are several common errors you may see when using token exchange. The table below include error messages, why they happen, and how to address them.

| <div style={{width: 225}}>Error message</div> | Why it's happening                                                                                                                                                                                               | Resolution                                                                                                                                                                             |
| --------------------------------------------- | ---------------------------------------------------------------------------------------------------------------------------------------------------------------------------------------------------------------- | -------------------------------------------------------------------------------------------------------------------------------------------------------------------------------------- |
| `Could not find identity provider token`      | Your organization either doesn't use SSO or it's configured in a way that doesn't support token exchange                                                                                                         | Follow docs to set up [Okta SSO](/admin/org-administration/auth/single-sign-on/okta) or contact [support@superblocks.com](mailto:support@superblocks.com) to update your configuration |
| `Identity provider token expired`             | Your Okta session has expired so the authorization server won't issue an access token                                                                                                                            | Refresh your browser, you should be prompted to reauthenticate. If you're not, log out and back in.                                                                                    |
| `Could not find a user JWT`                   | The Superblocks Agent doesn't have a user JWT so can't extract a `subject_token` to send to Okta. It most likely is occurring because the integration is being used in a Workflow, Scheduled Job, or public App. | Refactor your code to use the integration in a Backend API                                                                                                                             |
| `Token exchange failed`                       | Superblocks couldn't successfully complete the token exchange with the Okta authorization server.                                                                                                                | See the additional error details provided by Okta. You may also be able to find additional error information in your Okta system logs.                                                 |