> ## Documentation Index
> Fetch the complete documentation index at: https://docs.superblocks.com/llms.txt
> Use this file to discover all available pages before exploring further.
# Database connections
export const Alert = ({type, title, children}) => {
const getIcon = () => {
switch (type) {
case 'info':
return "data:image/svg+xml,%3Csvg xmlns='http://www.w3.org/2000/svg' width='20' height='20' viewBox='0 0 20 20' fill='none'%3E%3Cpath d='M10 0C4.477 0 0 4.477 0 10s4.477 10 10 10 10-4.477 10-10S15.523 0 10 0zm0 15c-.552 0-1-.448-1-1s.448-1 1-1 1 .448 1 1-.448 1-1 1zm1-3H9V6h2v6z' fill='%230099FF'/%3E%3C/svg%3E";
case 'success':
return "data:image/svg+xml,%3Csvg width='20' height='20' viewBox='0 0 20 20' fill='none' xmlns='http://www.w3.org/2000/svg'%3E%3Cpath fill-rule='evenodd' clip-rule='evenodd' d='M10 0C4.477 0 0 4.477 0 10s4.477 10 10 10 10-4.477 10-10S15.523 0 10 0zm4.293 6.293L9 11.586 5.707 8.293c-.391-.391-1.024-.391-1.414 0s-.391 1.024 0 1.414l4 4c.391.391 1.024.391 1.414 0l6-6c.391-.391.391-1.024 0-1.414s-1.024-.391-1.414 0z' fill='%230CC26D'/%3E%3C/svg%3E";
case 'warning':
return "data:image/svg+xml;charset=utf-8;base64,PHN2ZyB4bWxucz0naHR0cDovL3d3dy53My5vcmcvMjAwMC9zdmcnIHhtbDpzcGFjZT0ncHJlc2VydmUnIHdpZHRoPScxMDgwJyBoZWlnaHQ9JzEwODAnPjxyZWN0IHdpZHRoPScxMDAlJyBoZWlnaHQ9JzEwMCUnIGZpbGw9J3RyYW5zcGFyZW50Jy8+PHBhdGggZD0nTTEzLjc5NCAxMC43NSA4LjMgMS4yNWExLjUgMS41IDAgMCAwLTIuNiAwbC01LjQ5NCA5LjVBMS40OTQgMS40OTQgMCAwIDAgMS41IDEzaDExYTEuNDkzIDEuNDkzIDAgMCAwIDEuMjk0LTIuMjVNNi41IDUuNWEuNS41IDAgMCAxIDEgMFY4YS41LjUgMCAwIDEtMSAwek03IDExYS43NS43NSAwIDEgMSAwLTEuNS43NS43NSAwIDAgMSAwIDEuNScgc3R5bGU9J3N0cm9rZTpub25lO3N0cm9rZS13aWR0aDoxO3N0cm9rZS1kYXNoYXJyYXk6bm9uZTtzdHJva2UtbGluZWNhcDpidXR0O3N0cm9rZS1kYXNob2Zmc2V0OjA7c3Ryb2tlLWxpbmVqb2luOm1pdGVyO3N0cm9rZS1taXRlcmxpbWl0OjQ7ZmlsbDojZmY5ZjM1O2ZpbGwtcnVsZTpub256ZXJvO29wYWNpdHk6MScgdHJhbnNmb3JtPSd0cmFuc2xhdGUoLjAyIDE5LjMwNSlzY2FsZSg3Ny4xNCknLz48L3N2Zz4=";
case 'danger':
return "data:image/svg+xml,%3Csvg width='20' height='20' viewBox='0 0 20 20' fill='none' xmlns='http://www.w3.org/2000/svg'%3E%3Cpath d='M10 0C4.477 0 0 4.477 0 10s4.477 10 10 10 10-4.477 10-10S15.523 0 10 0zm5.707 4.293L10 9.586 4.293 4.293c-.391-.391-1.024-.391-1.414 0s-.391 1.024 0 1.414L8.586 11l-5.707 5.293c-.391.391-.391 1.024 0 1.414s1.024.391 1.414 0L10 12.414l5.707 5.293c.391.391 1.024.391 1.414 0s.391-1.024 0-1.414L11.414 11l5.707-5.293c.391-.391.391-1.024 0-1.414s-1.024-.391-1.414 0z' fill='%23F45252'/%3E%3C/svg%3E";
case 'note':
return "data:image/svg+xml,%3Csvg xmlns='http://www.w3.org/2000/svg' width='20' height='20' viewBox='0 0 20 20' fill='none'%3E%3Cpath d='M10 0C4.477 0 0 4.477 0 10s4.477 10 10 10 10-4.477 10-10S15.523 0 10 0zm0 15c-.552 0-1-.448-1-1s.448-1 1-1 1 .448 1 1-.448 1-1 1zm1-3H9V6h2v6z' fill='%230099FF'/%3E%3C/svg%3E";
default:
return "";
}
};
return
{title &&
{title}
}
{children}
;
};
Superblocks facilitates seamless integrations with popular databases so you team can easily access and build tools right on top of your company's data. By leveraging various authentication methods and network settings, you can centrally manage how developers connect to your data ensuring reliable access and secure access to data.
## Connection method
When connecting to databases in Superblocks, you will typically have two options:
### Connection form
This method lets you connect by filling out a simple form with your database credentials. This user-friendly interface is designed for ease of use, enabling you to connect to your database quickly without needing extensive technical knowledge.
Connection forms usually limit you to connecting via `username/password` authentication. If you need to need to connect using a more advanced authentication method provided by your database, you may want to explore using a [connection string](#connection-string).
### Connection string
Alternatively, you can connect using a connection string, which lets you enter an arbitrary connection URI. This method provides greater flexibility, letting you specify additional parameters, making it suitable for advanced configurations or custom setups.
The format required for the connection string and options available varies by database. The following databases support connection strings and have the following expected forms.
| Database
| String format | Docs
|
| ------------------------------------------- | ------------------------------------------------------------------------------------------------------------ | ------------------------------------------------------------------------------------------------------------------------------------------------------------- |
| Amazon Redshift | `redshift://[:username]:[:password]@[:host]:[:port]/[:database]` | [Docs](https://docs.aws.amazon.com/redshift/latest/mgmt/jdbc20-build-connection-url.html)
**Note**: Exclude the `jdbc` prefix from the connection string |
| CockroachDB | `postgres://:@:/?` | [Docs](https://www.cockroachlabs.com/docs/v24.1/connection-parameters#connect-using-a-url) |
| MariaDB | `mariadb://[[:]@][:]/[[?=[&=]]]` | [Docs](https://github.com/mariadb-corporation/mariadb-connector-nodejs/blob/master/documentation/connection-options.md) |
| Microsoft SQL | `Server=[:serverName],[:port];Database=[:database];User Id=[user];Password=[:password];Encrypt=[true/false]` | [Docs](https://learn.microsoft.com/en-us/dotnet/framework/data/adonet/connection-string-syntax) |
| MongoDB | `mongodb+srv://:@/?retryWrites=true&w=majority` | [Docs](https://www.mongodb.com/docs/manual/reference/connection-string/) |
| MySQL | `mysql://[:username]:[:password]@[:host]:[:port]/[:database]` | [Docs](https://dev.mysql.com/doc/refman/8.4/en/connecting-using-uri-or-key-value-pairs.html) |
| PostgreSQL | `postgres://[:user]:[:password]@[:host]:[:port]/[:database]` | [Docs](https://github.com/brianc/node-postgres/tree/master/packages/pg-connection-string) |
| Redis | `redis://[:password@]host[:port][/db-number]` | [Docs](https://github.com/redis/node-redis/blob/master/docs/client-configuration.md) |
## Networking
For Superblocks to connect to your database the Superblocks Agent will need network access. If your database is available on public subnets or allows any IP to connect, you should have no problems.
For security purposes, many databases are configured to limit who can connect to them. In this case, you'll need to configure you database to accept inbound traffic from the Superblocks Agent.
### IP allowlist
To let Superblocks Cloud connect to your database, update your database's ingress allowlist to include the following:
* **NAT hostname**: `nat.superblocks.com`
* **Current DNS**: [A Records](https://dnsjson.com/nat.superblocks.com/A.json)
* **Last recorded IPs**:
```
107.22.228.244
3.93.101.124
34.209.17.50
34.227.169.51
35.155.119.178
35.171.116.214
35.86.18.137
44.232.244.93
54.148.33.216
```
* **NAT hostname**: `nat.eu.superblocks.com`
* **Current DNS**: [A Records](https://dnsjson.com/nat.eu.superblocks.com/A.json)
* **Last recorded IPs**:
```
52.17.136.219
99.81.159.1
54.220.65.107
13.50.50.66
13.50.81.30
13.51.231.18
```
### In-network Agent
Alternatively, you can access in-network resources by deploying the [Superblocks data plane](/enterprise/hybrid-architecture/overview) inside the same network as your database.
The data plane service will execute your APIs and connect directly to your databases, ensuring all your data is kept securely within your corporate firewall.
## Network settings
### SSL configuration
Superblocks supports the ability to establish connections using Secure Socket Layer (SSL), a protocol for creating authenticated and encrypted links between networked computers.
#### Configuring SSL
SSL can be configured using the Integration configuration form for [supported integrations](#support-by-integration).
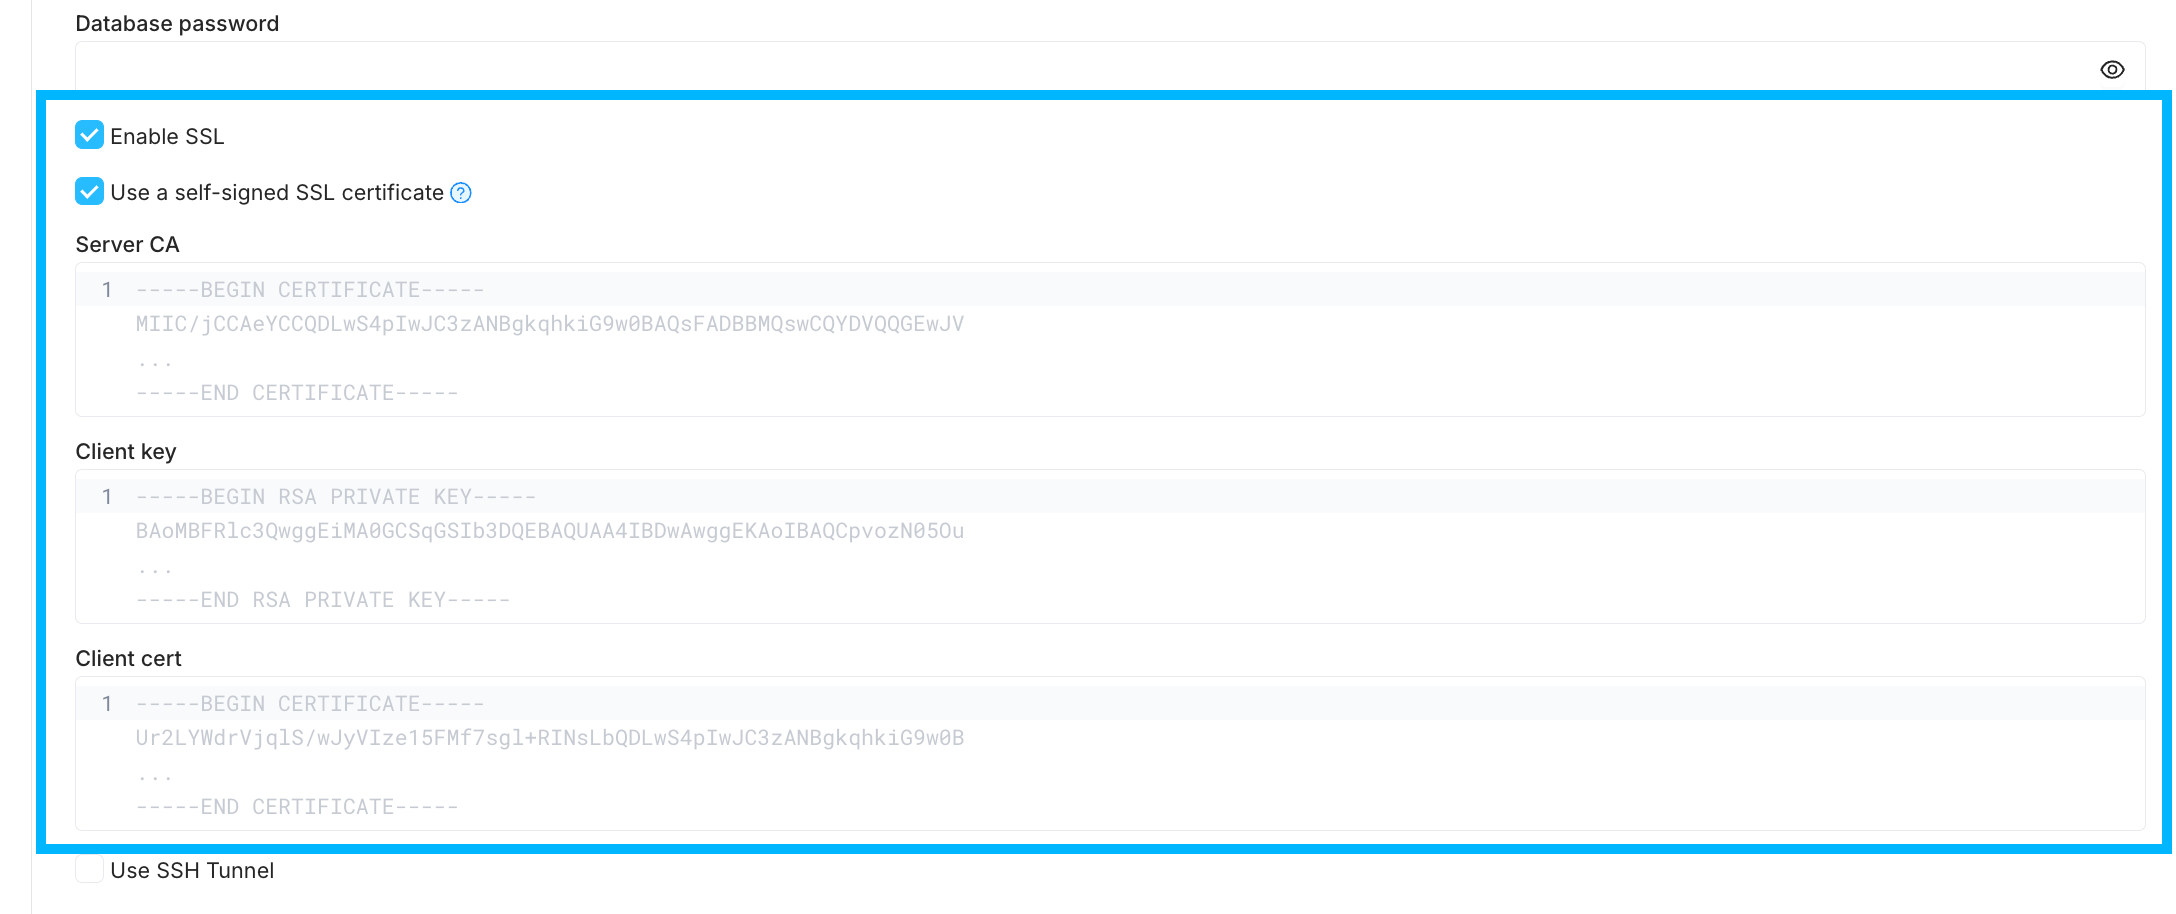 1. On the Integration configuration form for your DB, select **Enable SSL**
2. Optionally, select **Use a self-signed SSL certificate**. If selected, provide the following:
* **Server CA**: Database server's Certificate Authority (CA) certificate
* **Client key**: Client's private key
* **Client cert**: Client's public key certificate
### SSH configuration
SSH Tunneling is only available when using **Superblocks Cloud**
Sometimes databases can't be accessed directly and require SSH tunneling to access. SSH or Secure Shell is a network communication protocol that allows two computers to communicate and encrypts shared data, letting you connect to DBs on private subnets securely from Superblocks Cloud.
#### SSH authentication methods
Superblocks supports the following SSH Authentication methods:
* Username/password
* Private key authentication
* Public key authentication (RSA or Ed25519)
#### Configuring SSH tunnels
SSH tunneling can be configured using the Integration configuration form for [supported integrations](#support-by-integration).
1. On the Integration configuration form for your DB, select **Enable SSL**
2. Optionally, select **Use a self-signed SSL certificate**. If selected, provide the following:
* **Server CA**: Database server's Certificate Authority (CA) certificate
* **Client key**: Client's private key
* **Client cert**: Client's public key certificate
### SSH configuration
SSH Tunneling is only available when using **Superblocks Cloud**
Sometimes databases can't be accessed directly and require SSH tunneling to access. SSH or Secure Shell is a network communication protocol that allows two computers to communicate and encrypts shared data, letting you connect to DBs on private subnets securely from Superblocks Cloud.
#### SSH authentication methods
Superblocks supports the following SSH Authentication methods:
* Username/password
* Private key authentication
* Public key authentication (RSA or Ed25519)
#### Configuring SSH tunnels
SSH tunneling can be configured using the Integration configuration form for [supported integrations](#support-by-integration).
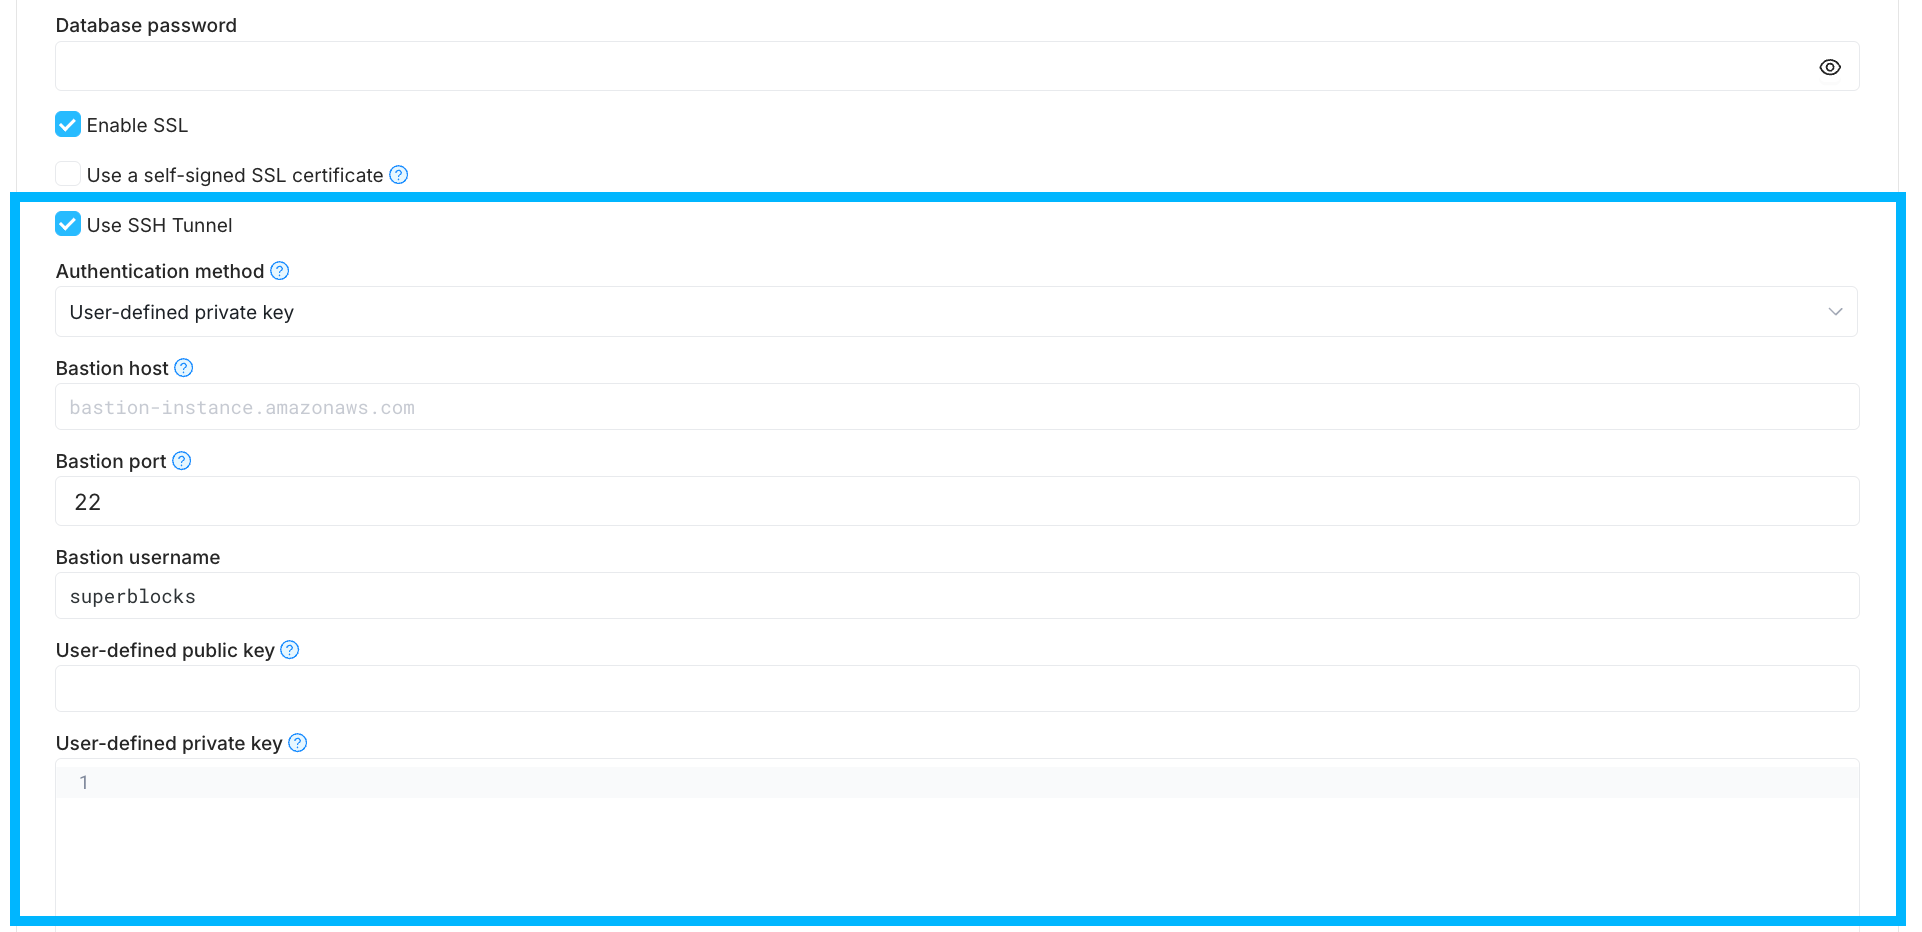 1. Configure your SSH server to allow connections from [Superblocks's IPs](#ip-allowlist)
2. On the Integration configuration form for you DB, select **Use SSH Tunnel**
3. Select an **Authentication method**
4. Specify the following shared configuration values:
* **Bastion host**: The name or IP address of the SSH server
* **Bastion port**: The port number used for the SSH connection
* **Bastion username**: The username required for SSH authentication
5. Follow instructions based on the selected **Authentication method**
Enter the following configuration values:
* **Password**: The SSH account password for the **Bastion user**
Enter the following configuration values:
* **Public key**: The public key of your SSH server's public/private key pair
* **Private key**: The private key of your SSH server's public/private key
Copy the Superblocks provided **Public key** to your SSH server's `~/.ssh/authorized_keys` file
### Support by Integration
The following network settings are supported by each database integration.
| Integration |
1. Configure your SSH server to allow connections from [Superblocks's IPs](#ip-allowlist)
2. On the Integration configuration form for you DB, select **Use SSH Tunnel**
3. Select an **Authentication method**
4. Specify the following shared configuration values:
* **Bastion host**: The name or IP address of the SSH server
* **Bastion port**: The port number used for the SSH connection
* **Bastion username**: The username required for SSH authentication
5. Follow instructions based on the selected **Authentication method**
Enter the following configuration values:
* **Password**: The SSH account password for the **Bastion user**
Enter the following configuration values:
* **Public key**: The public key of your SSH server's public/private key pair
* **Private key**: The private key of your SSH server's public/private key
Copy the Superblocks provided **Public key** to your SSH server's `~/.ssh/authorized_keys` file
### Support by Integration
The following network settings are supported by each database integration.
| Integration | SSL
| SSL Certificate
| SSH Tunneling
|
| ------------------------------------------------------------------ | -------------------------------------------- | -------------------------------------------------- | ------------------------------------------------ |
| [Amazon Redshift](/integrations/integrations-library/aws-redshift) | ✓ | ✗ | ✗ |
| [CockroachDB](/integrations/integrations-library/cockroachdb) | ✓ | ✓ | ✗ |
| [MariaDB](/integrations/integrations-library/mariadb) | ✓ | ✓ | ✗ |
| [Microsoft SQL Server](/integrations/integrations-library/mssql) | ✓ | ✗ | ✗ |
| [MongoDB](/integrations/integrations-library/mongodb) | ✓ | ✓ | ✗ |
| [MySQL](/integrations/integrations-library/mysql) | ✓ | ✓ | ✓ |
| [Postgres](/integrations/integrations-library/postgres) | ✓ | ✓ | ✓ |