> ## Documentation Index
> Fetch the complete documentation index at: https://docs.superblocks.com/llms.txt
> Use this file to discover all available pages before exploring further.
# Okta SCIM setup
> Instructions for setting up SCIM provisioning using Okta as an IdP
export const Alert = ({type, title, children}) => {
const getIcon = () => {
switch (type) {
case 'info':
return "data:image/svg+xml,%3Csvg xmlns='http://www.w3.org/2000/svg' width='20' height='20' viewBox='0 0 20 20' fill='none'%3E%3Cpath d='M10 0C4.477 0 0 4.477 0 10s4.477 10 10 10 10-4.477 10-10S15.523 0 10 0zm0 15c-.552 0-1-.448-1-1s.448-1 1-1 1 .448 1 1-.448 1-1 1zm1-3H9V6h2v6z' fill='%230099FF'/%3E%3C/svg%3E";
case 'success':
return "data:image/svg+xml,%3Csvg width='20' height='20' viewBox='0 0 20 20' fill='none' xmlns='http://www.w3.org/2000/svg'%3E%3Cpath fill-rule='evenodd' clip-rule='evenodd' d='M10 0C4.477 0 0 4.477 0 10s4.477 10 10 10 10-4.477 10-10S15.523 0 10 0zm4.293 6.293L9 11.586 5.707 8.293c-.391-.391-1.024-.391-1.414 0s-.391 1.024 0 1.414l4 4c.391.391 1.024.391 1.414 0l6-6c.391-.391.391-1.024 0-1.414s-1.024-.391-1.414 0z' fill='%230CC26D'/%3E%3C/svg%3E";
case 'warning':
return "data:image/svg+xml;charset=utf-8;base64,PHN2ZyB4bWxucz0naHR0cDovL3d3dy53My5vcmcvMjAwMC9zdmcnIHhtbDpzcGFjZT0ncHJlc2VydmUnIHdpZHRoPScxMDgwJyBoZWlnaHQ9JzEwODAnPjxyZWN0IHdpZHRoPScxMDAlJyBoZWlnaHQ9JzEwMCUnIGZpbGw9J3RyYW5zcGFyZW50Jy8+PHBhdGggZD0nTTEzLjc5NCAxMC43NSA4LjMgMS4yNWExLjUgMS41IDAgMCAwLTIuNiAwbC01LjQ5NCA5LjVBMS40OTQgMS40OTQgMCAwIDAgMS41IDEzaDExYTEuNDkzIDEuNDkzIDAgMCAwIDEuMjk0LTIuMjVNNi41IDUuNWEuNS41IDAgMCAxIDEgMFY4YS41LjUgMCAwIDEtMSAwek03IDExYS43NS43NSAwIDEgMSAwLTEuNS43NS43NSAwIDAgMSAwIDEuNScgc3R5bGU9J3N0cm9rZTpub25lO3N0cm9rZS13aWR0aDoxO3N0cm9rZS1kYXNoYXJyYXk6bm9uZTtzdHJva2UtbGluZWNhcDpidXR0O3N0cm9rZS1kYXNob2Zmc2V0OjA7c3Ryb2tlLWxpbmVqb2luOm1pdGVyO3N0cm9rZS1taXRlcmxpbWl0OjQ7ZmlsbDojZmY5ZjM1O2ZpbGwtcnVsZTpub256ZXJvO29wYWNpdHk6MScgdHJhbnNmb3JtPSd0cmFuc2xhdGUoLjAyIDE5LjMwNSlzY2FsZSg3Ny4xNCknLz48L3N2Zz4=";
case 'danger':
return "data:image/svg+xml,%3Csvg width='20' height='20' viewBox='0 0 20 20' fill='none' xmlns='http://www.w3.org/2000/svg'%3E%3Cpath d='M10 0C4.477 0 0 4.477 0 10s4.477 10 10 10 10-4.477 10-10S15.523 0 10 0zm5.707 4.293L10 9.586 4.293 4.293c-.391-.391-1.024-.391-1.414 0s-.391 1.024 0 1.414L8.586 11l-5.707 5.293c-.391.391-.391 1.024 0 1.414s1.024.391 1.414 0L10 12.414l5.707 5.293c.391.391 1.024.391 1.414 0s.391-1.024 0-1.414L11.414 11l5.707-5.293c.391-.391.391-1.024 0-1.414s-1.024-.391-1.414 0z' fill='%23F45252'/%3E%3C/svg%3E";
case 'note':
return "data:image/svg+xml,%3Csvg xmlns='http://www.w3.org/2000/svg' width='20' height='20' viewBox='0 0 20 20' fill='none'%3E%3Cpath d='M10 0C4.477 0 0 4.477 0 10s4.477 10 10 10 10-4.477 10-10S15.523 0 10 0zm0 15c-.552 0-1-.448-1-1s.448-1 1-1 1 .448 1 1-.448 1-1 1zm1-3H9V6h2v6z' fill='%230099FF'/%3E%3C/svg%3E";
default:
return "";
}
};
return
{title &&
{title}
}
{children}
;
};
**Notes**
* If you are setting up SCIM after assigning users to a Superblocks SSO app, be sure to run a [**full import**](#import-existing-users) to link the existing assigned user to the Superblocks user
* If your Superblocks SSO app uses [**OpenID Connect App**](https://help.okta.com/en-us/content/topics/apps/apps_app_integration_wizard_oidc.htm), you'll need to create a separate provisioning-only app to handle SCIM. You'll assign users/groups to both of these applications. Learn more about how to [Add a provisioning only app](#add-a-provisioning-only-app)
## Features
The following provisioning features are supported when integrating with Okta:
* **Push New Users**: New users created through Okta will also be created in the company's Superblocks organization.
* **Push User Deactivation**: Deactivating a user through Okta will deactivate the user from the company's Superblocks organization.
* **Reactivate Users**: Reactivating a user through Okta will reactivate the user in Superblocks.
* **Push Profile Updates**: Updates made to the user's profile through Okta will be pushed to Superblocks.
* **Import New Users**: New users created in Superblocks will be downloaded and turned into new AppUser objects, for matching against existing Okta users.
* **Group Push**: Groups and their members can be pushed to Superblocks.
## Setup
If your SSO app uses [**OpenID Connect**](https://help.okta.com/en-us/content/topics/apps/apps_app_integration_wizard_oidc.htm), you'll need to create a separate SCIM app. Follow instructions to [create a provisioning only app](#add-a-provisioning-only-app), then come back to [configure SCIM](#configure-scim).
### Configure SCIM
1. From the Okta admin console, locate your **Superblocks** SSO App
2. Go to the **General** tab, click **Edit** on the **App Settings**
3. Check the box **Enable SCIM Provisioning** and click **Save**
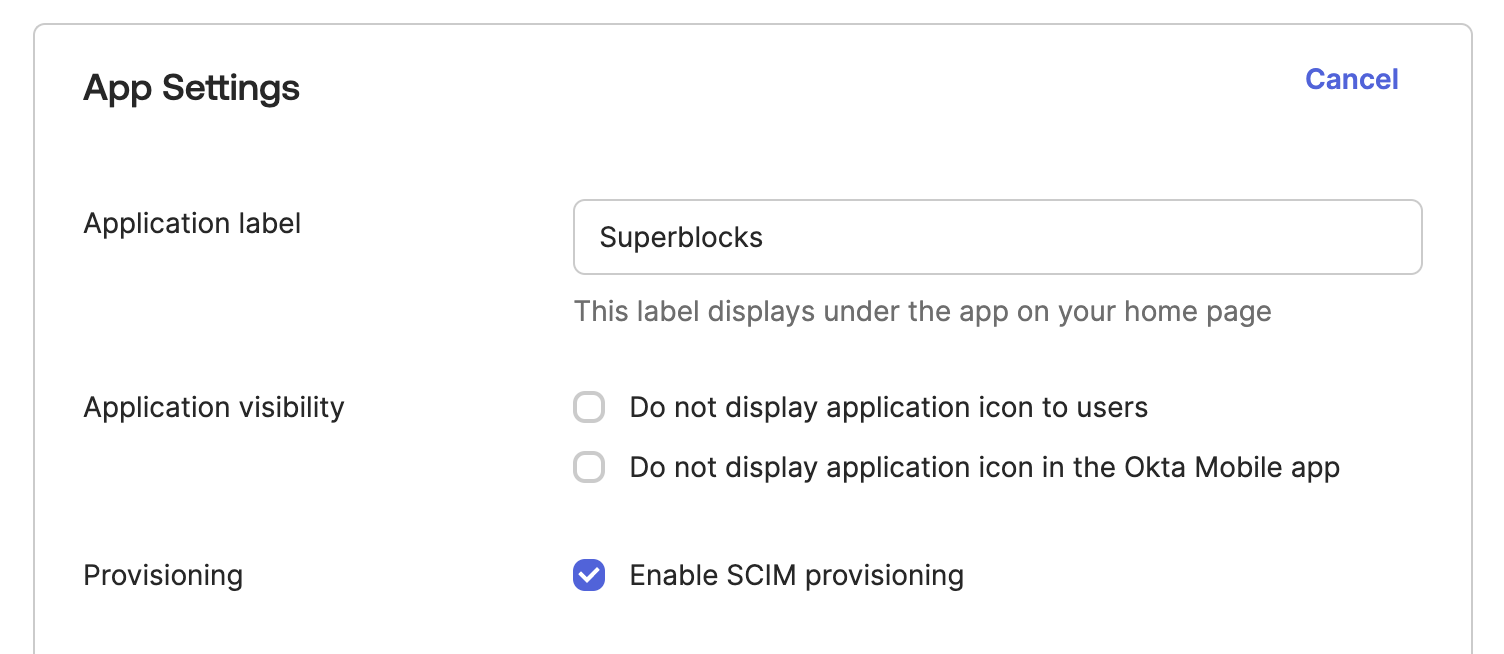 4. Go to the newly enabled **Provisioning** tab
5. Next to **SCIM Connection** click **Edit**. Configure the connection as follows:
| Field | Value |
| --------------------------------- | ------------------------------------------------------------------------------------------------------------------------------------------------------------------------- |
| SCIM connector base URL | **US**: [https://app.superblocks.com/scim/v2](https://app.superblocks.com/scim/v2)
4. Go to the newly enabled **Provisioning** tab
5. Next to **SCIM Connection** click **Edit**. Configure the connection as follows:
| Field | Value |
| --------------------------------- | ------------------------------------------------------------------------------------------------------------------------------------------------------------------------- |
| SCIM connector base URL | **US**: [https://app.superblocks.com/scim/v2](https://app.superblocks.com/scim/v2)
**EU**: [https://eu.superblocks.com/scim/v2](https://eu.superblocks.com/scim/v2) |
| Unique identifier field for users | email |
| Supported provisioning actions | Select all of the provisioning actions |
| Authentication Mode | HTTP Header |
| Authorization | [Access token](/admin/org-administration/auth/access-tokens) with Org Admin privileges |
6. Test the connection and click **Save**
7. You should see two new settings **To App** and **To Okta**. Click **To App**
8. Click **Edit** and configure your provisioning options. Note: Sync Password is not supported
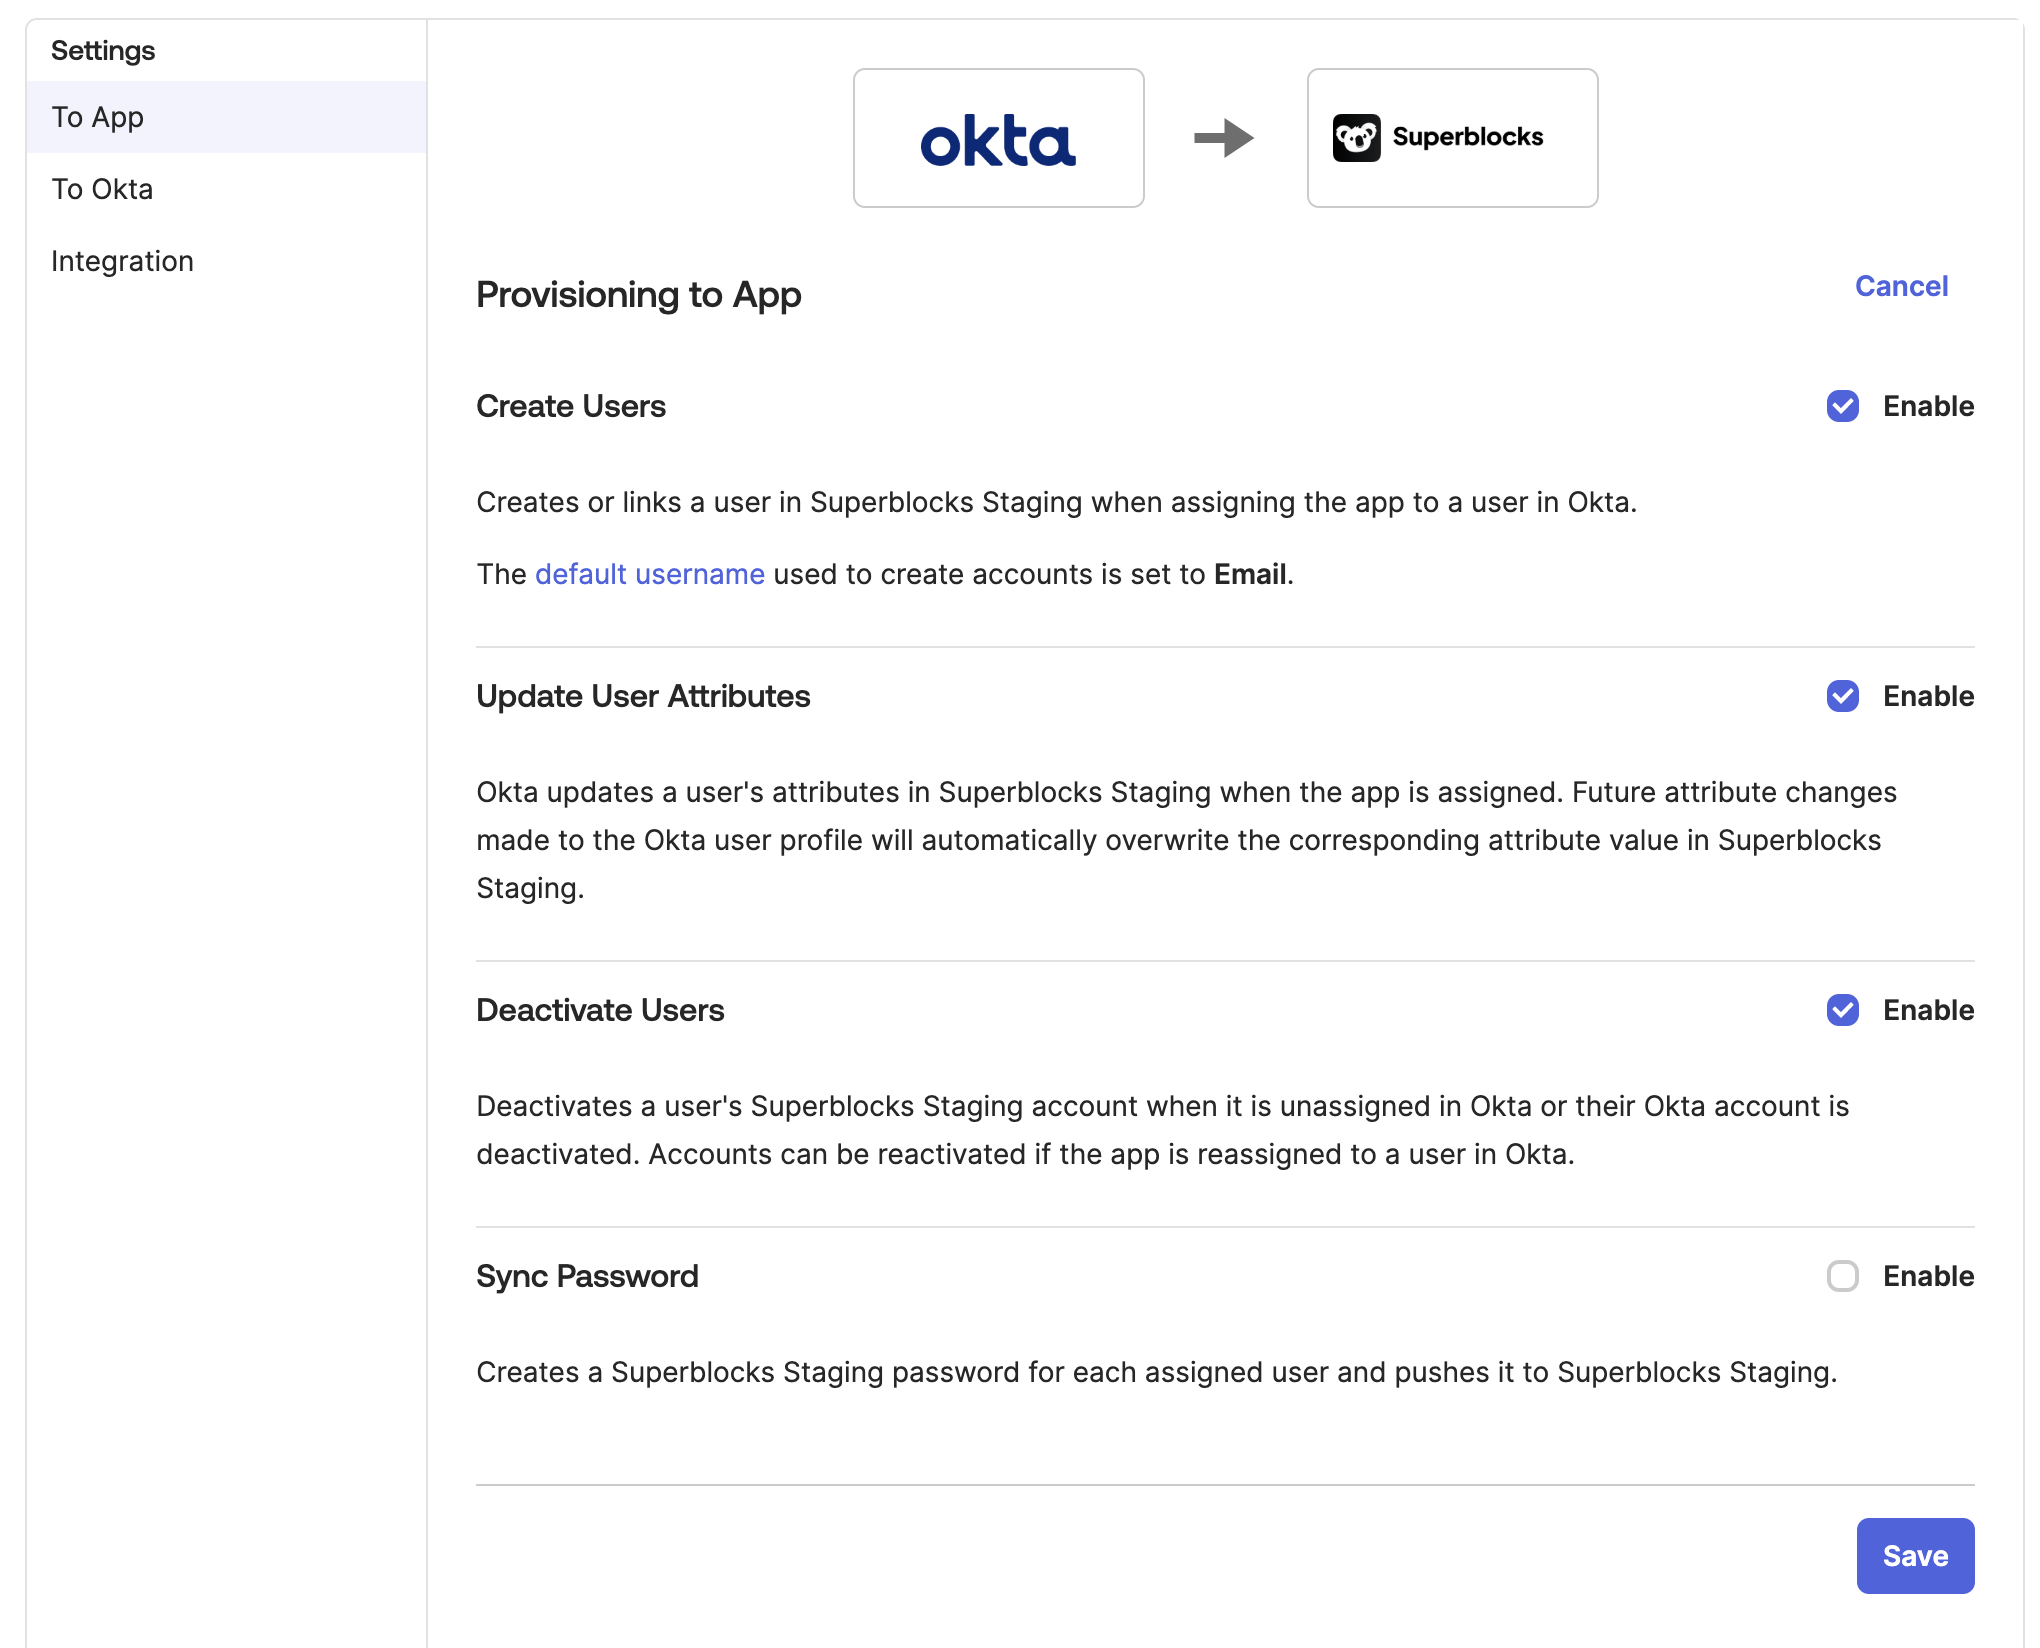 9. Click **Save**
10. Optionally, configure attribute mappings to [assign user roles via SCIM](#manage-user-roles-with-scim)
### Add a provisioning only app
If your Superblocks SSO app in Okta uses [**OpenID Connect**](https://help.okta.com/en-us/content/topics/apps/apps_app_integration_wizard_oidc.htm), you'll need to set up a separate app for SCIM. The easiest way to do this is to set up a separate [**Secure Web Authentication (SWA) App**](https://help.okta.com/en-us/content/topics/apps/apps_app_integration_wizard_swa.htm). This app **will not** be used by your users to sign-in to Superblocks, it will just be used for provisioning/group management.
To configure an SWA app:
1. From the Okta admin console, click **Applications** → **Applications**
2. Click **Create App Integration**
3. Select **SWA - Secure Web Authentication**
4. Name the app and enter `https://app.superblocks.com` as the login URL
5. Click **Finish**. You can now [continue to configure SCIM for Superblocks](#configure-scim)
Note that users will not be able to log in through this app so you should make sure you're not showing this app to users on the Okta launch page.
## Import existing users
With SCIM configured, you should run an import of existing users from your Superblocks organization to Okta so you can link your Okta users to their Superblocks account.
1. From your Superblocks SCIM app in Okta, click on the **Import** tab.
2. Click **Import Now** which will import all users from your existing Superblocks account.
3. Choose how you want Okta to import each user. Options include:
* Link to **EXACT Okta user match**: links the Superblocks user to an existing user in Okta.
* Link to **NEW Okta user**: creates a new user in Okta and links the Superblocks user to the new user
* **IGNORE this user for now**: leave the user in Superblocks and doesn't link them to an Okta user. Superblocks users that are not linked to a user in Okta will need to be managed from Superblocks. Learn more about [Managing Users](#manage-superblocks-users)
9. Click **Save**
10. Optionally, configure attribute mappings to [assign user roles via SCIM](#manage-user-roles-with-scim)
### Add a provisioning only app
If your Superblocks SSO app in Okta uses [**OpenID Connect**](https://help.okta.com/en-us/content/topics/apps/apps_app_integration_wizard_oidc.htm), you'll need to set up a separate app for SCIM. The easiest way to do this is to set up a separate [**Secure Web Authentication (SWA) App**](https://help.okta.com/en-us/content/topics/apps/apps_app_integration_wizard_swa.htm). This app **will not** be used by your users to sign-in to Superblocks, it will just be used for provisioning/group management.
To configure an SWA app:
1. From the Okta admin console, click **Applications** → **Applications**
2. Click **Create App Integration**
3. Select **SWA - Secure Web Authentication**
4. Name the app and enter `https://app.superblocks.com` as the login URL
5. Click **Finish**. You can now [continue to configure SCIM for Superblocks](#configure-scim)
Note that users will not be able to log in through this app so you should make sure you're not showing this app to users on the Okta launch page.
## Import existing users
With SCIM configured, you should run an import of existing users from your Superblocks organization to Okta so you can link your Okta users to their Superblocks account.
1. From your Superblocks SCIM app in Okta, click on the **Import** tab.
2. Click **Import Now** which will import all users from your existing Superblocks account.
3. Choose how you want Okta to import each user. Options include:
* Link to **EXACT Okta user match**: links the Superblocks user to an existing user in Okta.
* Link to **NEW Okta user**: creates a new user in Okta and links the Superblocks user to the new user
* **IGNORE this user for now**: leave the user in Superblocks and doesn't link them to an Okta user. Superblocks users that are not linked to a user in Okta will need to be managed from Superblocks. Learn more about [Managing Users](#manage-superblocks-users)
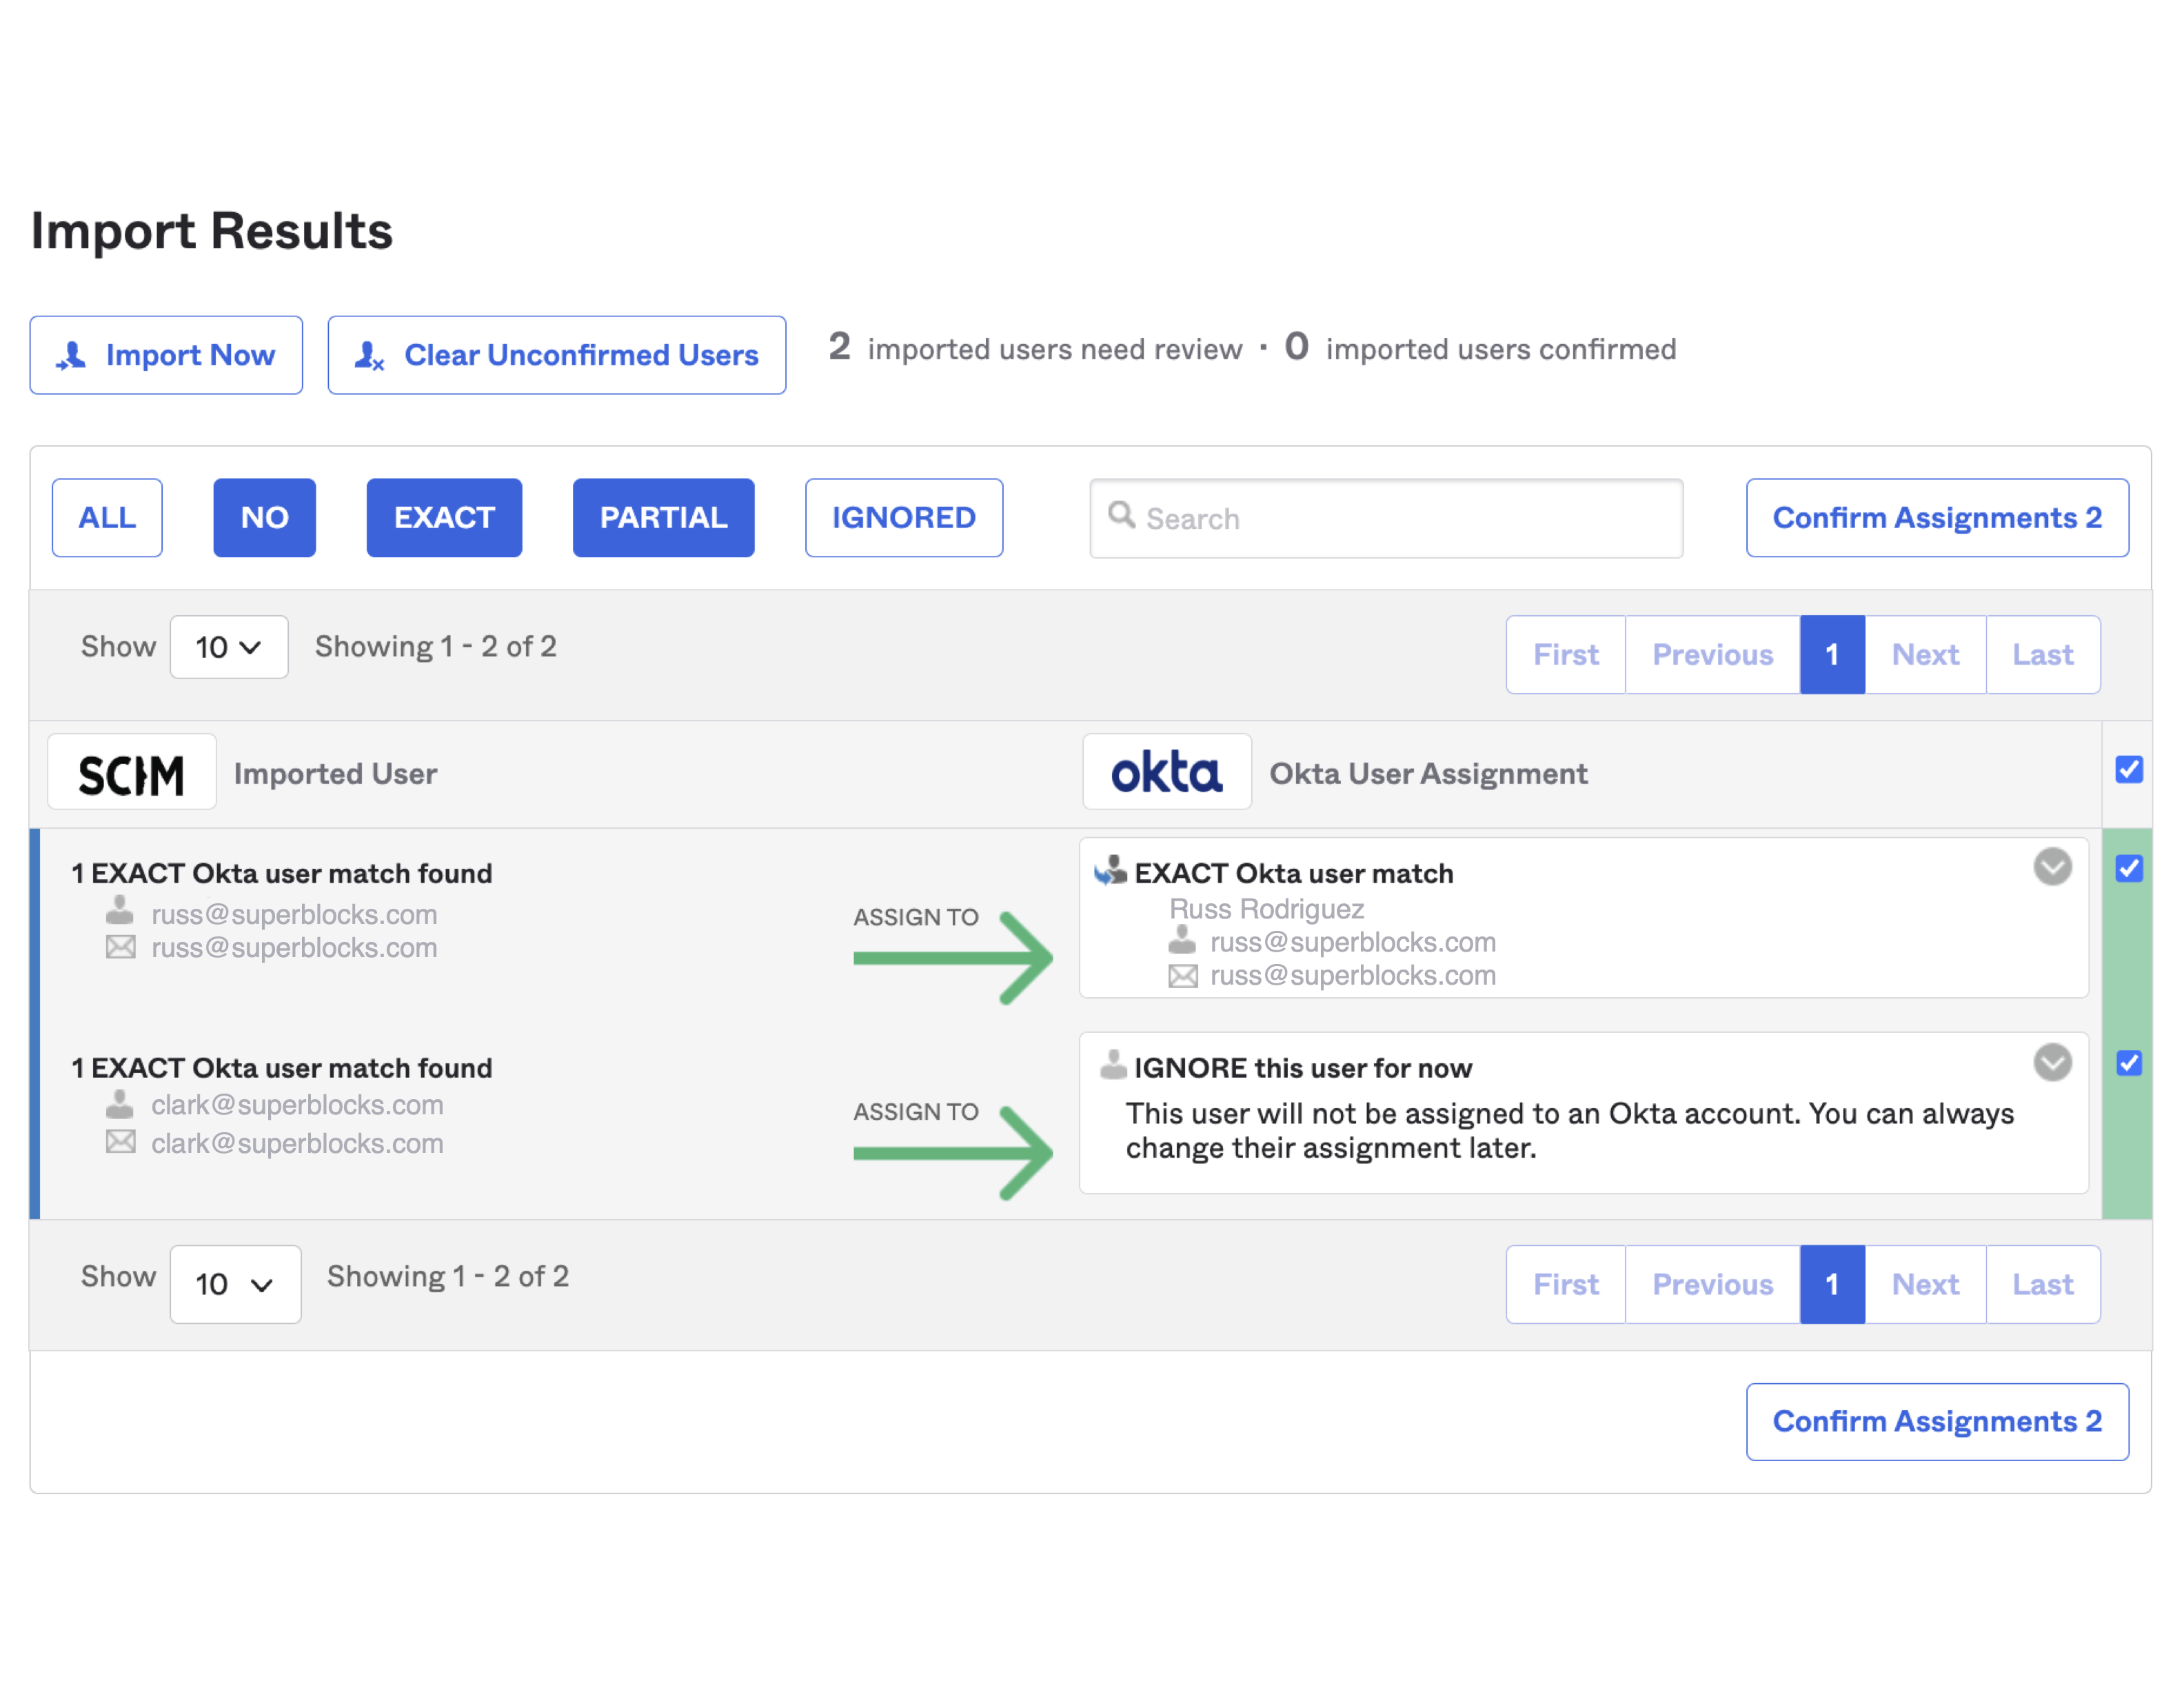 4. Click **Confirm Assignments** to finish the import
## Configure user attributes
Certain user attributes in Okta can by synced to your Superblocks users' profiles.
### Supported user attributes
The Superblocks SCIM API currently supports the following attributes:
| SCIM User Attribute |
4. Click **Confirm Assignments** to finish the import
## Configure user attributes
Certain user attributes in Okta can by synced to your Superblocks users' profiles.
### Supported user attributes
The Superblocks SCIM API currently supports the following attributes:
| SCIM User Attribute | Superblocks User Attribute
| Description |
| ------------------- | ------------------------------------------------------------ | ---------------------------------------------------------------------------------------------------------------------------------------------------------------------------------------------------------------------------------------- |
| `emails` | `Global.user.email` | Email identifier used to log in to Superblocks. |
| `displayName` | `Global.user.name` | The text shown in Superblocks when referring to the user. |
| `name.givenName` | `Global.user.name` | First name of the user. Concatenated with `name.familyName` if `displayName` is not provided. |
| `name.familyName` | `Global.user.name` | Last name of the user. Concatenated with `name.givenName` if `displayName` is not provided. |
| `groups` | `Global.user.groups` | List of groups to which the user belongs. |
| `active` | N/A | Disables the user when set to `FALSE` |
| `role` | N/A | The user's [**organization role**](/admin/org-administration/org-roles). Defaults to `null`. If not set, the [default role for the organization](/admin/org-administration/org-roles/using-org-roles#setting-default-role) will be used. |
### Create custom role attribute
All of the supported attributes listed above except `role` are supported by default in the Okta user profile. You can manage a user's [**organization role**](/admin/org-administration/org-roles) via SCIM by configuring a custom attribute in Okta.
Roles can be assigned to users, or you can scale role management by assigning roles based on the Okta group a user is in. To learn more about how Okta manages syncing attributes via SCIM, read Okta's [Attribute Mapping](https://help.okta.com/en-us/content/topics/users-groups-profiles/usgp-about-attribute-mappings.htm#Okta) documentation.
To create a custom attribute for your Superblocks user roles:
1. Go to your Superblocks SCIM app in Okta
2. Click on the **Provisioning** tab
3. In the **To App** settings, scroll down to the section labeled **Superblocks Attribute Mappings**
4. Click **Go to Profile Editor**
5. Click **Add Attribute**
6. Fill in the attribute configuration as follows:
| Field | Value |
| ------------------ | ------------------------------------------------------------ |
| Data type | string |
| Display name | Superblocks Role (customizable) |
| Variable name | `superblocks_role` (customizable) |
| External name | `role` |
| External namespace | `urn:ietf:params:scim:schemas:extension:enterprise:2.0:User` |
| Enum | Checked |
7. In the **Attribute members** list include the following:
| Display name | Value |
| ------------ | ----------- |
| Owner | `owner` |
| Admin | `admin` |
| Developer | `developer` |
| End-user | `end_user` |
The `value` field should correspond to the `key` of [organization role](/admin/org-administration/org-roles) you want to assign. You can find the key of any of your custom roles, by going to the [Roles & Permissions](https://help.okta.com/en-us/content/topics/users-groups-profiles/usgp-about-profiles.htm#App) page in Superblocks, selecting the role, and clicking **Edit details**.
8. For **Attribute type** select either **Personal** or **Group**. To learn more about these types, see [Personal vs Group attribute types](#personal-vs-group-attribute-types)
9. Click **Save**
Now that you've created the custom attribute, it will show up when you assign users or groups to the Superblocks SCIM app. [Import users from Superblocks](#import-existing-users) to sync to Okta the currently assigned role in Superblocks.
You can also [map Okta attributes to app attributes](https://help.okta.com/en-us/content/topics/users-groups-profiles/usgp-map-attributes.htm) by configuring mapping rules.
#### Personal vs Group attribute types
When assigning roles in Okta via SCIM, you'll need to choose whether to manage roles for each user individually or in groups. Here's the difference:
* **Personal**: You'll decide what role to give each user when assigning them to the Superblocks SCIM app. Alternatively, you can create [custom mapping rules](https://help.okta.com/en-us/content/topics/users-groups-profiles/usgp-map-attributes.htm) to set the role based on other user attributes in Okta.
* **Group**: You'll decide what role to associate with each Okta group assigned to the Superblocks SCIM app. You'll then [prioritize your groups](https://help.okta.com/en-us/content/topics/users-groups-profiles/usgp-prioritize-app-group.htm). When a user is added to one or more of the assigned Okta groups, the role they receive in Superblocks will be based on the group priorities.
## Manage groups with SCIM
Optionally, you can set up Okta to manage Superblocks Groups and their members. If this is not configured, new users added through Okta will not be assigned to any custom groups in Superblocks.
To sync an Okta group with a Superblocks group:
1. From the Superblocks app in Okta, go to the **Push Groups** tab
2. Click **Push Groups** → **Find groups by name**
3. Enter the name of the **Okta** group you want to sync with Superblocks
4. Okta will try to automatically match the Okta group to a group in Superblocks based on the name. If there is no corresponding group in Superblocks select **Create Group**, otherwise select **Link Group** and choose the Superblocks group you want to sync with.
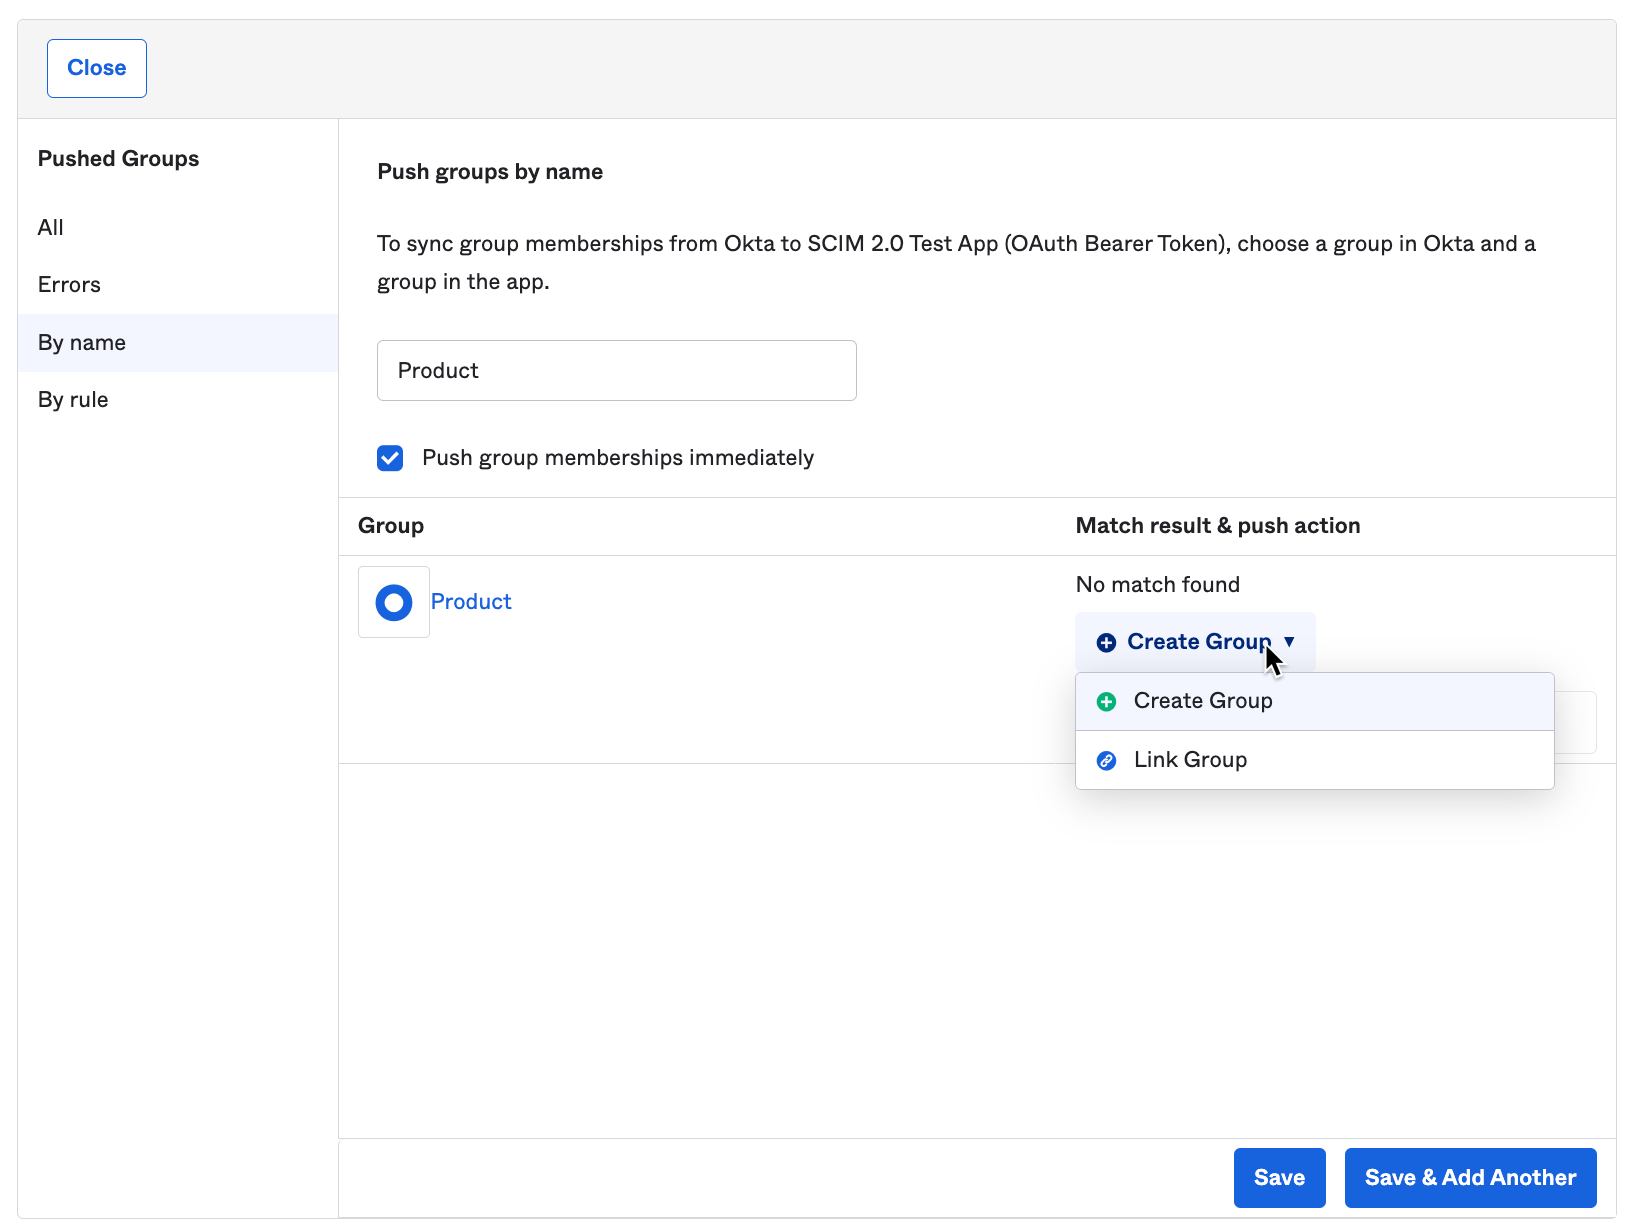 5. Click **Save**. This will either create a new group in Superblocks or link the group to an existing Okta group. If you choose to **Push group memberships immediately**, users who are members of the group in Okta will be added to the Superblocks group and receive access to any Applications, Workflows, or Scheduled Jobs associated with that Superblocks group.
Once group push is configured, when you create a new Superblocks user from Okta, or change which groups they're in within Okta, they'll be automatically added or removed from Superblocks groups that you've synced.
Note: Once group push is configured, all user membership changes should be made from Okta. Changing group membership in Superblocks can cause synchronization issues with Okta.
5. Click **Save**. This will either create a new group in Superblocks or link the group to an existing Okta group. If you choose to **Push group memberships immediately**, users who are members of the group in Okta will be added to the Superblocks group and receive access to any Applications, Workflows, or Scheduled Jobs associated with that Superblocks group.
Once group push is configured, when you create a new Superblocks user from Okta, or change which groups they're in within Okta, they'll be automatically added or removed from Superblocks groups that you've synced.
Note: Once group push is configured, all user membership changes should be made from Okta. Changing group membership in Superblocks can cause synchronization issues with Okta.